Windows creates temporary files when you browse websites, install software, update the system, or run applications. Although these files support short-term tasks, many remain after they are no longer needed and gradually occupy valuable storage space.
A reliable temp file remover can locate and clear this unnecessary data efficiently. This guide explains how to delete temp files on Windows 10 and 11 with Advanced SystemCare, Windows Settings, Disk Cleanup, Storage Sense, Run, and Command Prompt. For broader system maintenance, a complete Windows optimizer can combine cleanup with other performance tools.

What Are Temporary Files on Windows?
Temporary files are created by Windows, browsers, installers, applications, and background services. They store short-term information, support updates, load cached content, and record errors.
Common examples include:
These files are often stored in %temp%, C:\Windows\Temp, browser folders, application directories, and Windows Update locations.
A temp file remover checks these locations and identifies data that is no longer required. If temporary files are only part of a larger storage problem, a hard disk cleaner can help locate additional junk across the drive.
Is It Safe to Delete Temporary Files?
Most temporary files are safe to delete, but some may still be used by Windows or open programs. Close unnecessary applications before cleaning and skip any file Windows reports as currently in use.
Avoid deleting unfamiliar system folders manually. Also review Downloads, Recycle Bin, browser data, and installation files before removal. Trusted temp file cleaner software is often easier for beginners because it scans recognized junk-file locations instead of requiring users to inspect each folder.
Temp File Remover vs. Manual Temp File Removal
Before choosing a method, compare automatic cleanup with manual Windows tools. Manual methods work well when you know exactly what to remove. A dedicated temp file remover is generally faster because it scans several locations from one interface.
| Method |
Ease |
Coverage |
Best for |
| Advanced SystemCare |
High |
Windows, browser, and app junk |
Convenient broader cleanup |
| Windows Settings |
High |
Windows temporary files |
Quick built-in cleanup |
| Disk Cleanup |
Medium |
Standard system files |
Traditional maintenance |
| Temp folders |
Medium |
Selected folders |
Targeted manual cleanup |
| Command Prompt |
Low |
User-defined locations |
Experienced users |
Method 1: Automatically Remove Temp Files with IObit Advanced SystemCare
Deleting temporary files folder by folder can be time-consuming. For users who want a simple and quick solution, an automatic temp file remover is the most convenient place to start.
IObit Advanced SystemCare simplifies cleanup by letting users select temporary-file categories and scan them together. As practical temp file cleaner software, it can identify unnecessary files while providing control over what is removed.
Advanced SystemCare Free
- Clean: 420 billion traces removed & 85 EB junk files cleaned
- Protect: 80 million unauthorized access blocked & 20 million bugs fixed
- Speed Up: 6 million hours of startup time saved & Turbo boost
- Optimize: Auto clean and auto care your PC with AI mode

Key Features of Advanced SystemCare
Junk File Clean: Removes temp files, caches, logs, error reports, and unnecessary data.
App/Extension Cleaner: Uninstalls unwanted apps and clears their remaining files.
Disk Optimization: Organizes stored data to improve disk efficiency and responsiveness.
System Optimization: Adjusts Windows settings for better speed, stability, and resource use.
Real-Time TuneUp: Automatically cleans and optimizes the PC during everyday use.
Auto RAM Clean: Releases unused memory to keep applications running smoothly.
Auto RAM Clean is especially relevant for users researching a RAM optimizer Windows 11, as it helps release unused memory and reduce unnecessary resource consumption.
How to Remove Temp Files with Advanced SystemCare
Follow these steps to configure and clean temporary files:
1. Download and install IObit Advanced SystemCare.
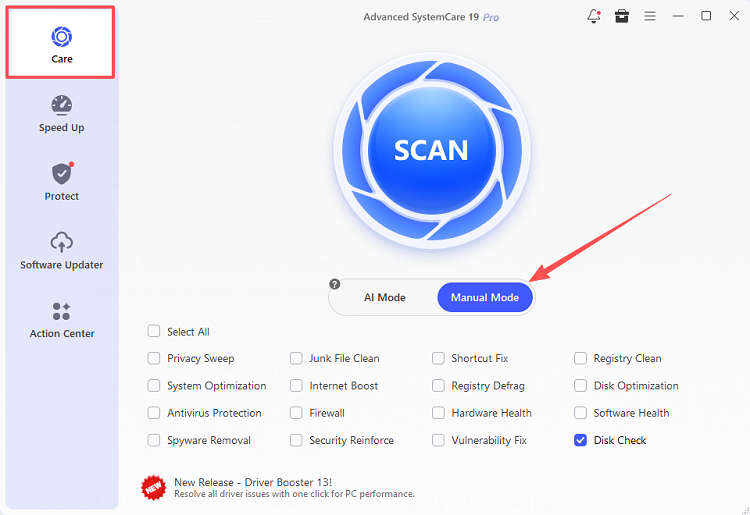
2. Open the Care section. Switch to Manual Mode.
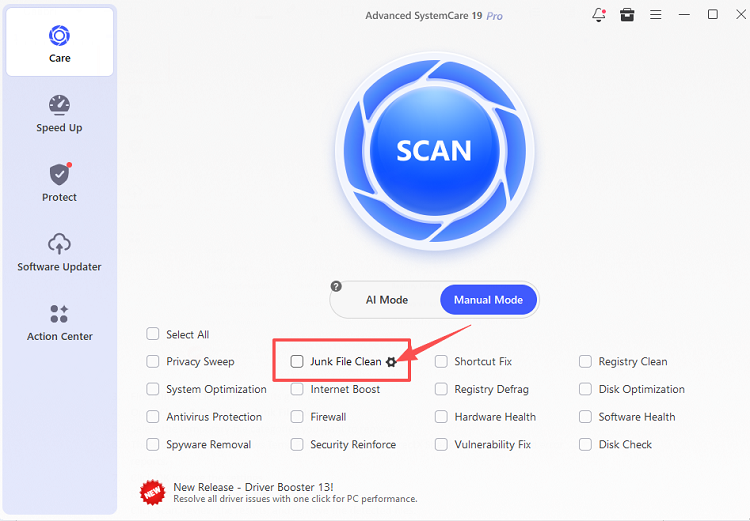
3. Find Junk File Clean and click its gear icon.
4. Select the temporary-file categories you want to remove. These may include Windows Temp Files, IE Temp Files, DirectX Shader Cache, logs, and error reports.
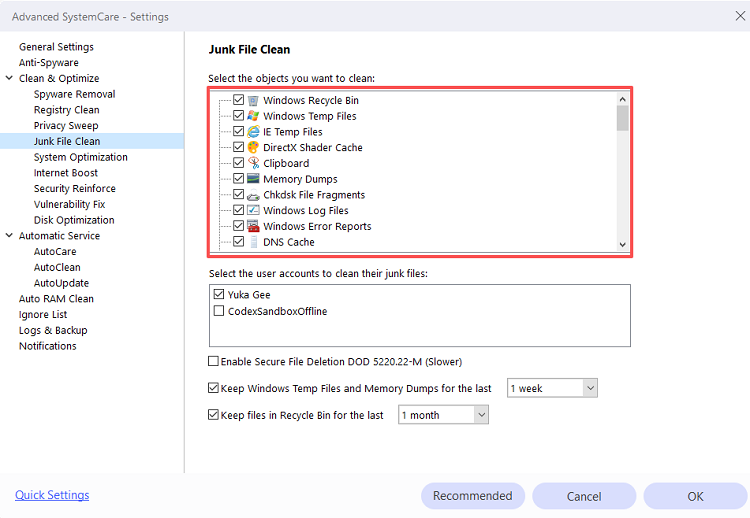 5. Click OK to save the settings. Return to Care and select Junk File Clean.
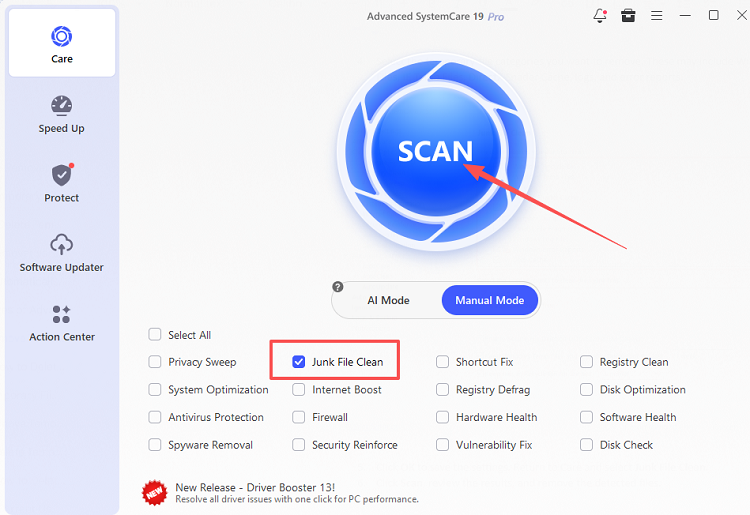 6. Click Scan, review the results, and remove the detected files.
Method 2: How to Delete Temp Files Through Windows Settings
Windows Settings provides an easy built-in cleanup method for users who do not want to install additional software.
Follow these steps to delete temporary files on Windows 10 & 11:
1. Press Windows + I. Select System > Storage.
2. Click Temporary files. Wait for Windows to calculate the available files.
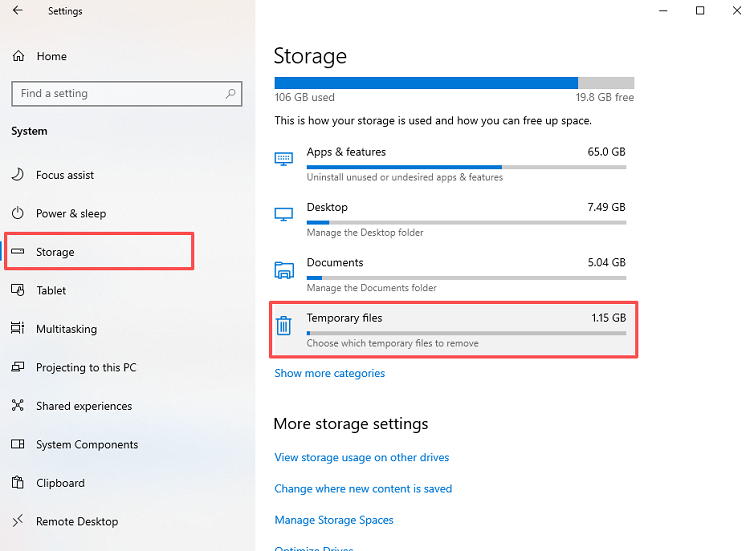 3. Review and select the appropriate categories. Click Remove files.
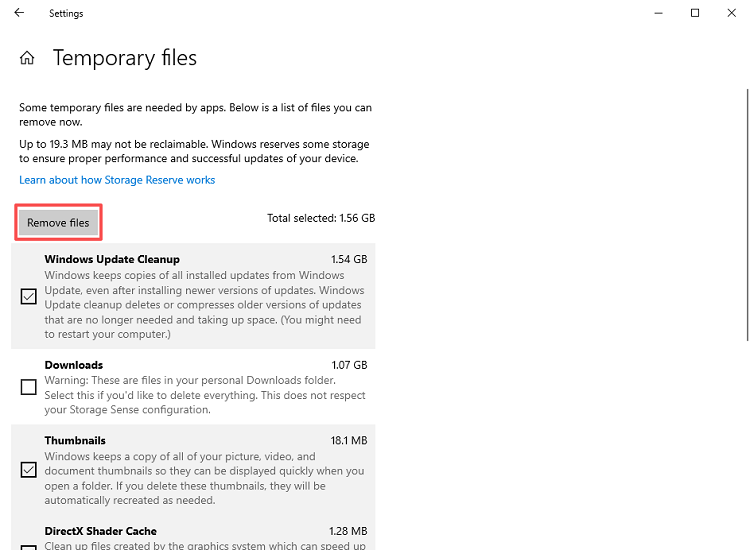
Tips: Check Downloads, Recycle Bin, Windows Update Cleanup, thumbnails, and Delivery Optimization Files carefully. Do not select Downloads unless its contents are no longer needed.
This feature acts as a basic temp file cleaner Windows 10 users can access without installing another application.
Method 3: Delete Temporary Files with Disk Cleanup
Disk Cleanup is a traditional Windows tool for clearing temporary and system-related files. It is useful for basic maintenance and standard Windows cleanup categories.
1. Open Start and search for Disk Cleanup.
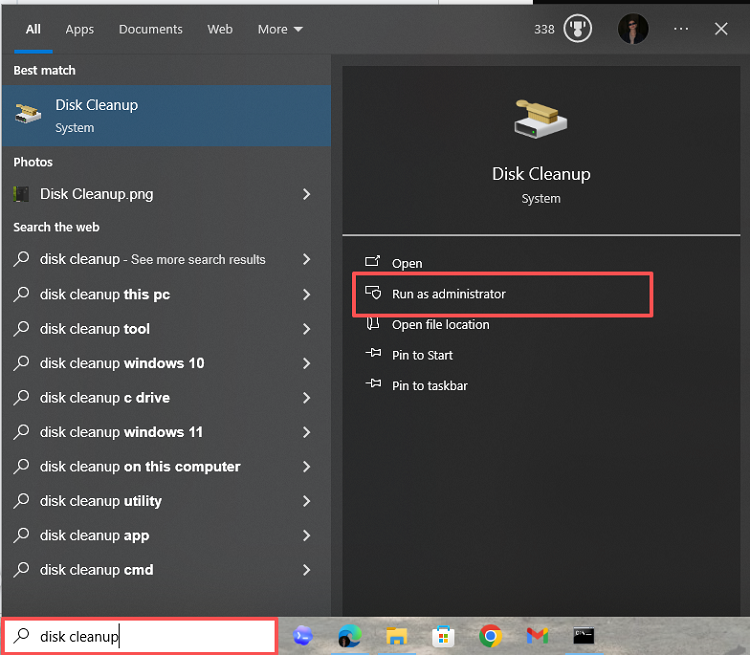 2. Launch the utility and select the Windows drive.
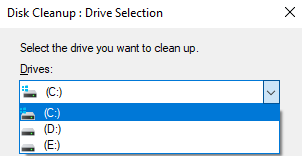 3. Choose the file categories you want to remove. Click OK > Delete Files.
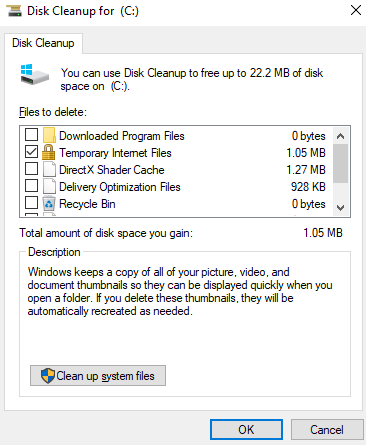 For additional system data, click Clean up system files, select the drive again, and review categories such as Windows Update Cleanup.
Disk Cleanup may cover fewer third-party application locations than a dedicated temp file remover. If Task Manager continues to report heavy drive activity after cleaning, check the possible causes of 100 disk usage Windows 11, since temporary files may not be the only problem.
Method 4: How to Delete Temporary Files and Folders with Run
The Run dialog gives direct access to common temporary-file folders. This method is useful when you want more control over which files are removed.
Clear the Current User Temp Folder
These steps explain how to delete temporary files and folders from the current Windows account:
1. Close unnecessary programs. Press Windows + R.
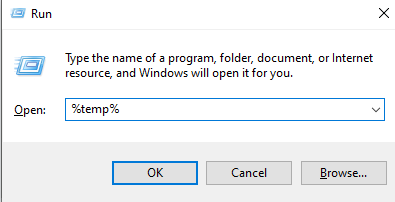
2. Type %temp% and press Enter.
3. Press Ctrl + A to select all items. Press Delete.
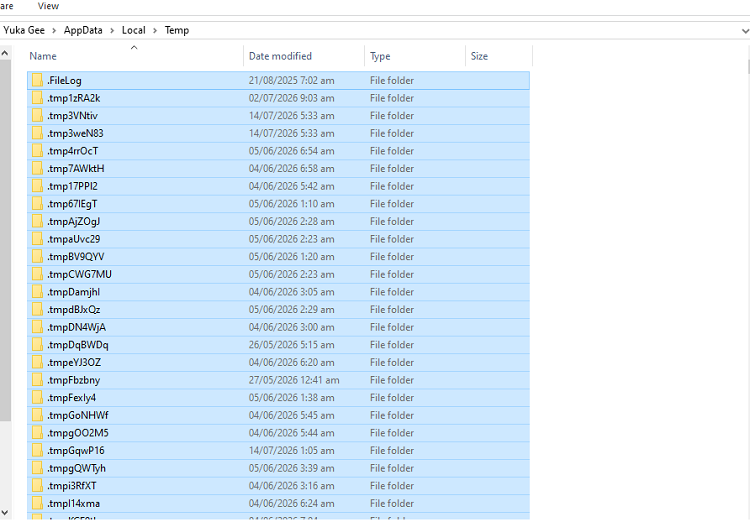
4. Skip files that are currently in use.
Clear the Windows Temp Folder
You can also clean the main Windows temporary folder:
1. Press Windows + R. Enter C:\Windows\Temp.
2. Approve administrator access.
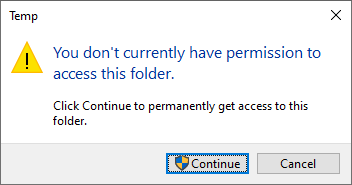
3. Select and delete removable files.
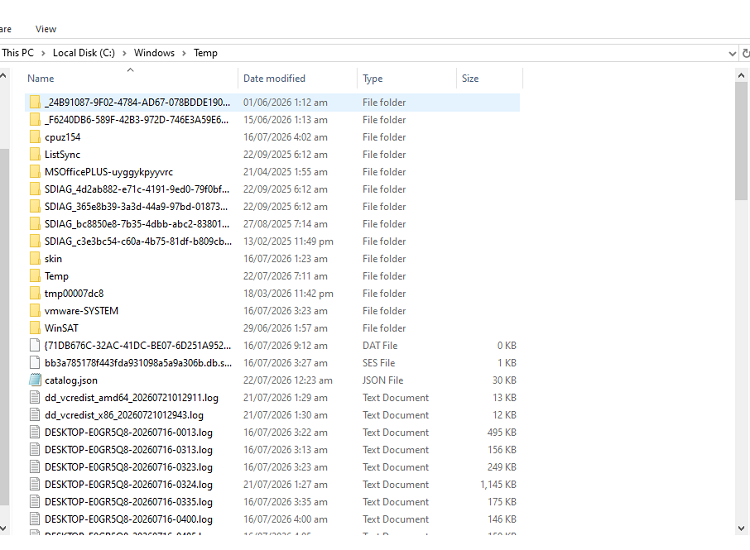
4. Skip locked or active items.
Delete only the contents inside the folder. Do not delete the Temp folder itself.
Method 5: Enable Storage Sense for Automatic Temp File Cleaning
Storage Sense automatically removes selected temporary files and is useful for routine Windows maintenance.
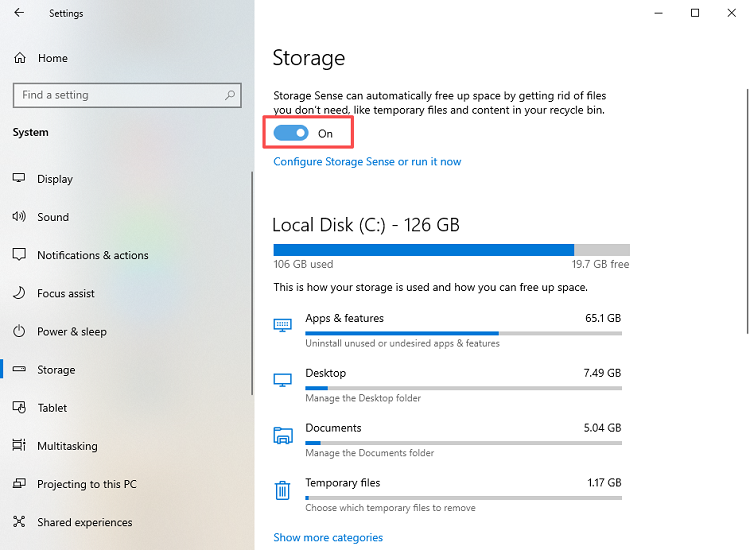
1. Open Settings > System > Storage. Turn on Storage Sense.
2. Open its configuration options. Choose how frequently it should run.
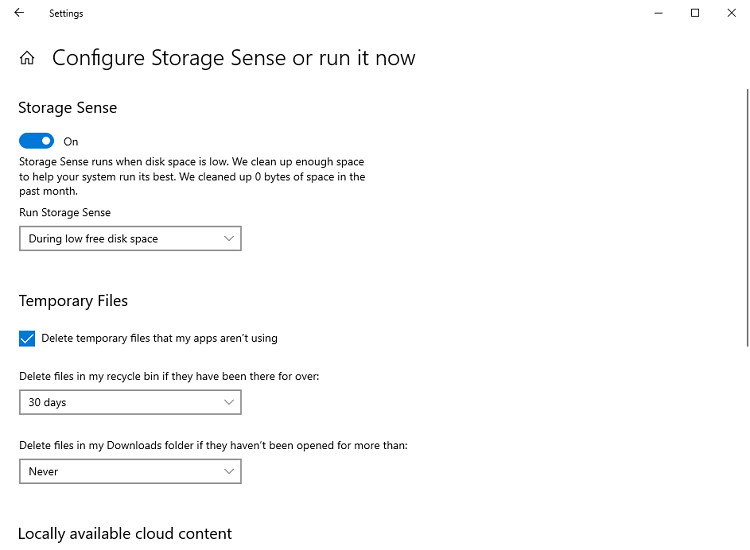 3. Configure Recycle Bin and Downloads cleanup rules.
4. Click Run Storage Sense now for immediate cleaning.
Storage Sense works as an automatic temp file cleaner, but it focuses on storage rather than network performance. Users experiencing slow downloads or connection delays should investigate a dedicated TCP optimizer separately.
Method 6: How to Remove Temporary Files and Folders Using Command Prompt
Command Prompt provides a faster cleanup option for experienced users. However, an incorrect path could remove unintended files, so every command should be checked carefully.
Follow these steps:
1. Press Windows + S to open Windows Search.
2. Type Command Prompt or cmd. Select Run as administrator.
3. Click Yes when the User Account Control window appears.
4. Enter the following command:
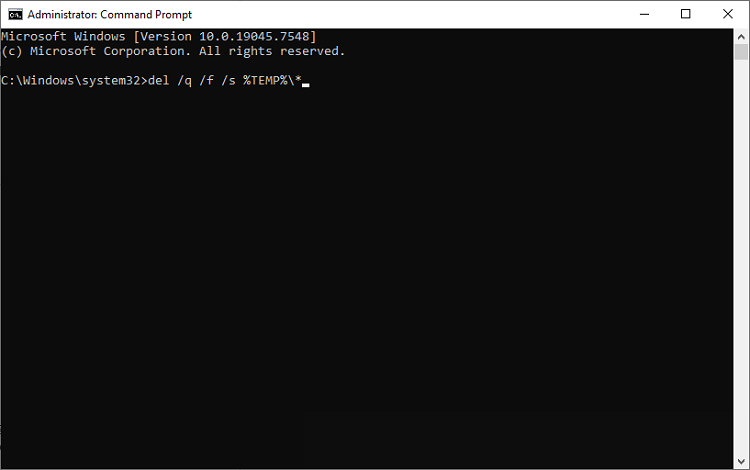 5. Press Enter and wait for the command to finish.
Skip any files that remain locked because Windows or another program is still using them.
The command parameters mean:
Before running the command, close active programs and confirm that the target path is correct. When you are unsure about command-line cleanup, using a graphical temp file remover is safer and easier.
Conclusion
You can remove temporary files with Windows Settings, Disk Cleanup, Storage Sense, Run, or Command Prompt. These built-in methods are useful, but they often require checking multiple locations separately.
For a more convenient approach, IObit Advanced SystemCare works as a practical temp file remover that scans Windows, browser, and application junk from one interface. After cleaning, a PC performance test can help determine whether storage, memory, or another system factor still needs attention.
Stop letting temporary files consume valuable space. Download IObit Advanced SystemCare, run a scan, review the detected items, and remove unnecessary files in a few simple steps.