Is your Windows PC freezing unexpectedly, showing strange error messages, or crashing after a recent update? These issues often happen because important system files are missing or corrupted. Instead of reinstalling Windows or trying complicated repairs, the System File Checker is one of the safest built-in tools you can use first. It scans protected Windows files and automatically repairs damaged ones whenever possible.
 In this guide, you’ll learn how to run System File Checker, understand its scan results, run it offline when Windows won’t boot, and interpret the generated log file.
Let’s get started.
What is System File Checker?
The system file checker is a built-in Windows utility developed by Microsoft to scan and repair corrupted, missing, or modified system files. It works by comparing your current system files with the original protected copies stored in Windows. If it finds any differences, it automatically replaces the damaged files with healthy versions.
Many Windows problems occur because essential operating system files become corrupted after unexpected shutdowns, malware infections, failed Windows updates, disk errors, or software conflicts. Instead of manually replacing those files, the System File Checker SFC utility performs the repair automatically.
The tool is completely free and available in Windows 11, Windows 10, Windows 8, and Windows 7. Since it focuses only on protected operating system files, it does not affect your personal documents, installed applications, or saved settings.
The most commonly used command is:
sfc /scannow
This command performs a complete scan of protected Windows files and repairs any integrity violations it detects.
Because of its safety and effectiveness, Microsoft recommends running SFC before attempting more advanced troubleshooting methods.
When to Use System File Checker?
Although many Windows issues have different causes, the System File Checker is one of the first troubleshooting tools worth trying whenever you suspect damaged system files.
Freezing or crashing
If your computer freezes randomly, restarts without warning, or frequently displays the Blue Screen of Death (BSOD), corrupted system files may be responsible. Running SFC can repair these files and improve overall system stability.
System errors
Error messages such as “Windows Resource Protection found corrupt files,” missing DLL errors, or unexpected application failures can indicate damaged Windows components. Running the Windows System File Checker command helps identify and repair these problems before they become more serious.
Broken features
Sometimes built-in Windows features stop working properly. For example, the Start menu may refuse to open, Windows Search may stop responding, or File Explorer may crash repeatedly. Since these features depend on protected Windows files, SFC can often restore their normal functionality.
Windows update failure
A failed Windows update may leave some system files incomplete or corrupted. As a result, future updates may continue failing or Windows may become unstable. Running SFC after a failed update helps repair damaged files before attempting another update.
Post-malware cleanup
Even after removing viruses or malware using antivirus software, Windows files may remain damaged. Running SFC ensures protected operating system files are restored to their original condition.
If SFC reports no problems but your computer still performs poorly, consider removing unnecessary junk files and temporary files. You can also use Advanced SystemCare to optimize your PC or learn how to clean junk files and use a temp file remover to recover storage space before performing additional troubleshooting.
Advanced SystemCare Free
- Clean: 420 billion traces removed & 85 EB junk files cleaned
- Protect: 80 million unauthorized access blocked & 20 million bugs fixed
- Speed Up: 6 million hours of startup time saved & Turbo boost
- Optimize: Auto clean and auto care your PC with AI mode

How to Run System File Checker in Windows 11/10
The steps to run System File Checker are exactly the same in Windows 11 and Windows 10. The tool must be launched from an elevated Command Prompt or Windows Terminal with administrator privileges.
Follow these steps to run System File Checker successfully.
Step 1. Open Command Prompt as Administrator
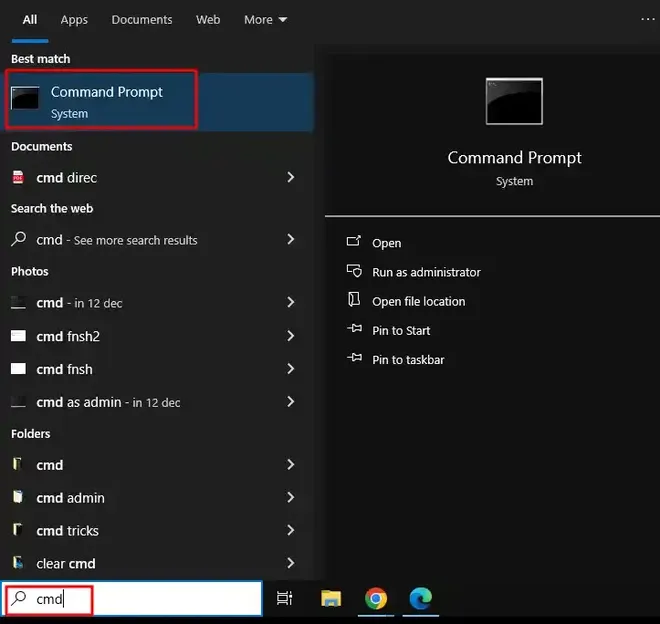
Tip: In Windows 11, you can also right-click the Start button and choose Windows Terminal (Admin). The SFC command works the same way.
Step 2. Run the SFC Scan
In the Command Prompt window, type the following command and press Enter:
sfc /scannow
The scan will begin immediately. Depending on your computer’s speed and storage device, it usually takes between 10 and 30 minutes.
During the scan:
Keep the Command Prompt window open.
Avoid shutting down or restarting your PC.
Wait until the verification reaches 100%.
Once the scan is complete, Windows will display one of several result messages. Each message indicates a different situation and determines what you should do next.
Understanding the Scan Results
Result Message 1:
Windows Resource Protection did not find any integrity violations.
What it means:
No corrupted or missing system files were detected. Your Windows system files are healthy.
What you can do:
The problem is likely caused by something other than Windows system files. Consider:
Result Message 2:
Windows Resource Protection found corrupt files and successfully repaired them.
What it means:
SFC detected damaged system files and replaced them with healthy copies.
What you can do:
Restart your computer and check whether the original issue has been resolved. In many cases, crashes, freezes, and Windows errors disappear after a successful repair.
Result Message 3:
Windows Resource Protection found corrupt files but was unable to fix some of them.
What it means:
Some corrupted files couldn’t be repaired because Windows couldn’t access the required replacement files.
What you can do:
Try the following:
-
Run the DISM command:
DISM /Online /Cleanup-Image /RestoreHealth
Restart your computer.
Run sfc /scannow again.
If the problem persists, review the sfcdetails.txt log to identify the affected files.
Result Message 4:
Windows Resource Protection could not perform the requested operation.
What it means:
Windows couldn’t complete the scan because another issue prevented SFC from accessing the required files.
What you can do:
By understanding these messages, you can determine the next troubleshooting step instead of repeatedly running the same scan without knowing what the results actually mean.
Also Read: How to Fix Windows Cannot Find When Uninstalling >>
How to Run System File Checker Offline
Sometimes Windows cannot repair itself while it is running. In these situations, you can run System File Checker offline from the Windows Recovery Environment (WinRE). This allows SFC to repair system files without interference from the operating system.
Running SFC offline is especially useful in the following situations:
Windows fails to boot: If your PC gets stuck in a boot loop or won’t start, you can run SFC from WinRE to repair damaged system files.
Core system files are locked: Some Windows files are in use while the operating system is running and cannot be repaired until Windows is offline.
Bypass “Windows Resource Protection could not start the repair service” errors: Running SFC from the recovery environment often resolves this issue because Windows services are not actively using the affected files.
Follow these steps to run SFC offline:
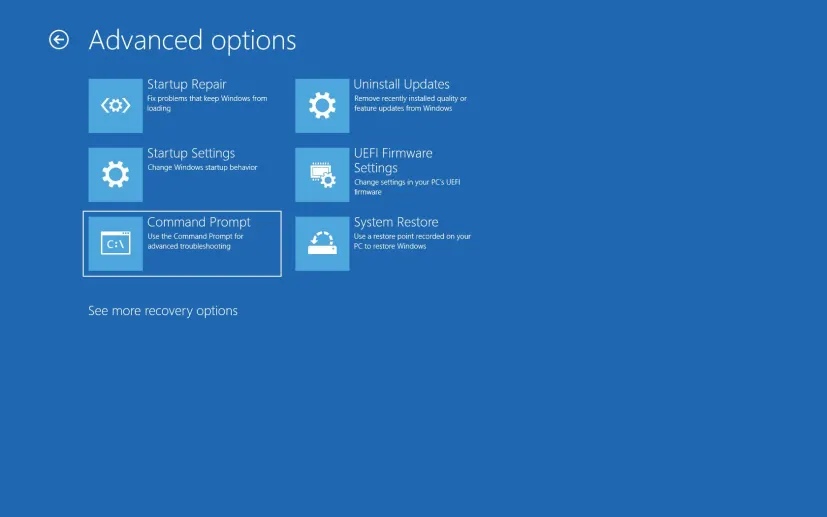
Step 1. Open Windows Recovery Environment
Turn on your PC.
If Windows fails to start, interrupt the boot process two or three times until Automatic Repair appears.
Select Advanced options.
Go to Troubleshoot > Advanced options > Command Prompt.
Step 2. Find the Windows Drive Letter
The Windows partition may not use the C: drive in WinRE. Type the following command and press Enter:
bcdedit
Look for the osdevice entry to identify the correct Windows drive letter.
Step 3. Run the Offline SFC Scan
Replace the drive letter below if your Windows installation is on a different partition.
sfc /scannow /offbootdir=C:\ /offwindir=C:\Windows
Press Enter and wait for the scan to finish.
If corrupted system files are found, SFC will repair them using the offline Windows installation. Once the scan is complete, close Command Prompt and restart your computer normally.
Bonus: Keep Sufficient Drive Space to Reduce the Risk of File Corruption
Windows naturally accumulates gigabytes of temporary installation files, browser caches, system logs, and leftover update data over time. When your drive gets dangerously close to full capacity, it doesn't just slow down—it active limits your SSD's ability to perform routine wear leveling and TRIM commands, increasing the risk of file corruption.
Advanced SystemCare, working as an all-in-one free Windows optimizer, automatically remove junk files to maintain drive breathing room and keep your PC at best performance. It scans and removes obsolete Windows update files, temporary system caches, memory dumps, and residual application junk. The time schedule option allows it to run background cleanups periodically when your PC is idle.
Advanced SystemCare Free
- Clean: 420 billion traces removed & 85 EB junk files cleaned
- Protect: 80 million unauthorized access blocked & 20 million bugs fixed
- Speed Up: 6 million hours of startup time saved & Turbo boost
- Optimize: Auto clean and auto care your PC with AI mode
How to Read the sfcdetails.txt File?
If SFC reports that it found corrupted files but couldn’t repair all of them, the generated log file can help you identify exactly which files were affected.
Windows stores all SFC activity in the CBS.log file, but since it contains thousands of entries, extracting only the relevant information makes it much easier to read.
Step 1. Generate the sfcdetails.txt File
Open Command Prompt as Administrator and run the following command:
findstr /c:"[SR]" %windir%\Logs\CBS\CBS.log > "%userprofile%\Desktop\sfcdetails.txt"
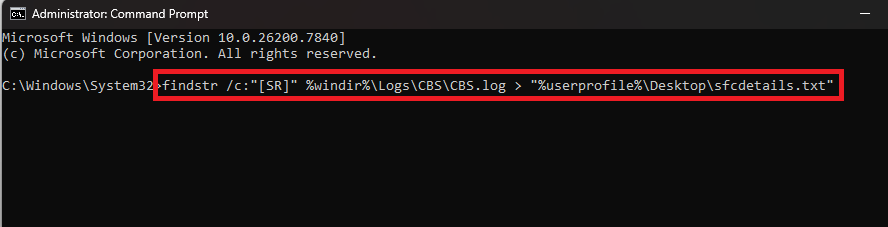
After the command finishes, a file named sfcdetails.txt will appear on your desktop.
Step 2. Open the File
Double-click sfcdetails.txt or open it with Notepad.
Step 3. Interpret the Results
Each entry describes what SFC checked and whether it successfully repaired the file.
Some common messages include:
Repairing corrupted file – Windows detected a damaged file and successfully restored it.
Cannot repair member file – SFC found corruption but couldn’t replace the file. Running the DISM tool and scanning again is usually recommended.
Verify complete – The scan finished successfully.
If several important system files cannot be repaired even after running DISM and SFC again, your Windows installation may be severely damaged. In that case, an in-place repair upgrade or reinstalling Windows may be the most effective solution.
Reviewing sfcdetails.txt helps you understand exactly what SFC repaired and whether further troubleshooting is necessary instead of relying only on the summary message displayed in Command Prompt.
Conclusion
The system file checker is one of the most useful built-in Windows tools for repairing corrupted or missing system files. Whether your PC is crashing, showing system errors, or failing to boot, SFC is a safe first troubleshooting step before considering more advanced repairs. If your system still feels slow after repairing Windows files, you can also download Advanced SystemCare to optimize your PC and use its clenaup feature and duplicate file finder to reclaim unnecessary storage space.