Whether you play esports or AAA games, low FPS, stuttering, long loading times, and background processes can make gaming on Windows 11 feel slower than expected. Fortunately, you can improve performance without immediately upgrading your hardware.
If you're wondering how to optimize Windows 11 for gaming, start with Game Mode, graphics settings, GPU drivers, startup apps, and system performance settings. This guide covers 6 practical Windows 11 optimization tips to reduce unnecessary background activity, boost FPS, lower latency, and create a smoother gaming experience.
Why Windows 11 Gaming Optimization Matters
Windows 11 includes several gaming-focused features, but many of them aren't enabled or configured for peak performance by default. In addition, background applications, startup programs, and unnecessary visual effects can consume valuable CPU, RAM, and disk resources. Optimizing Windows 11 helps:
Increase average FPS
Reduce game stuttering
Lower input latency
Improve CPU and GPU efficiency
Speed up game loading times
Reduce crashes and freezing
Improve overall system responsiveness
If your games suddenly feel slower or your PC struggles with newer titles, applying the following optimizations can make a noticeable difference.
6 Tips to Optimize Windows 11 for Gaming
The following 6 tips help reduce system overhead, improve resource allocation, and create a smoother gaming experience, allowing Marvel Rivals and other games to run at higher, more stable FPS. Now, let’s start by turning on Windows Game Mode.
Tip 1. Turn On Windows Game Mode
Windows Game Mode is one of the easiest features to enable, yet many users overlook it. When enabled, Windows prioritizes gaming by reducing background activity, preventing unnecessary Windows Update driver installations during gameplay, and allocating more system resources to your running game. It's an excellent first step when you want to optimize Windows 11 for gaming laptop or PC without installing additional software. If you’re interested in this way, follow these steps to do it.
Step 1. Press Windows + I to launch the Settings app.
Step 2. From the left sidebar, click Gaming.
Step 3. Click Game Mode, then toggle Game Mode to On.
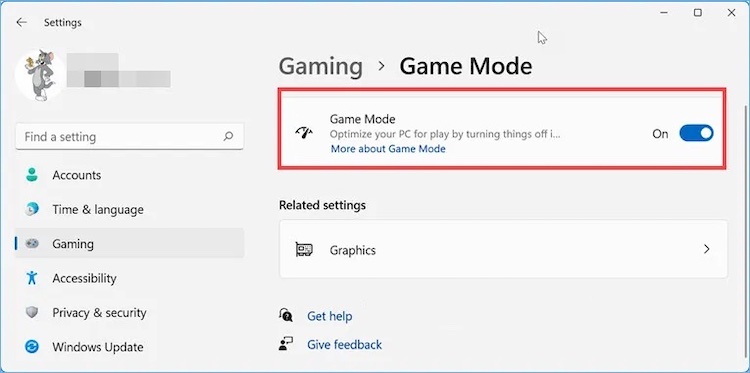 Step 4. Close and reopen your game to ensure the setting takes effect.
Tip 2. Update Windows, GPU Drivers, and DirectX
There are many benefits of keeping your operating system and graphics drivers up to date. For example, it can optimize your PC performance, fix bugs, and improve compatibility, etc. GPU manufacturers frequently release game-ready drivers for newly launched titles, while Microsoft continuously improves Windows 11 optimization for gaming. If you are not sure whether your GPU driver is current, you can also learn how to update your graphics driver manually or automatically. Updating Windows, graphics drivers, and DirectX is an essential part of Windows 11 gaming optimization because it improves compatibility, fixes bugs, and may add game-specific performance enhancements.
To Update Windows:
Step 1. Press Windows + I.
Step 2. Select Windows Update from the sidebar.
Step 3. Click Check for updates.
Step 4. Download and install all recommended updates.
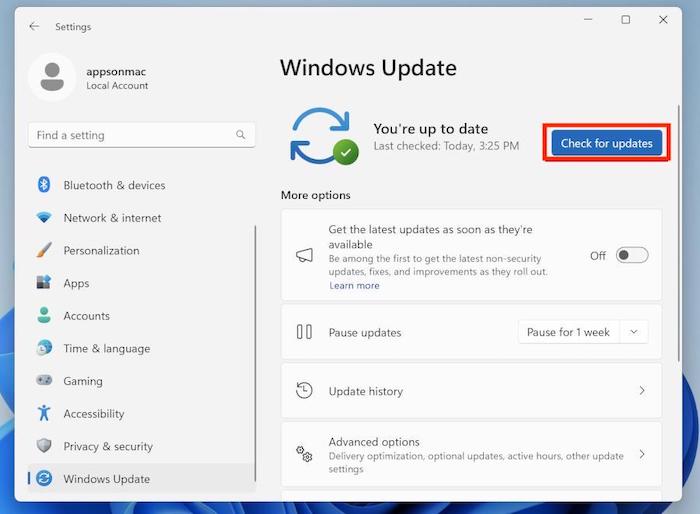
Step 5. Restart your PC after installation.
To Update Your Graphics Driver:
Step 1. Open Device Manager and expand Display adapters.
Step 2. Right-click the Graphic you wish to update and select Update driver.
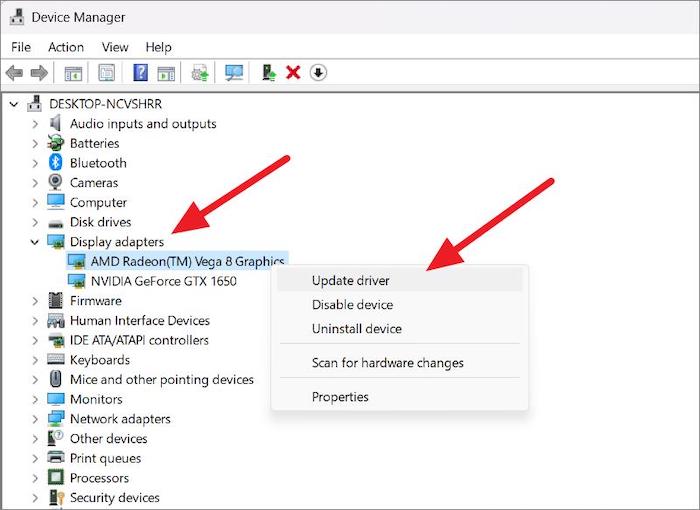
Step 3. Run the installer and follow the on-screen instructions.
Step 4. Reboot your computer after installation.
To Update DirectX:
Windows Update automatically installs the latest supported DirectX components. Keeping Windows fully updated is usually all that's required.
Tip 3. Enable Hardware-Accelerated GPU Scheduling and Gaming Features
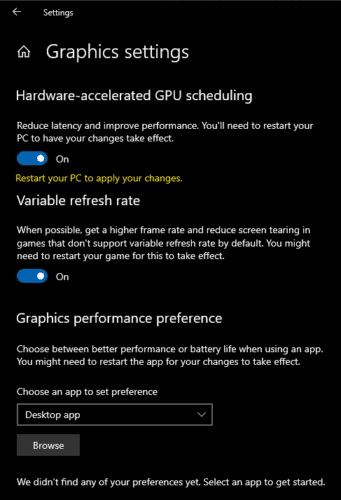
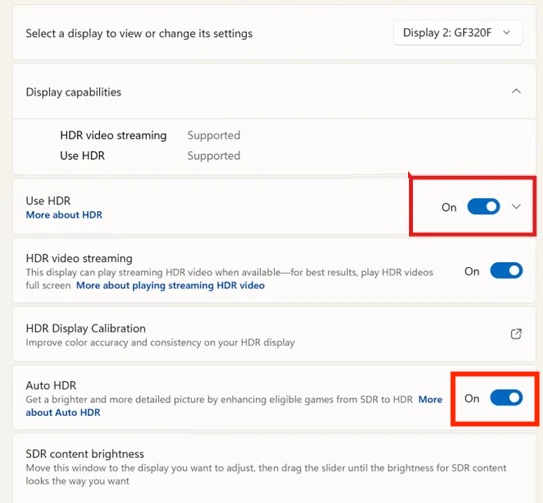
Modern versions of Windows 11 include several advanced gaming features that reduce rendering latency and improve graphics performance. Hardware-Accelerated GPU Scheduling shifts some graphics processing tasks from the CPU to the GPU, while Variable Refresh Rate (VRR), Auto HDR, and Optimizations for Windowed Games enhance visual smoothness and responsiveness. Enabling these features is another important step toward a Windows 11 super optimize for gaming configuration.
To Enable Hardware-Accelerated GPU Scheduling, VRR, and Optimizations for Windowed Games:
Step 1. Press Windows + I.
Step 2. Go to System > Display.
Step 3. Click Graphics and select Change default graphics settings.
Step 4. Enable the Hardware-accelerated GPU scheduling option.
Step 5. Below this option, enable Variable Refresh Rate if your monitor supports it. Similarly, turn on Optimizations for Windowed Games.
 To Enable Auto HDR:
Step 1. Return to Settings > System > Display.
Step 2. Under “Brightness & Color,” click HDR.
Step 3. Turn on Use HDR and Auto HDR.
Marvel Rivals FPS Boost Tip
For a practical Marvel Rivals FPS boost, enable Game Mode and Hardware-Accelerated GPU Scheduling, update your graphics driver, and assign the game to the high-performance GPU in Windows Graphics settings. Inside the game, lower shadows, effects, reflections, and other GPU-heavy options before reducing resolution, as these settings can improve FPS while preserving image clarity.
Tip 4. Disable Background Apps and Startup Programs
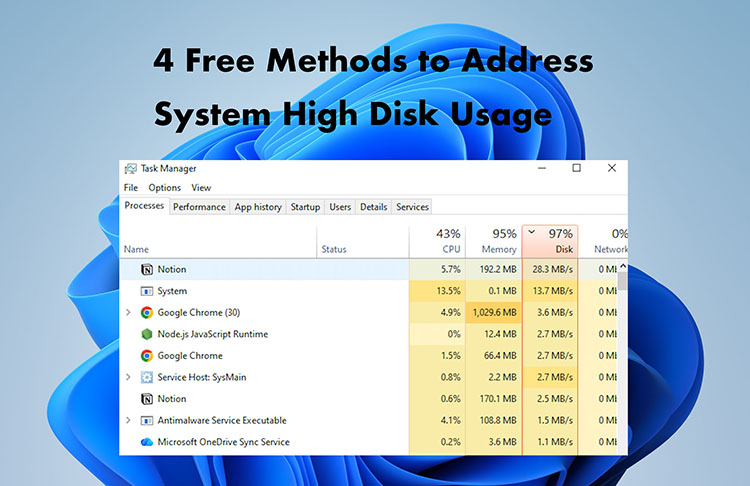
Even powerful gaming PCs can lose performance when too many applications are running in the background. Programs that launch automatically during startup continue using CPU, RAM, disk, and network resources even if you are not actively using them. Disabling unnecessary startup apps and closing background processes can free valuable system resources, helping you optimize Windows 11 for gaming and maintain smoother gameplay with fewer interruptions.
To Disable Startup Apps and Close Background Processes:
Step 1. Press Windows + I to open Settings.
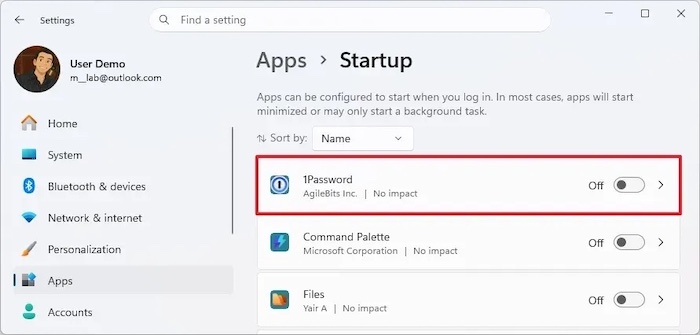
Step 2. Navigate to Apps > Startup.
Step 3. Windows displays all apps that launch when your computer starts.
Step 4. Turn off the toggle switch for the app you wish to disable.
Step 5. Go back to Apps > Apps & features.
Step 6. Find the app you wish to close in the background.
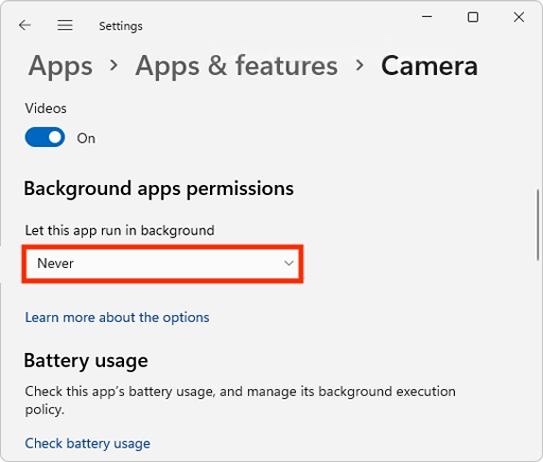
Step 7. Click on the three dots next to the app and select Advanced options.
Step 8. Under the Background apps permissions, select Never from the drop-down list.
✨Tip: Avoid ending Windows system processes unless you know their purpose. The Background apps permissions option is only available for supported apps. For traditional desktop software, close the program from the system tray or disable it through Task Manager.
If you prefer to manage startup apps, background services, junk files, and system optimization from one place, the next method provides a more automated option.
Tip 5. Optimize Windows Automatically with IObit Advanced SystemCare
While manually disabling unnecessary apps can improve gaming performance, regular system maintenance is just as important. Over time, junk files, invalid registry entries, unnecessary startup items, and background services accumulate, slowing your PC. IObit Advanced SystemCare simplifies the process by combining system cleanup, AI-powered optimization, startup management, and Turbo Boost into one application, making it one of the easiest ways to optimize Windows 11 for gaming.
Advanced SystemCare Free
- Clean: 420 billion traces removed & 85 EB junk files cleaned
- Protect: 80 million unauthorized access blocked & 20 million bugs fixed
- Speed Up: 6 million hours of startup time saved & Turbo boost
- Optimize: Auto clean and auto care your PC with AI mode

Here are more outstanding features of Advanced SystemCare.
Clean Junk Files With AI Scan
AI Scan removes temporary files, caches, and leftovers that waste storage. Open Advanced SystemCare, choose AI Mode, scan, then fix issues. It works as a hard disk cleaner and helps Windows load faster.
Use Turbo Boost For Gaming
Turbo Boost closes background services and frees CPU and RAM before gaming. Open Turbo Boost, choose Game Mode, turn it on, then launch your game. It acts like a RAM optimizer Windows 11 users can rely on for smoother FPS.
Optimize Startup Programs
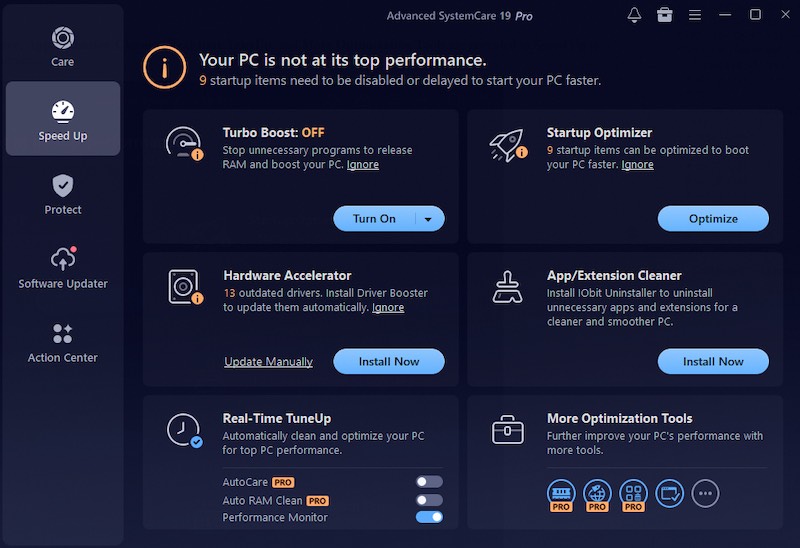
Startup Optimizer disables unnecessary apps that slow boot and consume memory. Review startup items, turn off what you do not need, save changes, and restart. This keeps more resources available for games and daily tasks.
Deep Clean The Registry
Registry Clean scans invalid entries left by removed software. Run a full scan, review results, and repair selected issues. This improves stability, reduces errors, and helps Windows run more efficiently over time.
Run Deep System Optimization
Speed Up applies recommended tweaks in one click. Open Speed Up, select optimizations, click Optimize, and restart if prompted. It combines cleanup, performance tuning, and resource management for a faster gaming setup.
Anyway, using Advanced SystemCare regularly keeps your PC running efficiently without requiring you to manually perform every optimization, making it an excellent companion for anyone building a Windows 11 super optimized for gaming setup. Once done, you can do a PC performance check with this tool either. Want to give it a try? Follow these steps.
Step 1. Download and install Advanced SystemCare on your Windows 11 PC. Launch the program after installation.
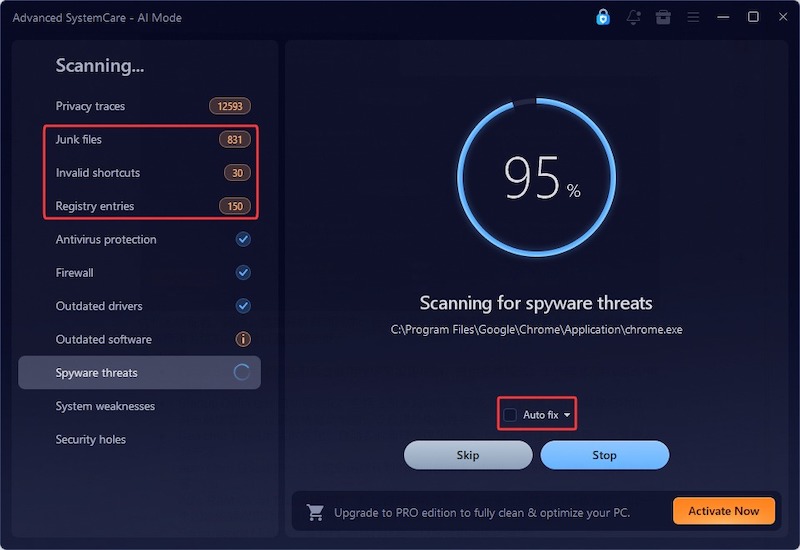
Step 2. Open Advanced SystemCare and select AI Mode from the left panel. Click Scan. Wait while the software analyzes your PC. Click Fix to automatically optimize system settings, remove junk files, and improve overall performance.
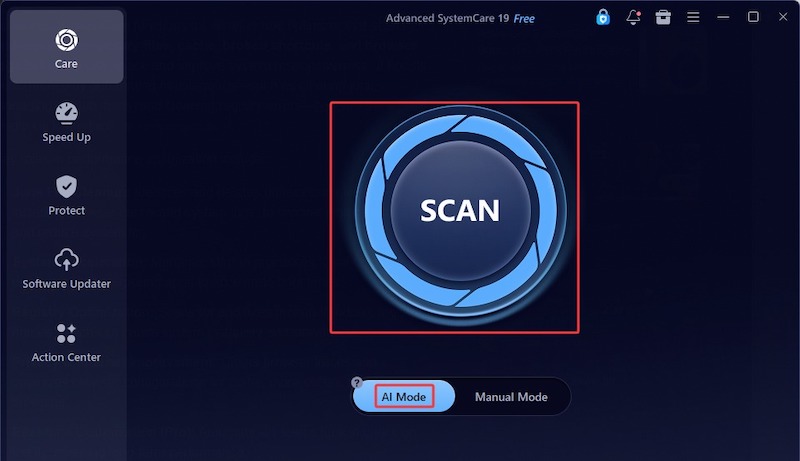
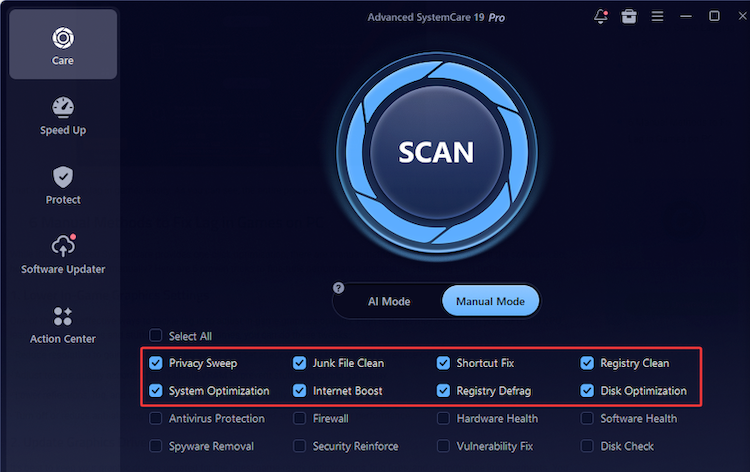
Step 3. Navigate to Manual Mode to enable Junk File Clean. Click Scan to identify junk files, startup items, and system issues that may interfere with Windows 11 gaming optimization. Review the results and click Fix to remove unnecessary files that occupy storage space.
Step 4. Open Speed Up. Choose Startup Optimization and scan for startup programs. Disable apps that you don't need when Windows starts.
Step 5. Repeat the scan and optimization process on a regular schedule.
Tip 6. Improve Network Performance for Online Gaming
If you mainly play online games, network performance is just as important as graphics performance. High ping, packet loss, and unstable connections can cause lag, rubber-banding, and delayed responses even on powerful PCs. Optimizing your network helps create a smoother multiplayer experience and complements your efforts to optimize Windows 11 for gaming.
Steps to Improve Your Internet Connection
Step 1. Whenever possible, connect your PC directly to your router using an Ethernet cable.
Step 2. Pause downloads, cloud backups, streaming services, and other devices using large amounts of bandwidth.
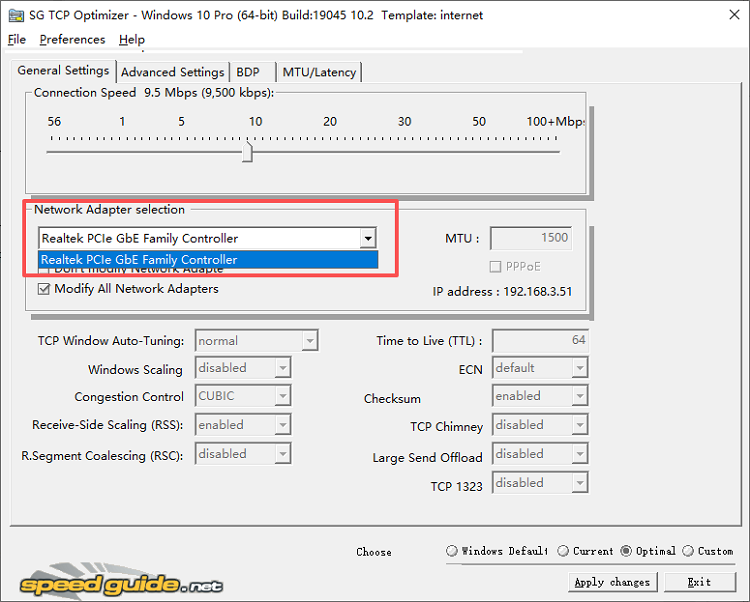
Step 3. A faster DNS service may improve connection setup or launcher responsiveness, but it usually has little effect on in-game ping once the server connection is established.
Step 4. Power cycle your router occasionally to refresh the connection.
Step 5. Enable Quality of Service (QoS)
Bonus Tips for a Windows 11 Super Optimize for Gaming Setup
Set Power Mode to Best Performance
For another simple Windows 11 gaming optimization, open Settings > System > Power & battery > Power mode and choose Best performance. This allows Windows to prioritize performance when running demanding games. On laptops, it is best to use this setting while plugged in because it increases power consumption and may generate more heat. If battery life matters more than maximum FPS, switch back to Balanced mode after gaming.
In addition to the six main methods above, the following tips provide further guidance on optimization Windows 11 for gaming, especially for laptops, competitive games, and long gaming session. To squeeze every bit of performance from your PC, consider these additional optimizations:
Keep at least 20% of your SSD free.
Disable unnecessary notifications while gaming.
Turn off apps running in the system tray.
Verify game files if you experience crashes.
Remove software you no longer use.
Keep your graphics drivers updated.
Restart your PC before long gaming sessions.
Use wired gaming peripherals whenever possible.
Avoid running multiple game launchers simultaneously.
The Bottom Line
Now you know how to optimize Windows 11 for gaming. Optimizing Windows 11 for gaming does not require expensive upgrades or advanced skills. Enable gaming features, update drivers, close background apps, and tune graphics options to improve FPS and stability. As one of the best PC optimizers for gaming, IObit Advanced SystemCare can help by cleaning junk files, managing startup items, maintaining the registry, and using Turbo Boost. With regular maintenance and a few simple tweaks, your PC can stay fast, responsive, and ready for smoother gaming sessions every time you play for better overall results.