This frustrating moment must sound familiar to every gamer: you are deep into an intense match, and sudden lag spikes disrupt your performance. What’s even worse, a background Windows update or hidden process can unexpectedly tank your frame rate. To address these issues, Microsoft introduced Windows Game Mode, a built-in feature designed to prioritize system resources and ensure your gameplay runs smoothly.

But does enabling Windows Game Mode actually deliver noticeable improvements, or can it sometimes cause more harm than good? In this guide, we will explore what Windows Game Mode is, how to enable it properly, whether Windows Game Mode is on or off is the better choice for your system, and the best software that can enhance your gaming performance easily!
What is Windows Game Mode & How Does It Work?
Windows Game Mode is a built-in Windows optimization feature that can enhance gaming performance. When it’s enabled, it will allocate more system resources to your active game. Specifically, Windows Game Mode prioritizes GPU and CPU usage for the foreground application, ensuring your game gets the processing power it needs. It also directs workloads toward the most efficient CPU cores while minimizing background activity.
Additionally, Windows Game Mode temporarily blocks Windows Updates, driver installations, and intrusive notifications during gameplay, which helps prevent unnecessary interruptions and creates a more immersive gaming environment. It’s also believed that the benefits of Windows Game Mode are more noticeable on mid-range devices.
How to Enable or Disable Game Mode in Windows 11/10?
Now that you have a clear background knowledge of Windows game mode. It’s time to see how it works on Windows 11/10.
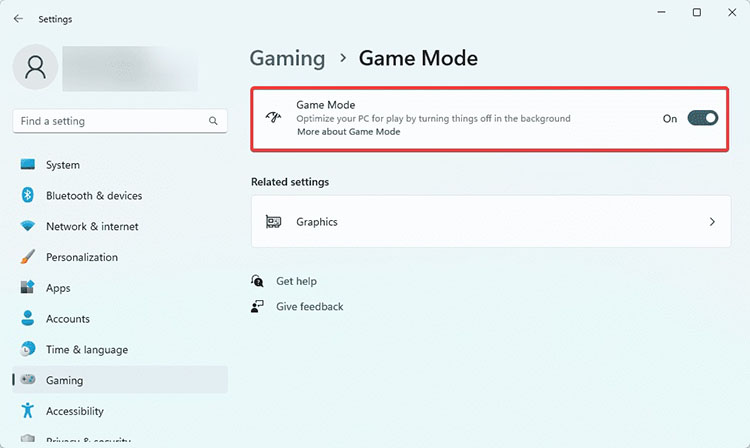
How to enable Windows Game Mode on Windows 11?
Step 1. Open the Start Menu and click the Settings (gear icon). Alternatively, type “Settings” in the search bar to locate it.
Step 2. In the Settings window, click on Gaming from the left-hand menu. Select Game Mode from the options.
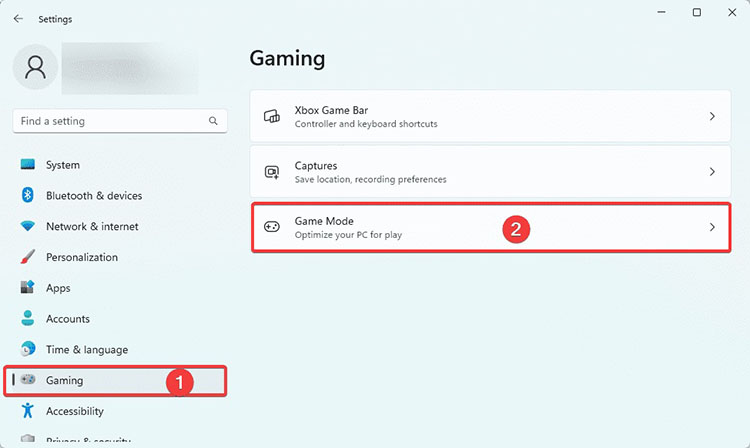
Step 3. Toggle the switch to turn Game Mode on or off.
How to enable/disable Game Mode on Windows 10?
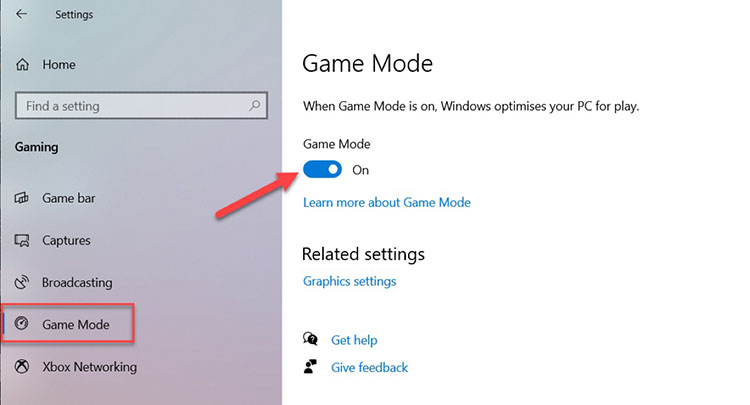
Step 1. Open the Start Menu and click the Settings (gear icon), or type “Settings” in the search bar to access it quickly.
Step 2. In the Settings window, select Gaming, then click on Game Mode from the left-hand panel.
Step 3. Toggle the option under Game Mode to On (or Off if you want to disable it).
Pro Tip: If Windows can not automatically recognize an older or indie game, you can manually enable detection. Press Win + G to open the Xbox Game Bar, click the Settings icon, and check the option “Remember this is a game.”
Windows Game Mode On vs. Off: Does It Actually Boost FPS?
When it comes to the Windows Game Mode PC, many users wonder about its real-world effectiveness. For instance, the trendy Windows 11 Game Mode on or off Reddit discussion often reflects mixed experiences. While some users report improved consistency on mid-range or older hardware, others notice minimal differences or occasional compatibility issues with certain games.
Windows Game Mode can indeed prioritize CPU and GPU resources for your active game and reduce background interference. However, in real-world scenarios, modern high-end PCs may not see a noticeable FPS increase, which is usually around 0-2% at most. Moreover, the main benefit lies in improving frame time stability, which can make gameplay feel smoother. Yet for lower-end systems, the impact of Windows Game Mode can be more obvious, which greatly helps minimize interruptions from background apps, updates, and notifications.
So, Windows game mode on or off? For gamers who look for a more significant performance boost, the pure Windows built-in features may not be enough. In such cases, you might need a more dedicated optimization tool to achieve more substantial improvements.
Enhance Gaming Performance Beyond Windows Game Mode
While Windows Game Mode helps provide a basic level of frame rate stability, it has limited optimization capabilities. Instead of manually closing apps, tweaking system settings, or constantly monitoring performance, a more efficient solution is to use a dedicated optimization tool.
Advanced SystemCare Free
- Clean: 420 billion traces removed & 85 EB junk files cleaned
- Protect: 80 million unauthorized access blocked & 20 million bugs fixed
- Speed Up: 6 million hours of startup time saved & Turbo boost
- Optimize: Auto clean and auto care your PC with AI mode

Here, Advanced SystemCare is the best tool that comes in handy. Unlike Windows Game Mode that prioritizes system resources during gameplay, Advanced SystemCare takes a more comprehensive approach. It is an all-in-one performance optimization tool that can enhance your entire PC system. The software can intelligently manage resources and close unnecessary programs, which helps deliver smoother gaming and better overall system responsiveness.
Key features of Advanced SystemCare:
-
Release RAM with one-click optimization
Advanced SystemCare, this RAM optimizer, can quickly detect and free up memory occupied by unnecessary background processes. With just a single click, it will release vital RAM for resource-heavy games, which significantly reduces lag and eliminates those frustrating micro-stutters to achieve a much smoother gameplay experience.
-
Prioritize CPU power directly to your game
With Turbo Boost in Game Mode, the software intelligently shuts down non-essential apps/services and allocates more CPU resources to your active game. This can effectively ensure better processing efficiency, leading to smoother gameplay and reduced frame drops.
-
Clean deep system junk files to boost drive speed
Advanced SystemCare can perform a deep scan (AI/Manual mode available) to remove accumulated junk, temporary files, and invalid registry entries that slow down your drive. After clearing these bottlenecks, your PC will improve read/write speeds to get faster game loading times.
-
Optimize internet settings for lower gaming ping
Its Internet Booster feature can adjust hidden Windows TCP/IP settings to reduce packet loss and data bottlenecks. You can enjoy your game with reduced latency, lower ping rates, and more stable connections!
How to use Advanced SystemCare Game Boost
Step 1. Download and Install Advanced SystemCare on your PC (Windows 11, 10, 8.1, 8, 7, Vista, and XP).
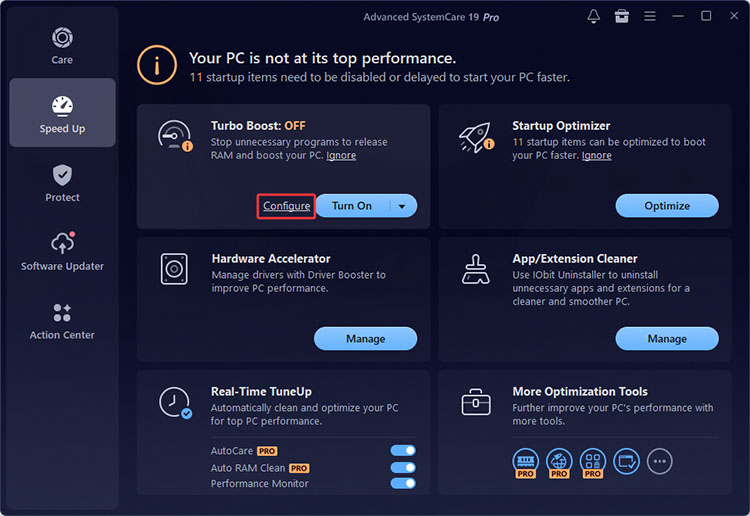
Step 2. Launch the app and go to the Speed Up tab. Locate Turbo Boost and click the Configure button.
Step 3. Choose Game Boost from the list on top. Select the background services, apps, or processes you want to disable. Click the Boost button.
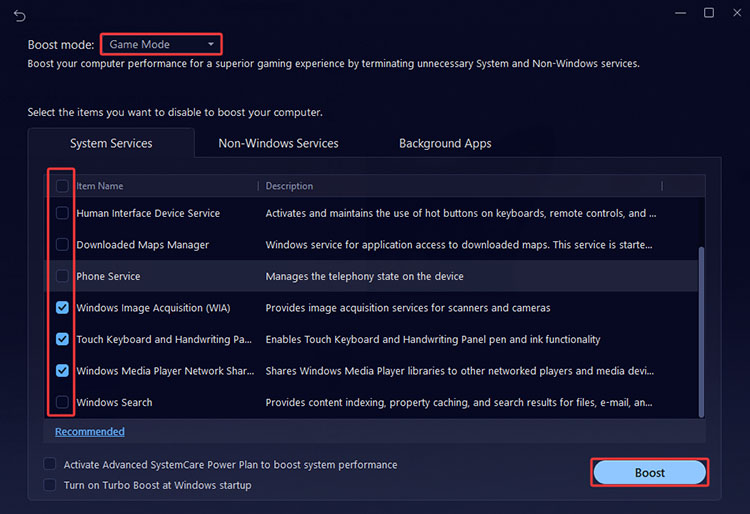
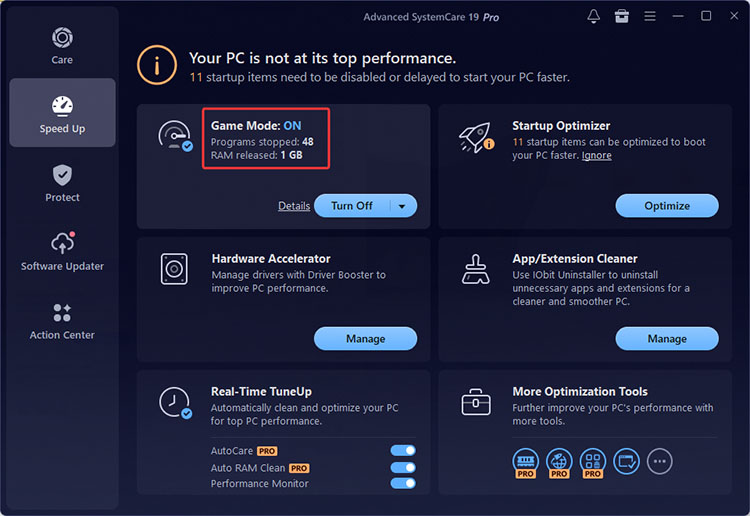
Step 4. Now the Game Mode is on. The software will release RAM and optimize your PC for smoother and faster gaming.
Conclusion
While Windows Game Mode can provide modest stability improvements, its impact is often limited, especially on high-end PCs. For gamers who want smoother gameplay, reduced lag, and better system performance, Advanced SystemCare is definitely a more powerful solution. With all-in-one optimization features, it helps unlock your PC’s full potential for ultimate gaming. Try it and enjoy a much smoother gaming experience from now on!