You need to know how to uninstall drivers. If you have a good habit of installing drivers from AMD or Nvidia to address daily PC problems, you can have a lot of old driver packages on your PC. If you don't regularly clean them, latent issues can cause system crashes and driver conflicts after a Windows update. This blog tells you how to discern unused drivers and, more conveniently, recommends a one-click driver uninstaller for you to remove all unnecessary drivers downloaded.
Issues Behind Manually Uninstalling Drivers
Manually removing drivers via file deletion or the outdated Device Manager might seem quick, but it often triggers serious system instability. Here’s what can go wrong when you uninstall a driver the wrong way:
1. GPU Driver Deletion → Black Screen: If you manually delete critical display driver files without switching to a basic display adapter, Windows may fail to load the graphical interface, leaving you with a black or frozen screen upon reboot.
2. Chipset Driver Removal → Power & Performance Bugs: Removing or corrupting chipset drivers can break power management. Your laptop might not sleep correctly, USB ports may disconnect randomly, or the CPU could run at a lower speed, causing lag.
3. Network Driver Uninstall → No Internet Access: Accidentally deleting Wi-Fi or Ethernet drivers without a backup means you lose all connectivity, making it hard to re-download the correct drivers.
4. Audio Driver Issues → No Sound: Manually removing audio drivers often leaves residual files that conflict with new installations, leading to "no audio device installed" errors.
5. Peripheral Device Drivers → Device Not Recognized: Printers, scanners, or gaming mice may stop being detected entirely if their drivers are incompletely removed.
In the next several parts, you can see some free methods to clean harmful old drivers.
How to Uninstall Drivers From Device Manager?
The first method is a built-in option called Device Manager. Free, intuitive, but not as functional as you imagine. You can open this default program to view all the drivers you currently have installed on your PC, including those downloaded along with Windows updates. This tool is pretty basic and cannot tell you which driver is outdated or which driver needs to be cleaned, and most pitifully, this tool cannot help you uninstall all old drivers in one click. So if you know your system well, you can use this tool to uninstall drivers.
Here is how to uninstall drivers from Device Manager:
Step 1. Right-click the Start button and select Device Manager.
Step 2. Expand the category (e.g., "Display adapters" for a GPU).
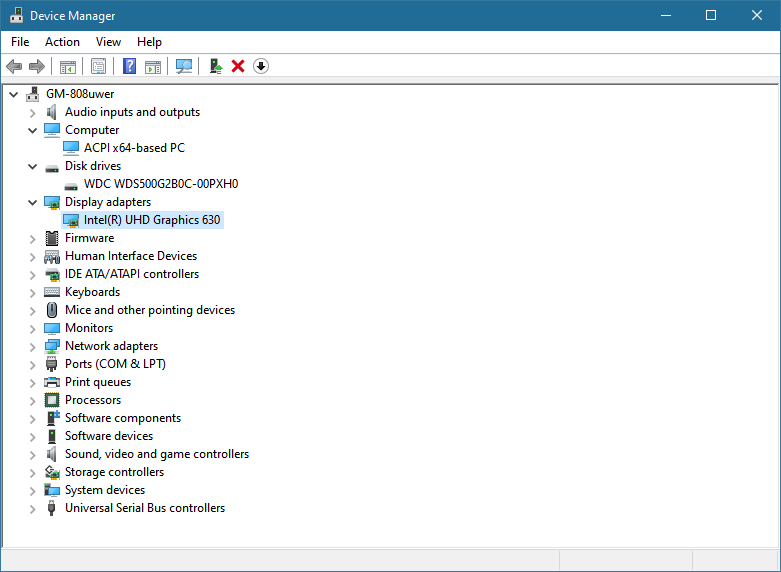
Step 3. Right-click the target device and select Uninstall device.
Step 4. Check the box "Delete the driver software for this device" (if available) and click Uninstall.
However, this method has two major downsides:
1. Incomplete Removal: Device Manager almost always leaves behind residual files, registry entries, and user settings. This can cause conflicts when you install a new version or a different brand's driver.
2. Automatic Reinstallation: Windows Update is aggressive. As soon as you reboot, Windows often automatically scans and reinstalls the same problematic driver it just removed, wasting your efforts.
Therefore, if you truly want to know how to delete drivers in Windows 11 or older versions permanently, Device Manager is not a helpful solution. It is best to temporarily disable or remove non-critical drivers, like a problematic Bluetooth adapter, before a clean reinstall. For deep cleaning, especially for GPUs, you need better tools.
How to Safely Uninstall and Reinstall Drivers?
For a safe, complete, and user-friendly process, IObit Driver Booster is the optimal choice. This software lists all the drivers on your PC, showing the date they were installed and whether there are new versions for the driver. It allows you to uninstall drivers directly from the driver list, without needing any separate uninstaller tool. And it scan and collects all the unused drivers that can be cleaned. Driver Booster is the ideal answer for those searching for how to uninstall and reinstall drivers without technical headaches.
How to uninstall and reinstall drivers directly with Driver Booster?
Step 1. Download and install Driver Booster from the official site. Or press the button below to download this software for free.
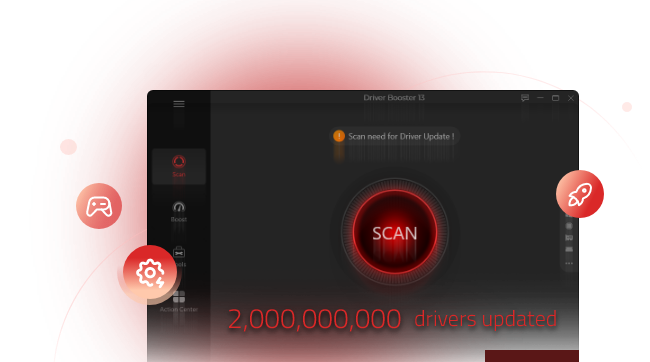
Step 2. Run a scan. Driver Booster will display all outdated, missing, or problematic drivers on your PC.
Step 3. Find the driver you wish to remove from the scan results list. Click the Uninstall button next to that driver. (Modified: Previously described Toolbox → Driver Uninstaller. Now describes direct uninstall from the driver list.)
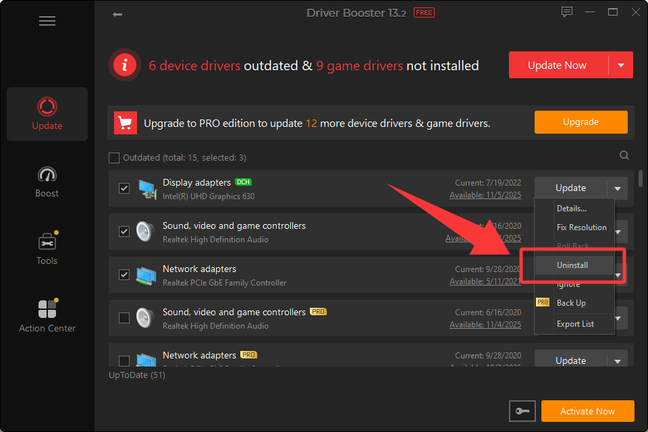
Step 4. Driver Booster will remove the driver completely. After uninstallation, you can choose to reinstall the latest stable driver — either by running a new scan and clicking Update, or by using the automatic reinstall prompt if available. Reboot your PC if prompted.
Core Features of Driver Booster Relevant to Uninstallation:
Direct Uninstall — Uninstall any driver with one click from the scan results. (New: Highlights the direct uninstall feature.)
Automatic Driver Updates — After removing a problematic driver, scan and install the correct working version.
Backup & Restore — Automatically creates a backup before any uninstall, so you can roll back instantly.
Fix Common Issues — Directly fixes sound, network, or graphics issues caused by bad driver states.
Driver Booster Free
- Automatically scan and update drivers.
- Update game ready drivers for peak gaming performance.
- Identify and fix various common of hardware issues.
- Boost 30% of system performance for fast & smooth running.
In Case You Need: How to Uninstall All Unnecessary Drivers Windows 11? Quick Scan and Removal
Also in Driver Booster, a handy feature hidden in a secret corner can help you uninstall all unnecessary drivers. Let's take a look.
Step 1. Open Driver Booster.
Step 2. Click the 'Tools' tab where the scanner for invalid device data is situated.
Step 3. Click on the ‘Fix Invalid Drivers’ button and let this software work on it.
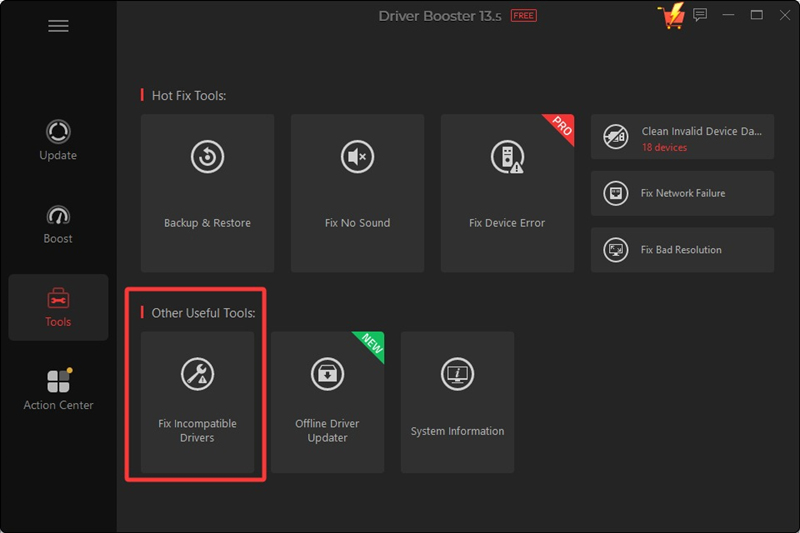
All the incompatible drivers you download will be deleted.
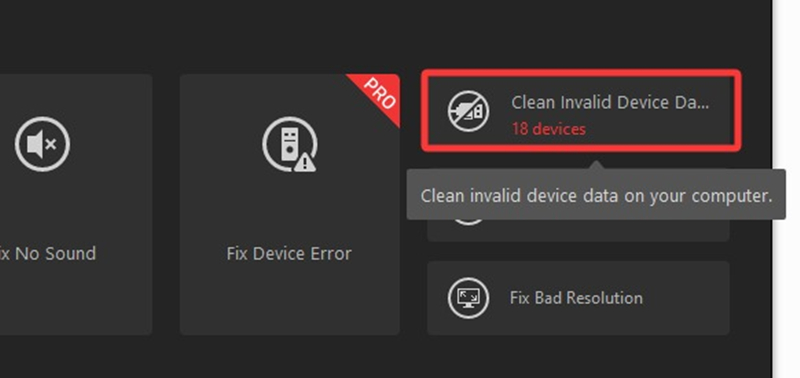
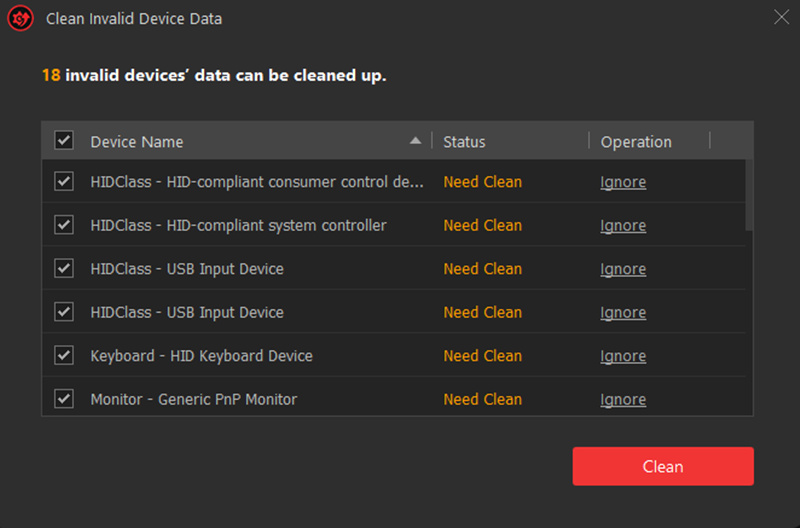
Bonus: You can also remove invalid device data and make your PC run faster.
Step 1. Click the 'Tools' tab where the scanner for invalid device data is situated.
Step 2. Remove all the invalid device data (Driver files will be safely kept where they were)
Unnecessary drivers can cause more problems than just taking up disk space. Old, corrupted, or leftover drivers may conflict with newer drivers, causing hardware detection issues, system crashes, BSODs, or unstable device performance. Please use IObit Driver Booster, the driver removal tool Windows 11/10, to clean your system for free.
Read Also: How to Update Chipset Drivers Windows 11? >>
How to Uninstall Drivers Windows 11 Without Device Manager?
If you prefer a free, open-source tool specialized to uninstall GPU drivers, Display Driver Uninstaller (DDU) is a quick answer. DDU completely scrubs all traces of display drivers from the registry and file system.
How to uninstall drivers with DDU:
Step 1. Download DDU from the official Wagnardsoft site. Extract it to a folder.
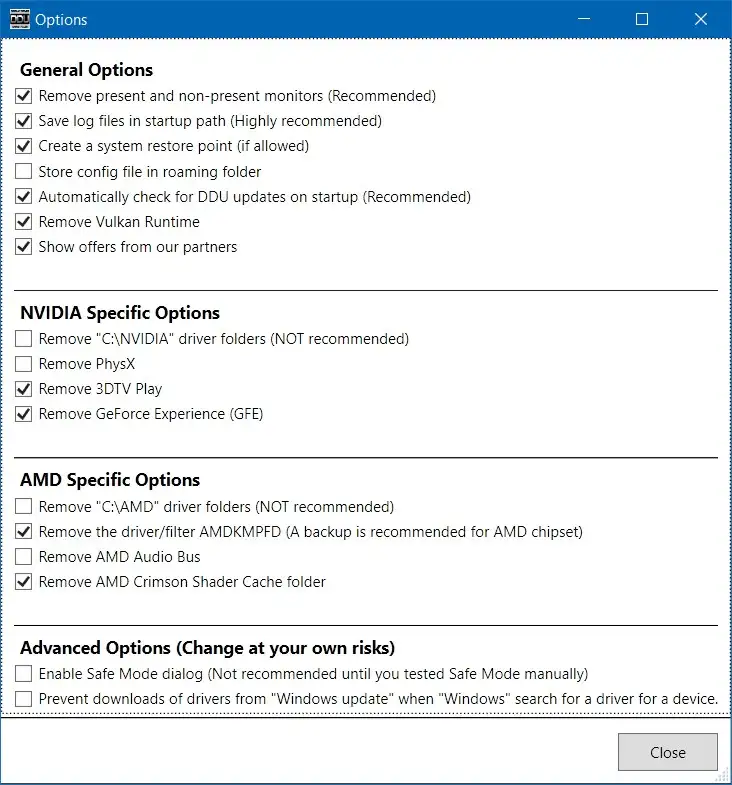
Step 2. Boot Windows into Safe Mode (Shift + Restart -> Troubleshoot -> Advanced Options -> Startup Settings -> Restart -> Press 4 or F4). DDU runs best in Safe Mode.
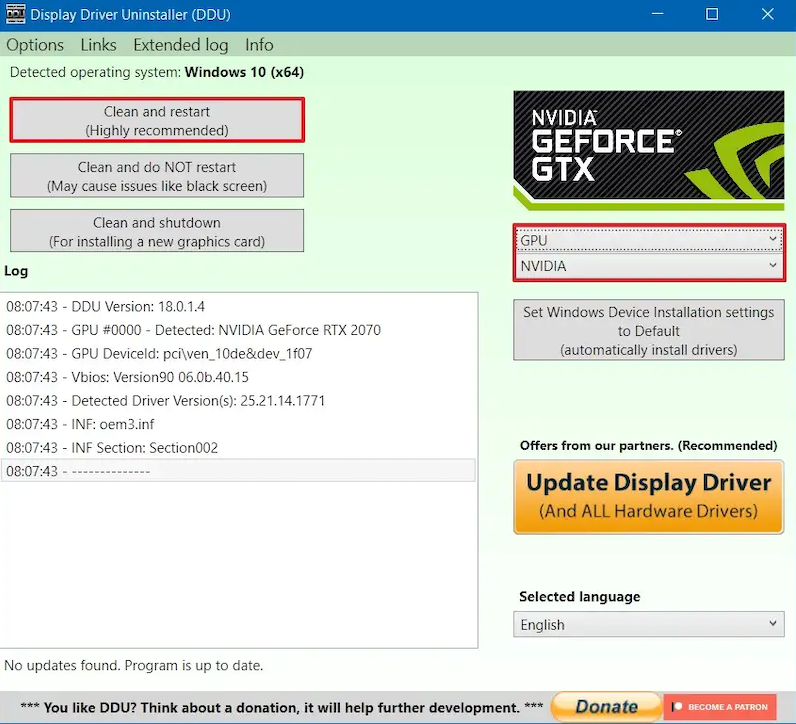
Step 3. Launch DDU. Choose your device type (GPU) and vendor (Nvidia, AMD, or Intel) from the dropdown menus on the right.
Step 4. Click the "Clean and restart" button. DDU will erase all driver files, folders, and registry keys, and then restart your PC normally.
After the reboot, Windows will use a basic display driver. You can now install a fresh GPU driver.
Note: DDU is powerful but lacks driver update or backup features. For full driver lifecycle management, Driver Booster remains the easiest, all-in-one solution.
Bonus Tip: How to Uninstall Drivers Nvidia/AMD?
For users specifically asking how to uninstall drivers NVIDIA or how to uninstall drivers AMD, here are the official approaches.
AMD provides the AMD Cleanup Utility, a dedicated tool designed to remove all AMD driver files and registry entries. It’s a small, free utility from AMD. Run it normally or in Safe Mode. It detects and removes all AMD graphics, chipset, and audio drivers automatically. After it wipes everything, it offers to restart your PC, leaving a clean slate for a fresh AMD driver install.
There is no official Nvidia driver uninstaller. Nvidia recommends using the standard "Uninstall a program" from Control Panel or using "Nvidia GeForce Experience" to perform a "Clean Installation" (which doesn't remove everything). For a truly complete removal of how to uninstall drivers Nvidia, manual cleanup is messy and risky.
I strongly urge you to use Driver Booster. Its Driver Uninstaller tool (covered in Part 3) fully cleans Nvidia drivers, including PhysX, audio, and display leftovers, much more thoroughly than manual methods. After cleaning, Driver Booster can instantly find and install the latest Game-Ready driver. This is the safest, most efficient way for how to uninstall drivers Nvidia.
Conclusion
Knowing how to uninstall driver correctly prevents crashes, black screens, and hardware conflicts. While Device Manager and DDU have their places, only IObit Driver Booster offers a one-click, safe solution for uninstalling, cleaning remnants, and automatically reinstalling the correct driver. Download Driver Booster today and manage your drivers with total confidence.
Driver Booster Free
- Automatically scan and update drivers.
- Update game ready drivers for peak gaming performance.
- Identify and fix various common of hardware issues.
- Boost 30% of system performance for fast & smooth running.