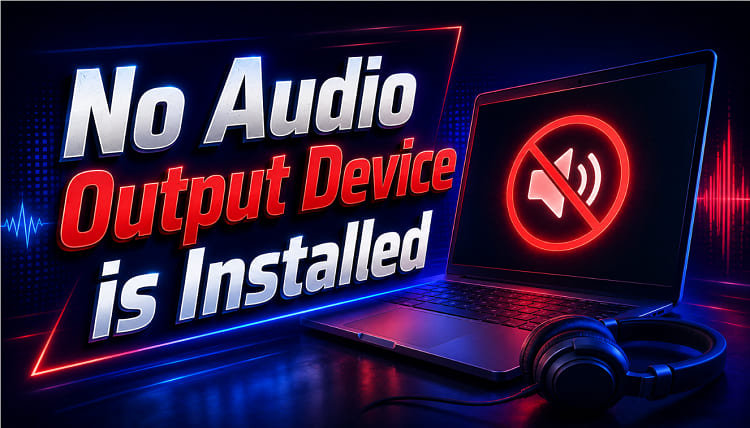
When Windows suddenly displays the message “no audio output device is installed”, your computer may stop producing sound completely. This issue can appear after a Windows update, driver failure, system change, or incorrect audio configuration. Whether you cannot hear music, videos, games, or meeting audio, the problem usually comes from Windows failing to recognize your speakers or headphones.
Fortunately, you do not need advanced technical skills to solve this error. In this guide, we will explain how to fix no audio output device is installed with practical methods.
Why Does "No Audio Output Device Is Installed" Appear?
Before applying any fixes, understanding why Windows cannot detect your audio device can help you choose the right solution. The error does not always mean your speakers or headphones are damaged. In many cases, the problem is caused by software conflicts, missing drivers, or incorrect system settings that prevent Windows from communicating with your audio hardware. The most common reasons include:
Outdated or corrupted audio drivers
Missing sound drivers after Windows updates
Disabled playback devices
Problems with Windows Audio services
Incorrect audio settings
Damaged Windows system files
Hardware detection failures
For laptop users, including those searching for Dell no audio output device is installed Windows 11, incompatible manufacturer drivers are also a frequent cause.
Method 1. Update Your Audio Driver Automatically with Driver Booster
Audio drivers act as a bridge between Windows and your speakers, headphones, or built-in sound hardware. When these drivers become outdated, corrupted, or incompatible with a Windows update, your system may fail to detect any output device. Therefore, updating the correct audio driver is usually the first and most effective step when fixing this error.
Instead of manually searching for the right audio drivers, you can use Driver Booster to scan your PC, detect missing or outdated drivers, and install compatible versions in just a few clicks.
Driver Booster Free
- Automatically scan and update drivers.
- Update game ready drivers for peak gaming performance.
- Identify and fix various common of hardware issues.
- Boost 30% of system performance for fast & smooth running.
Why Choose Driver Booster for Audio Driver Updates?
Driver Booster is a professional driver management tool designed to solve common hardware problems caused by missing or outdated drivers. It supports millions of drivers and can quickly identify whether your audio device requires an update, reinstallation, or repair.
Key Features of Driver Booster
Automatic Audio Driver Detection - Driver Booster scans your computer and detects missing, outdated, or damaged audio drivers that may cause the no audio output device installed error.
One-Click Driver Updates - It allows you to update Realtek Audio, Intel Smart Sound Technology, NVIDIA HD Audio, AMD Audio, and other sound drivers without searching manually.
Audio Problem Repair - Built-in repair tools help fix common sound-related problems caused by incorrect or incomplete driver installations.
Large Driver Database - With a massive driver database, Driver Booster improves compatibility across different PC brands, including Dell, ASUS, HP, Lenovo, and Acer devices. So, you can also use it for Lenovo driver update.
Driver Backup and Restore - Before updating drivers, Driver Booster can create backups, allowing you to restore previous versions if compatibility issues occur.
How to Update Audio Drivers with Driver Booster
Step 1. Download and install Driver Booster on your Windows PC.
Step 2. Open the program and click Scan. Wait for Driver Booster to detect outdated or missing drivers.
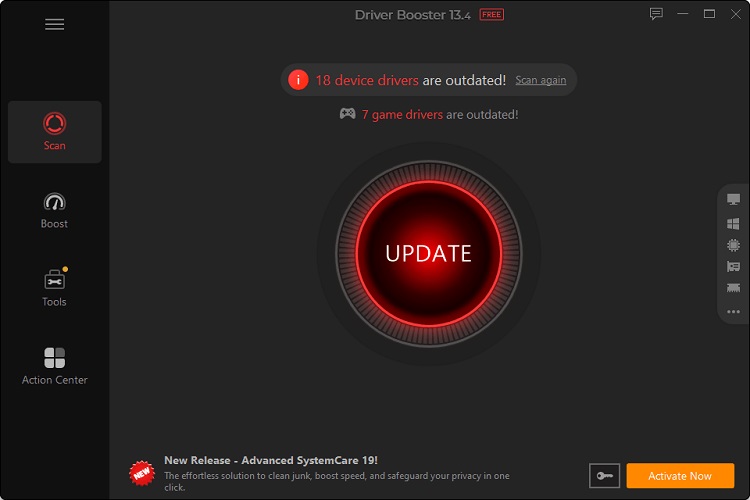
Step 3. Find your audio driver in the scan results and click Update to install the latest driver. Or you can click Update Now to update all drivers.
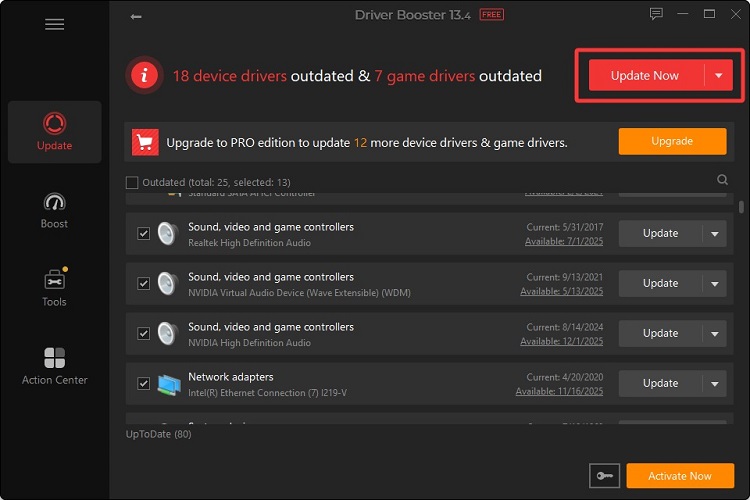
Step 4. Restart your computer and check whether your sound works again.
Method 2. Run Windows Audio Troubleshooter
After updating drivers, Windows still needs to correctly recognize and configure your audio hardware. If the problem continues, built-in Windows troubleshooting tools can automatically check common sound problems, including incorrect settings, disabled services, or device detection failures. This method is especially useful for users who encounter the issue after system updates or configuration changes.
Steps to Run Audio Troubleshooter
Step 1. Press Win + I to open Windows Settings.
Step 2. Go to System > Sound.
Step 3. Scroll down to the Advanced section.
Step 4. Under Troubleshoot common sound problems, select Output devices if you have no sound from your speakers or headphones.
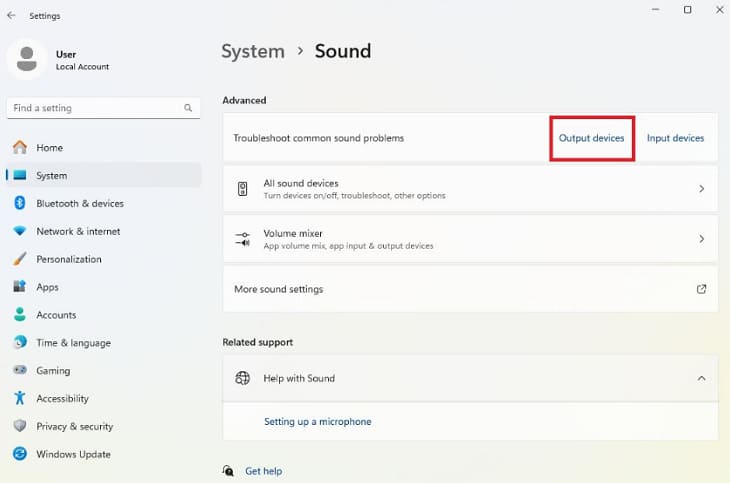
Step 5. Follow the on-screen instructions and allow Windows to scan for audio problems.
Step 6. Apply any recommended fixes, then test your audio again.
Method 3. Enable the Audio Output Device
Sometimes Windows detects your speakers or headphones but accidentally disables them. This can happen after driver updates, Windows upgrades, or changes in sound settings. When the playback device is disabled, Windows may display no audio output device is installed even though the hardware is working correctly. So, you’ll need to enable the audio output device. Here are the steps.
Steps to Enable Your Audio Output Device
Step 1. Press Windows + I to open Settings.
Step 2. Select System > Sound.
Step 3. Scroll down to Advanced and click More Sound Settings.
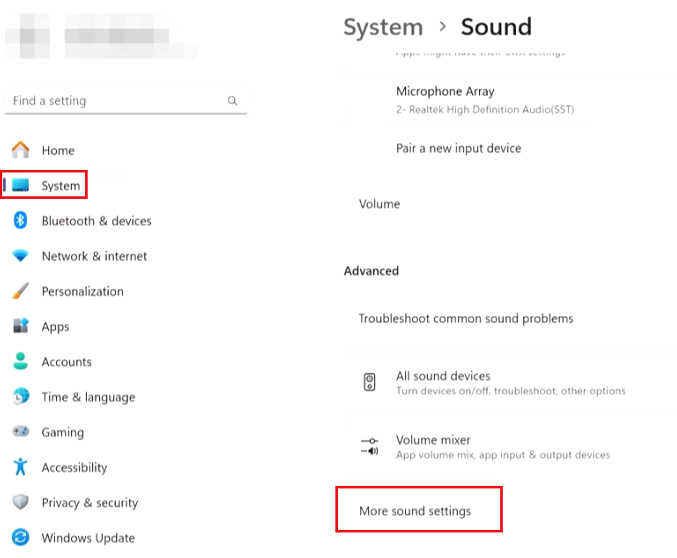
Step 4. On the More sound settings page, head to Playback tab and check if the device is disabled. If it is disabled, click Enable.
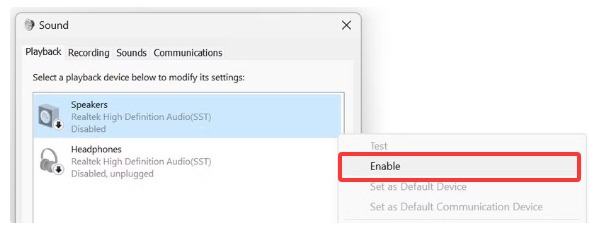
Step 5. Play some audio to check whether the sound has returned.
Method 4. Restart Windows Audio Services
Even with the correct drivers and enabled devices, Windows audio may fail if related services stop running properly. These background services control communication between your operating system and audio hardware. Restarting them can refresh the audio system and fix temporary software conflicts without requiring advanced changes.
Steps to Restart Windows Audio Services
Step 1. Press Windows + R to open the Run dialog.
Step 2. Type services.msc and press Enter.
Step 3. Scroll down to find Windows Audio.
Step 4. Right-click it and select Restart.
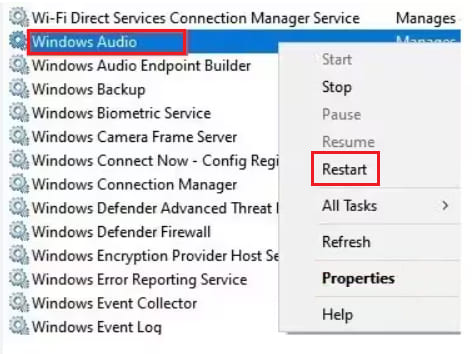
Step 5. Find Windows Audio Endpoint Builder.
Step 6. Right-click it and select Restart as well.
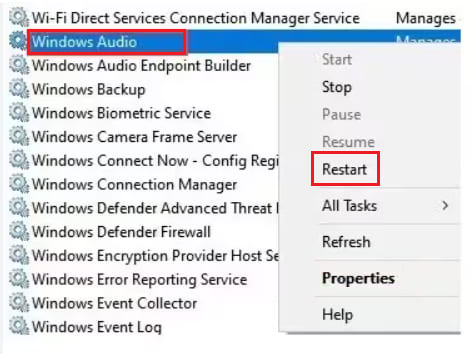
Step 7. Close the Services window and test your audio.
Method 5. Reinstall the Audio Driver Through Device Manager
If restarting audio services does not solve the problem, the installed audio driver may be corrupted or incorrectly configured. A damaged driver can prevent Windows from recognizing your speakers or headphones, causing the no audio output device is installed message to appear. Reinstalling the audio driver removes the existing driver files and allows Windows to create a fresh connection with your audio hardware.
Steps to Reinstall the Audio Driver
Step 1. Press Win + X and select Device Manager.
Step 2. Expand Sound, video and game controllers.
Step 3. Find your audio device, such as Realtek Audio or Intel Smart Sound Technology.
Step 4. Right-click the device and select Uninstall device.
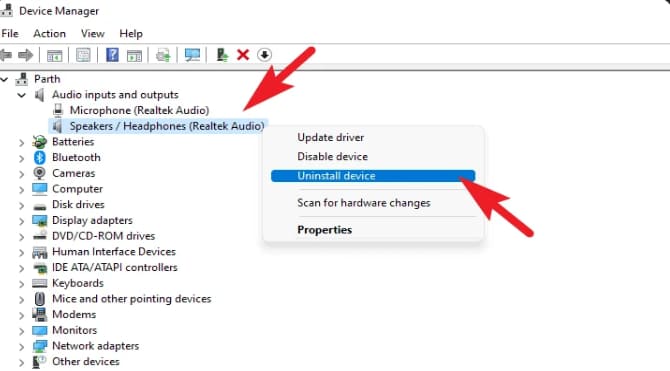
Step 5. Check Attempt to remove the driver for this device if available.
Step 6. Click Uninstall.
Step 7. Restart your computer. Windows will automatically reinstall a basic audio driver.
If Windows installs an outdated or incompatible driver, use Driver Booster to download the latest compatible audio driver for your device.
Method 6. Repair Corrupted Windows System Files
When your audio drivers and settings appear normal but Windows still shows no audio output device is installed how to fix, damaged system files may be preventing audio components from working correctly. Windows relies on many internal files to manage hardware detection and system services, so repairing corrupted files can restore normal communication between your PC and audio devices.
H3: Steps to Run System File Checker
Step 1. Search for Command Prompt in the Windows search bar.
Step 2. Select Run as administrator.
Step 3. Type the following command:
sfc /scannow
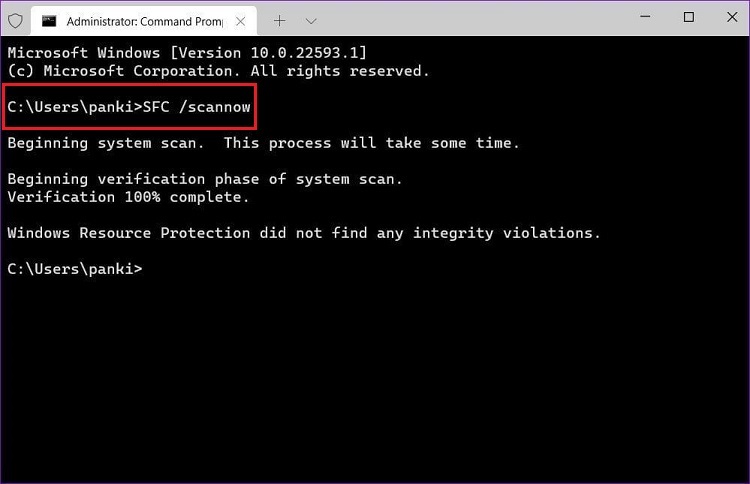
Step 4. Press Enter and wait for the scan to complete.
Step 5. After the repair process finishes, restart Windows and check whether your audio device is detected.
Method 7. Check Windows Update and Optional Driver Updates
Windows updates can sometimes replace existing drivers with generic versions that do not fully support your hardware. This is a common reason users experience no audio output device is installed Windows 11 after upgrading or installing a system update. Checking for additional driver updates can help Windows restore compatibility with your sound hardware.
Steps to Check Audio Driver Updates in Windows
Step 1. Press Win + X and select Device Manager to open it.
Step 2. Expand Sound, video and game controllers.
Step 3. Locate your speakers, sound card, or other audio device.
Step 4. Right-click the device and select Update driver.
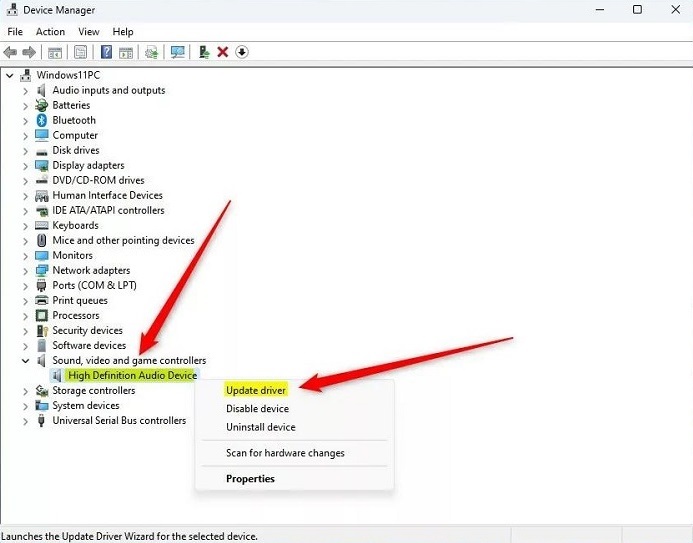
Step 5. Choose Search automatically for drivers.
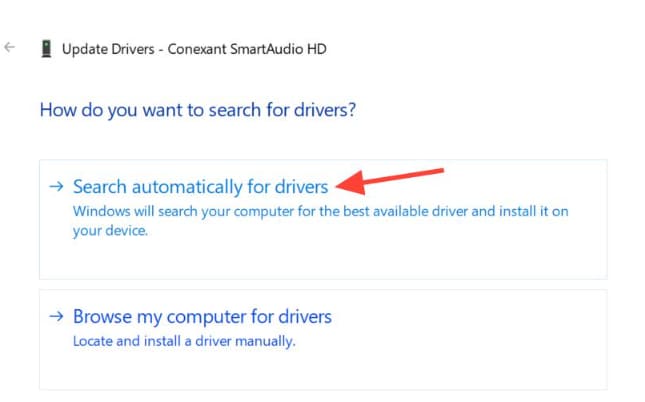
Step 6. Windows will check for an available driver.
Step 7. If a newer compatible driver is found, follow the on-screen instructions to install it.
Method 8. Install Manufacturer Audio Drivers
For some computers, especially laptops, generic Windows drivers may not provide full hardware support. Manufacturers often customize audio drivers for specific devices, so installing the official driver package can fix detection problems that standard updates cannot resolve. This solution is particularly helpful for users searching for Dell no audio output device is installed in Windows 10 or 11.
Steps to install audio drivers from your manufacturer's website:
Step 1. Identify your PC model.
Press Windows + X and select Device Manager.
Expand Sound, video and game controllers.
Note the name and model of your audio device.
Identify Your PC Model
Step 2. Visit your manufacturer's official support website.
Step 3. Search for your computer model or audio device.
Step 4. Select your version of Windows, such as Windows 11 64-bit.
Step 5. Download the latest audio driver.
Step 6. Install the driver package and restart your computer.
Bottom Line
When Windows cannot detect speakers or headphones, the issue is usually caused by drivers, services, or system settings rather than hardware failure. Start by checking disabled devices and restarting audio services, then proceed to reinstalling drivers or repairing system files if necessary.
For a quicker fix, this automatic driver updater - Driver Booster can automatically detect and update faulty audio drivers. Whether you face no audio output device is installed, or similar issues on Windows 11, Windows 10, or Dell laptops, keeping drivers updated helps ensure stable sound performance.