Miniconda may be necessary if you regularly use Python on your computer in order to manage Python versions and build separate Conda environments. However, you might not require Miniconda after a project is completed. It may become necessary to uninstall it in order to free up disk space.
The issue is that Miniconda occasionally crashes or malfunctions when being uninstalled. PATH entries, configuration files, and Conda commands might still be present even after the main program has been deleted. In order to help you get rid of unwanted Miniconda leftovers more thoroughly, this guide offers multiple methods to uninstall Miniconda on Windows, macOS, and Linux.

Cannot Uninstall Miniconda Entirely: 4 Reasons
Perhaps you might have already attempted to deal with the problem manually, but there might be a chance that you encounter the following issue reported by many users—Uninstall Miniconda paths not working. It generally implies that the primary executable of the software hasn't been successfully uninstalled, whereas scripts, PATH, environment files, or other hidden settings haven't been fully deleted.
Here are four possible causes why uninstall Miniconda doesn't work properly:
1. Cannot uninstall Miniconda
The uninstaller's malfunctioning is the most frequent and evident problem. A "Failed to run pre-uninstall" error message might appear when you begin the uninstallation process, which would stop it from finishing. This usually results from an issue with Miniconda's installation files or uninstallation script, which stops conventional uninstallation techniques from functioning.
2. Uninstall Miniconda paths not working
Python may still refer to Conda even after the main Miniconda program has been successfully removed.
The PATH is typically the issue: Miniconda may add its own paths to the system environment variables during installation, but these paths are not deleted with the program. As long as the relevant paths remain in the PATH, the system may continue to prioritize the Conda version of Python.
3. Uninstall Miniconda without deleting environments
If you still have active project environments stored in Miniconda, the uninstallation process may accidentally delete important files. Some individually created Conda environments may contain specific versions of Python, dependencies, and project configurations.
Therefore, it is recommended that you check which environments you still need to use and back them up before beginning the uninstallation.
4. Miniconda is still there after uninstall
Another somewhat confusing situation is when the uninstallation process appears to be complete, but the conda command is still usable and the Miniconda folder remains. This usually means that Conda configurations, PATH entries, or installation directories are still present on the system. In this case, simply deleting the main executable does not constitute a truly thorough uninstallation.
How to Uninstall Miniconda on Windows Entirely
Many basic programs in Windows can help you run the software uninstallation process—but to achieve a clean uninstall Windows 11/10, you need to do more than simply remove the main program. Additionally, you must manually search your device's various locations for any remaining data and clean it up.
This guide suggests using IObit Uninstaller if that seems like too much trouble or if you're concerned about inadvertently erasing crucial files. In addition to removing the Miniconda main program, this free uninstaller can check for any associated leftovers. You can still use Force Uninstall even if the system keeps blocking you from removing it.
Here is how to uninstall Miniconda using this best uninstaller for Windows 11.
Step 1. Download and install IObit Uninstaller on your Windows PC, then launch the software.
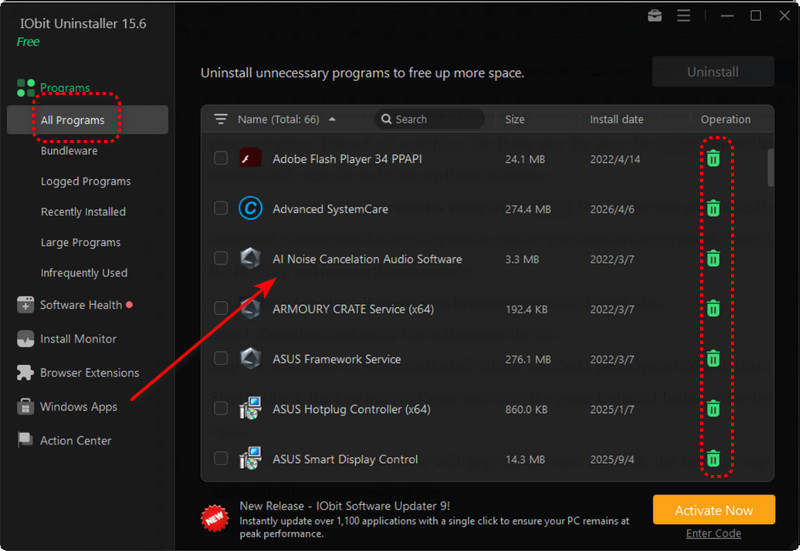
Step 2. Click Programs > All Programs on the left sidebar and find Miniconda in the program list.
Step 3. Check Miniconda and click Uninstall on the right side of the page. Then confirm the uninstallation in the new window.
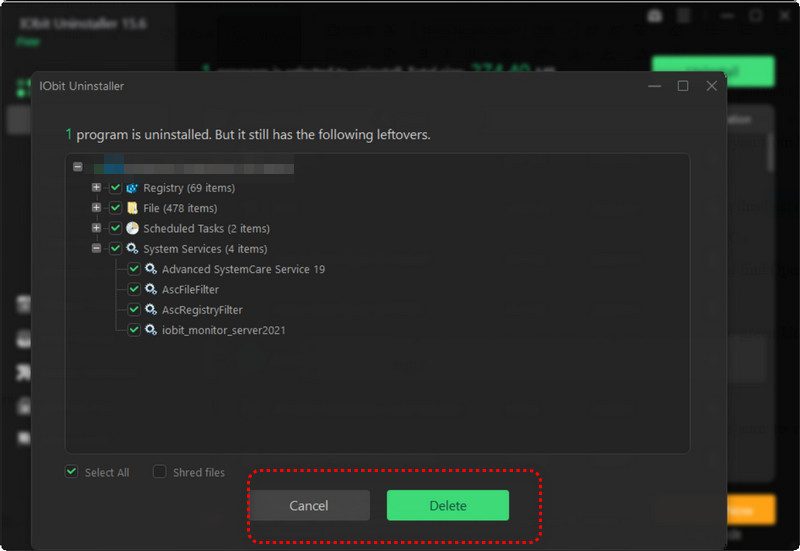
Step 4. After the main program has been uninstalled, IObit Uninstaller will scan for remaining files, folders, and registry entries. Once you confirm that these items are all related to Miniconda, select them for removal.
Core Features of IObit Uninstaller
·Complete Program Uninstallation: IObit Uninstaller will remove the program entirely once you give it the task. You can avoid the trouble of finding the program package yourself by simply choosing the target program and confirming the uninstallation.
·Leftover File & Registry Cleanup: IObit Uninstaller keeps searching for Miniconda-related files, folders, registry entries, and other leftover traces after the main program has been deleted. You can manually choose which items require additional cleanup.
·Powerful Uninstall & Forced Uninstall: How to fix Windows cannot find when uninstalling? If Miniconda cannot be removed through the normal method because of corrupted files or an unresponsive uninstaller, you can try Force Uninstall to completely remove stubborn data—with the same clean and hassle-free experience.
Tips: Have other questions? Click to learn the most reliable method for how to force uninstall programs.
·Software Health Monitoring: To keep your Windows system cleaner, IObit Uninstaller offers features like Software Health, which can check for software leftovers, out-of-date programs, and other related issues in addition to software uninstallation.
Advice: Before uninstalling Miniconda, make sure to identify and back up any crucial Conda environments you still have. In this manner, you can finish the cleanup without inadvertently erasing files that are essential to your ongoing projects.
How to Uninstall Miniconda on macOS Completely?
If you're a Mac user, Finder, which is built into macOS, can be your most helpful tool when you want to uninstall Miniconda. The basic idea is simple: first remove the application, then check the relevant folders for any leftover files.
Here is how to uninstall Miniconda on a Mac using Finder.
Step 1. Open Finder on your Mac.
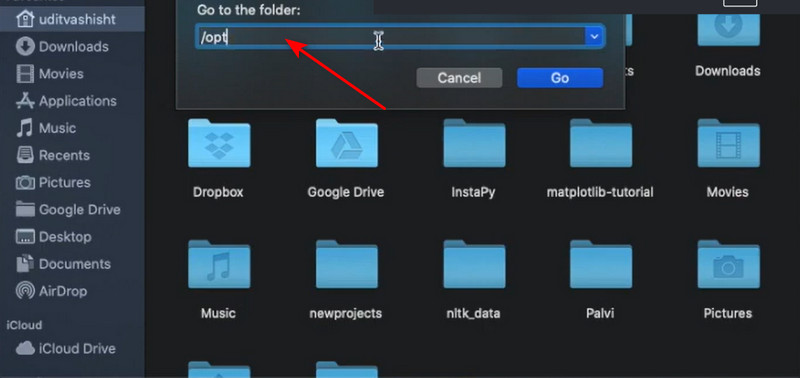
Step 2. Click Go > Go to Folder from the menu bar, then enter one of the following paths:
~/miniconda3
Or, if Miniconda was installed system-wide:
/opt/miniconda3
Press Enter to open the Miniconda installation folder.
Step 3. Once inside the Miniconda folder, press Command + A to select all files and folders. Right-click the selection and choose Move to Trash.
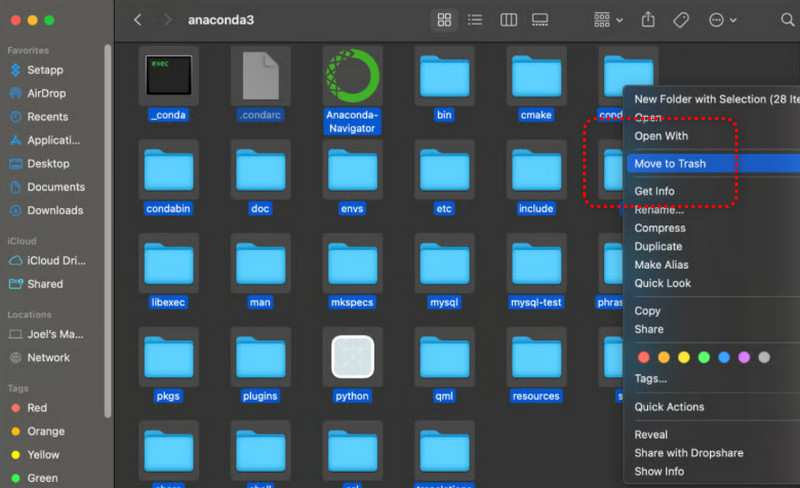
If you want to remove the entire miniconda3 folder, go back to its parent directory, select the folder, and move it to the Trash instead.
Step 4. Finally, right-click the Trash icon in the Dock and select Empty Trash. This permanently uninstall Miniconda macOS.
How to Uninstall Miniconda Ubuntu (Linux)?
The steps to uninstall Miniconda on Linux are also quite simple. The basic idea is to delete the installation directory through Terminal and then remove the Miniconda path from the Shell configuration.
This process may involve using a few commands, so you can follow the steps below.
Here is how to uninstall Miniconda on Ubuntu.
Step 1. Miniconda is usually installed in your home directory, often under ~/miniconda3. To check whether the folder is there, run:
ls ~ | grep miniconda
Step 2. Once you've confirmed the installation path, use rm -rf to remove the folder. For example:
rm -rf ~/miniconda3
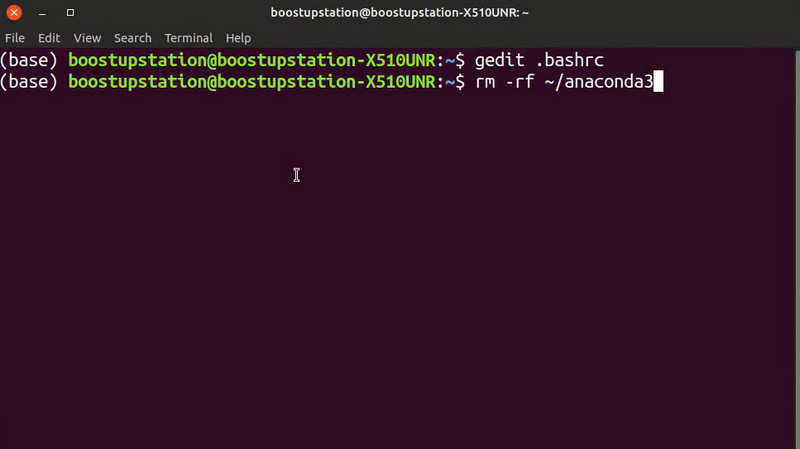
Double-check the path before running this command. rm -rf permanently deletes the specified folder and everything inside it.
Step 3. Miniconda may have added its path to your Shell's PATH during installation. To finish the uninstall, remove those entries as well.
Open the .bashrc file:
nano ~/.bashrc
Look for entries similar to:
# added by Miniconda3 installer
export PATH="/home/username/miniconda3/bin:$PATH"
Delete the Miniconda-related lines, then save and close the file. If you use another Shell, check its corresponding .bash_profile or configuration file as well.
Step 4. Run the following command to reload your Bash configuration:
source ~/.bashrc
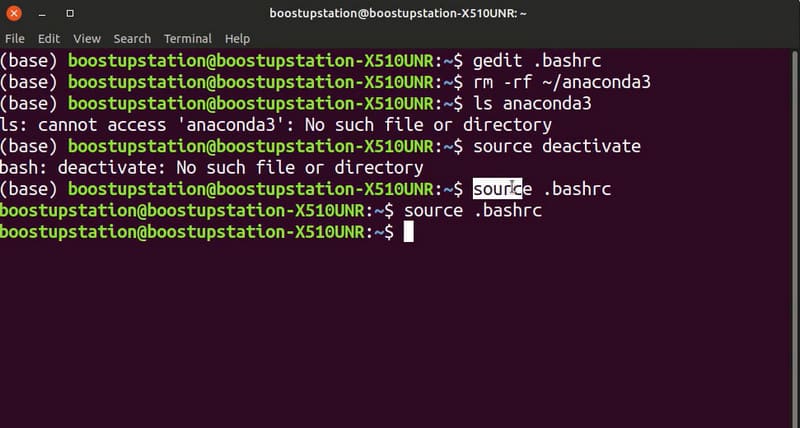
Finally, restart Terminal and check whether Miniconda has been removed from your Ubuntu system.
Common Problems After Uninstalling Miniconda
You may believe that everything has been removed after uninstalling Miniconda, only to discover that a few annoying leftover files are still causing issues. When using Visual Studio Code or other development tools, this is particularly typical. The following are three potential problems and their fixes:
1. PATH Still Contains Miniconda
The system may keep giving priority to the Python or Conda versions that come with Miniconda if the Miniconda path is still present in the PATH environment variable. Because of this, typing conda in the terminal may still produce errors or unexpected paths even if the main installation folder has been removed.
Fix: Examine your shell configuration file and delete any PATH entries connected to Miniconda.
2. VS Code Still Detects Conda
Have you uninstalled Miniconda but still see Conda environments in VS Code? Don't worry—this is likely because VS Code still remembers the interpreter path you used previously. Additionally, other Conda environments may still exist on your system.
Fix: Choose the Python interpreter you want to use by opening the Python Interpreter settings in Visual Studio Code.
3. Python Still Points to Conda
Another frequent problem is that the Python or Python3 commands continue to refer to the previous Conda installation directory even after Miniconda has been uninstalled. Leftover PATH entries or shell configurations are typically the cause of this.
Fix: To precisely determine the location of the current Python interpreter, clean up the pertinent configurations, restart the terminal, and then execute the which python or which python3 command.
Bonus Tip: Manually Remove Leftover Miniconda Files
It's time to wrap things up.
Certain hidden apps, configurations, caches, and environment files might still be on your device even after the main Miniconda application has been deleted. You can manually locate and remove them, but be sure the files you choose are truly Miniconda's.
Hopefully, the following breakdown will help you learn how to delete hidden apps and files of Miniconda without accidentally removing other Conda environments or project data.
.condarc: This is Conda's configuration file. If you no longer use Conda, you can delete it.
.conda: This directory may contain Conda user configurations and environment-related data. You can remove it if you no longer need these files.
.continuum: Some older Conda/Anaconda installations may leave this directory behind. If you no longer use them, it can be deleted.
Package cache: Conda's downloaded package cache can take up considerable disk space. Check and clean the relevant cache directories if necessary.
Environments: Check your Conda environment directories and make sure there are no virtual environments you still need before deleting them.
PATH: Examine your PATH environment variable and eliminate entries that refer to directories like miniconda3/bin.
Shell profile entries: Examine Shell configuration files like.bashrc,.bash_profile, or.zshrc, and delete any initialization code that Miniconda may have added.
You can verify whether Miniconda has been fully eliminated by reopening Terminal and using commands like which python and which conda after verifying these items.
Conclusion
It takes more than just deleting the main program to fully uninstall Miniconda, whether you're using Windows, macOS, or Linux. Caches, configuration files, PATH entries, and Conda environments may still persist and cause issues in the future.
To safely clean them up, use the above techniques. IObit Uninstaller makes it simpler for Windows users to get rid of Miniconda and its residue. Try it for a hassle-free, cleaner uninstall!
IObit Uninstaller Free
- Complete forced uninstallation for stubborn programs.
- Uninstall a batch of programs at once.
- Scan and remove leftover files, folders, and registry entries.
- Support the management of Universal Windows Platform apps.