Outdated addresses, misspelled emails, exposed passwords, and old payment suggestions can make online forms inconvenient or risky. Chrome stores several types of personal information, so delete autofill Chrome data may involve more than one type of cleanup. Some users want to delete autofill from Chrome in bulk, while others only need to remove autofill on Chrome for one incorrect entry. This guide explains five methods to delete autofill Chrome data, from Chrome’s built-in controls to a broader Windows privacy tool, so you can choose the right level of removal.

What Autofill Data Does Google Chrome Save?
Before deleting anything, identify which category contains the unwanted information. Chrome separates general form entries from passwords, addresses, and payment methods. Some items may also be stored in your Google Account or Google Wallet instead of only on the current computer.
Saved Passwords and Login Details: Chrome can store usernames, passwords, and passkeys through Google Password Manager to make future sign-ins faster and easier.
Saved Addresses and Contact Information: Chrome may save names, phone numbers, email addresses, postal addresses, and other contact details for completing forms automatically.
Saved Payment Methods: Chrome can store card information for quicker checkout, while some payment details may be managed separately through Google Wallet.
Individual Form Data: Chrome may remember previous entries from ordinary form fields, iincluding names, company details, phone numbers, and other information previously entered into form fields, and other custom responses you entered.
Changes to synced information can appear on other devices signed in to the same Google Account. Wallet-based payment methods may require separate deletion.
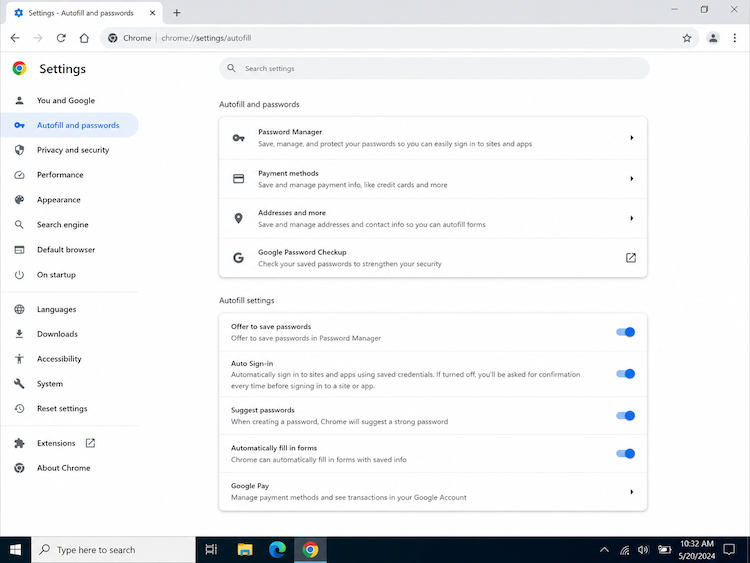
Method 1: Delete All Autofill Data at Once
This method suits users who want to remove many saved form entries together. It mainly clears autofill form data, so leave passwords, cookies, history, and other categories unchecked unless you also want them deleted. Clearing this category may not remove addresses or payment information stored in Google Wallet.
How to Delete All Autofill Data at Once in Chrome
Step 1. Open Chrome and select the three-dot menu in the upper-right corner.
Step 2. Select Delete browsing data, and then open the Advanced tab.
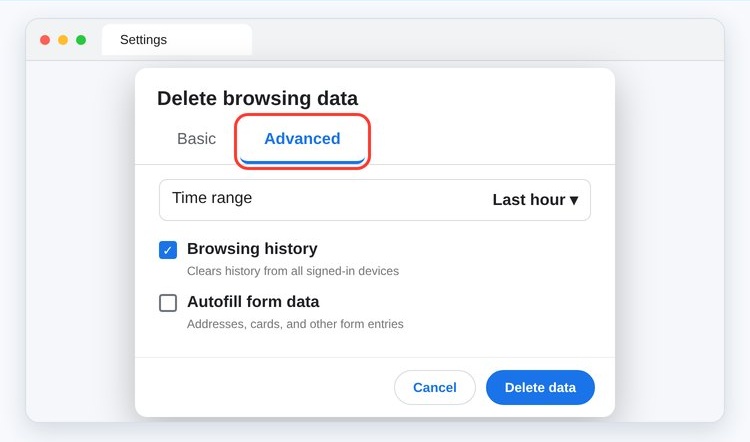
Step 3. Choose a time range. Select All time if you want to remove every matching entry.
Step 4. Select Autofill form data and deselect unrelated categories.
Step 5. Select Delete data to complete the process.
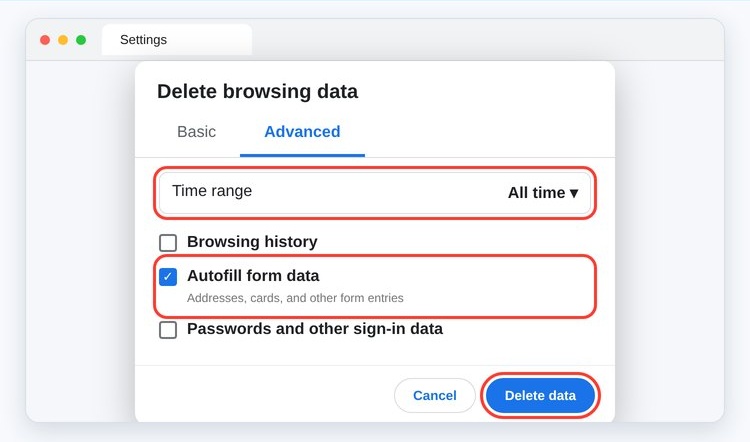
Use this approach to delete autofill from Chrome in bulk. Regular browser cleanup can also be part of broader PC maintenance. If your computer is slowing down beyond Chrome, a PC optimizer can help address system-wide performance issues.
Method 2: Delete a Single Autofill Entry in Chrome
When only one incorrect email, phone number, or text suggestion appears, there is no need to clear everything. Open the affected form, type enough characters to display the suggestion, and highlight the unwanted entry with the arrow keys.
On Windows, press Shift + Delete after highlighting the entry. Chrome’s suggestion system supports removing eligible individual items from the active popup. If the shortcut or a visible delete control is unavailable, manage the saved information through the category settings in Method 3.
How to Remove One Specific Autofill Suggestion
Step 1. Open the webpage where the incorrect suggestion appears.
Step 2. Click the relevant form field and type until the entry is displayed.
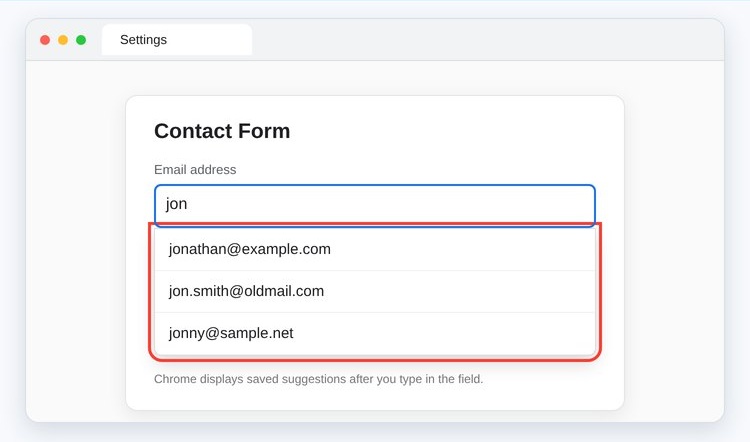
Step 3. Use the arrow keys to highlight the unwanted suggestion.
Step 4. Press Shift + Delete on Windows.
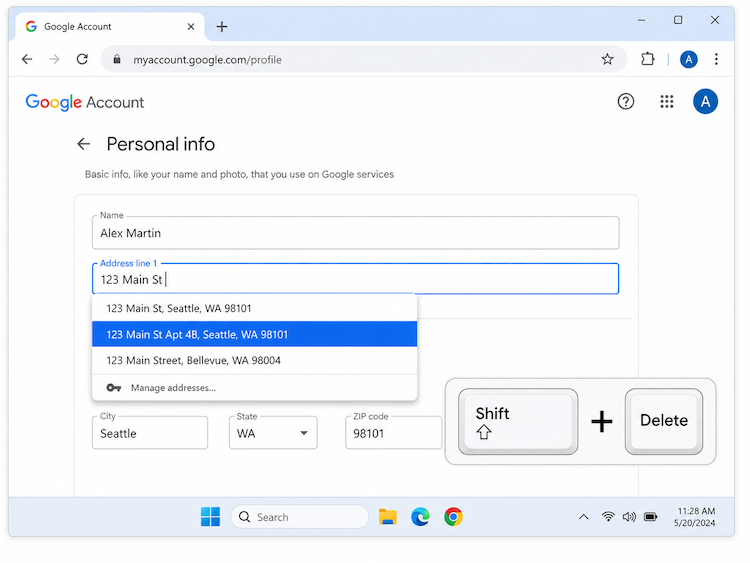
This lets you delete autofill Chrome suggestions without affecting other saved records. Removing incorrect autofill suggestions keeps form filling more accurate. If your main issue is slow webpage loading instead, you can also learn how to boost internet speed on PC with several practical Windows tips.
Method 3: Manage or Delete Specific Addresses, Passwords, or Payment Methods
Use Chrome’s category pages when you want to inspect, edit, or selectively remove saved information. Current desktop interfaces place these controls under Autofill and passwords or Passwords and autofill, depending on the Chrome page you open. This selective route is useful when you need to delete autofill Chrome data by category.
How to Delete Saved Addresses and Contact Information
Step 1. Open Settings > Autofill and passwords > Addresses and more.
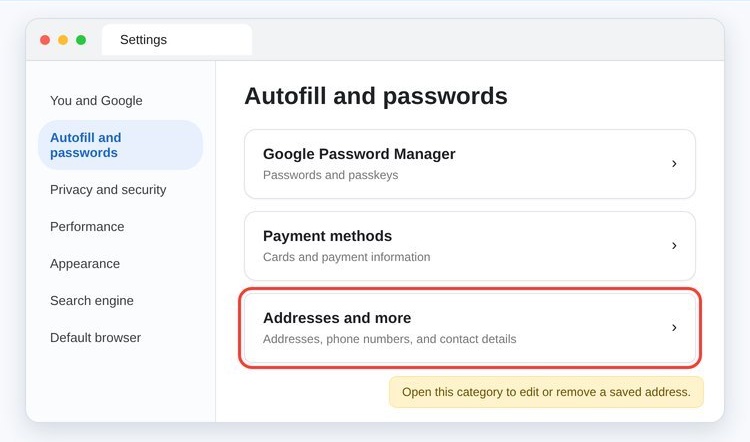
Step 2. Find the address or contact record you no longer need.
Step 3. Click the three-dot More menu next to the saved address, then select Delete.
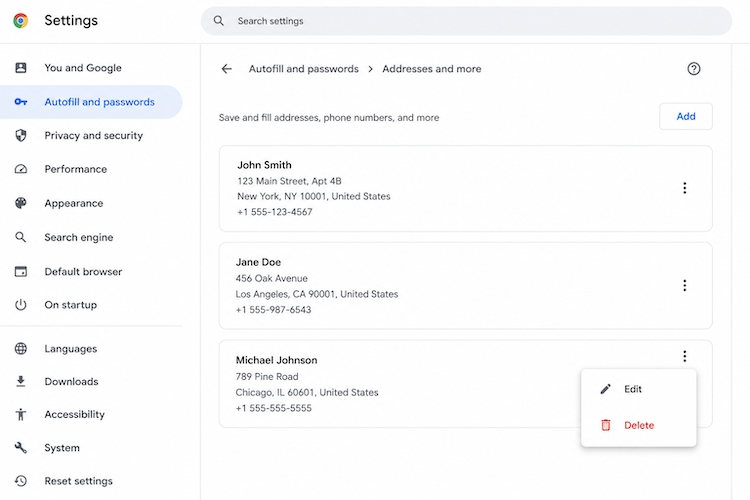
Step 4. Repeat the process for any other outdated entries.
How to Remove Saved Payment Methods
Step 1. Open Settings > Autofill and passwords > Payment methods.
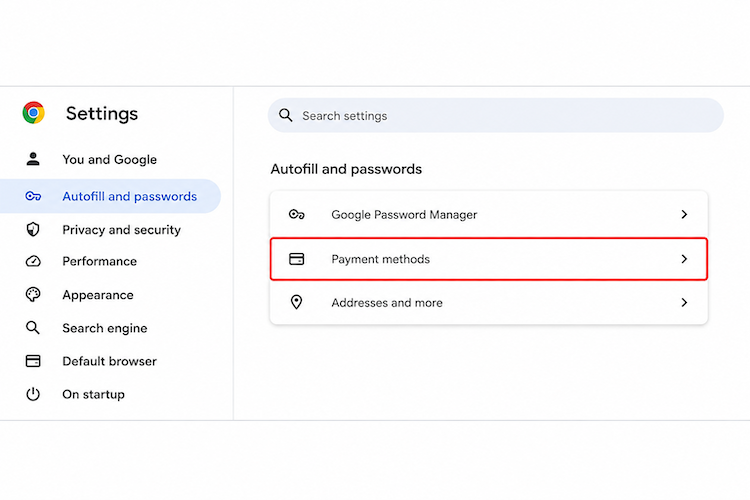
Step 2. Locate the card or payment record.
Step 3. Open its menu and select Remove.
Step 4. If Chrome redirects you to Google Wallet, remove the payment method from the Wallet page.
How to Delete Saved Passwords in Google Password Manager
Step 1. Open the Chrome menu and select Passwords and autofill > Google Password Manager.
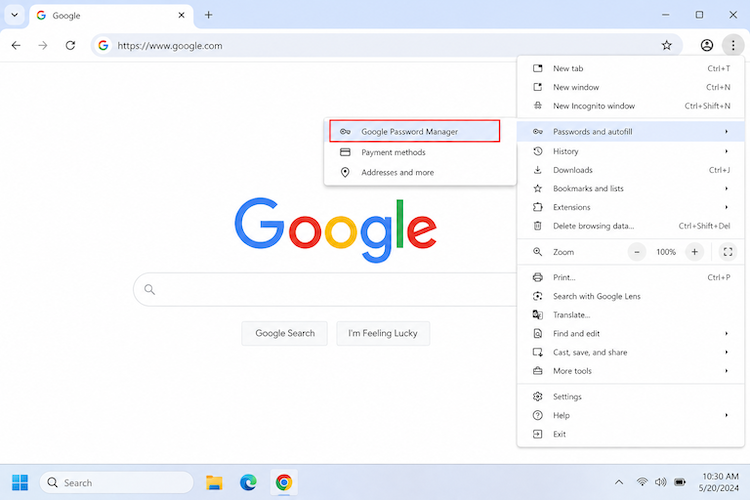
Step 2. Under Passwords, select the website entry you want to remove.
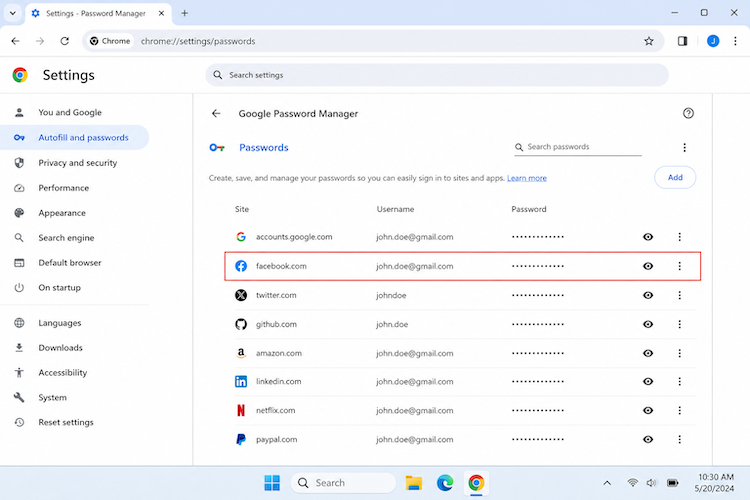
Step 3. Verify your identity if Chrome requests authentication.
Step 4. Select Delete. Google Password Manager also provides an option to delete all manager data when a complete reset is necessary.
These controls explain how to delete autofill on Google Chrome without clearing every type of browser data. Managing saved Chrome data improves privacy and form accuracy, while connection-related problems require different solutions. A TCP optimizer may be useful when you want to adjust network settings for better performance.
Method 4: Delete Chrome Autofill with IObit Advanced SystemCare
Users who prefer one Windows interface for several browser privacy categories can use Advanced SystemCare. Its Privacy Sweep module is designed to remove activity history and browsing traces, supports Chrome, and can scan privacy traces across Windows user accounts.
IObit lists browsing history, cookies, saved passwords, and other sensitive browser data among the information Privacy Sweep can remove. Close all Chrome windows before scanning so the program can inspect active browser files more thoroughly.
Advanced SystemCare Free
- Clean: 420 billion traces removed & 85 EB junk files cleaned
- Protect: 80 million unauthorized access blocked & 20 million bugs fixed
- Speed Up: 6 million hours of startup time saved & Turbo boost
- Optimize: Auto clean and auto care your PC with AI mode

Why Use Advanced SystemCare to Delete Chrome Autofill?
Clean multiple Chrome data types: Review available categories such as form information, passwords, cookies, history, cache, sessions, and related traces.
Choose exactly what to remove: Select only the Chrome privacy categories you want to clean while leaving passwords, cookies, history, or other data unchecked.
Use one organized interface: Manage several browser privacy areas from one Windows dashboard, reducing the need to open multiple Chrome settings pages separately.
Clean different Windows accounts: Privacy Sweep can inspect privacy traces associated with all user accounts on the computer.
Remove broader privacy traces: Clear selected browser and application activity traces beyond autofill suggestions for a more comprehensive privacy cleanup routine.
Enable secure file deletion: Use the separate File Shredder for exported files or backups requiring permanent deletion.
File Shredder applies to local files rather than individual Chrome database records. IObit states that files removed by this tool cannot be recovered through its undelete utility.
How to Delete Chrome Autofill with Advanced SystemCare
Step 1. Download and install Advanced SystemCare, and then close all Chrome windows.
Step 2. Open Care, switch to Manual Mode, and select Privacy Sweep.
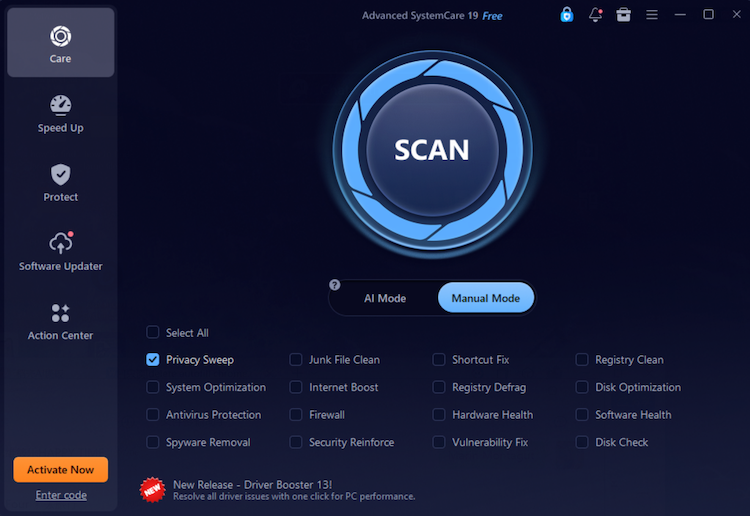
Step 3. Open Settings and review the available Google Chrome privacy categories. Leave any information you still need unchecked.
Step 4. Start the scan and open the Privacy Sweep results.
Step 5. Confirm the selected Chrome entries and select Fix.
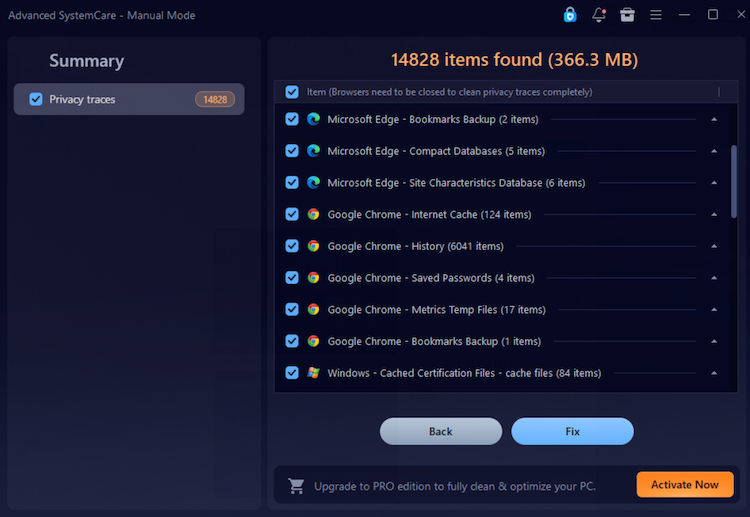
This method can delete autofill Chrome information with other approved privacy tools, but the scan results should always be reviewed first. Advanced SystemCare also includes broader PC maintenance tools beyond browser privacy. If high memory usage is another concern, this RAM optimizer Windows 11 guide explains additional ways to manage RAM usage.
Method 5: Turn Off Autofill Completely in Chrome
Turning off autofill prevents Chrome from saving or suggesting new personal information, but it does not necessarily erase records that have already been stored. Delete existing entries first with one of the previous methods.
Depending on your Chrome version and region, you may also see additional autofill categories such as identity documents, travel information, or Enhanced Autofill. Disable these options as needed.
How to Turn Off Autofill Completely in Chrome
Step 1. Open Settings > Autofill and passwords.
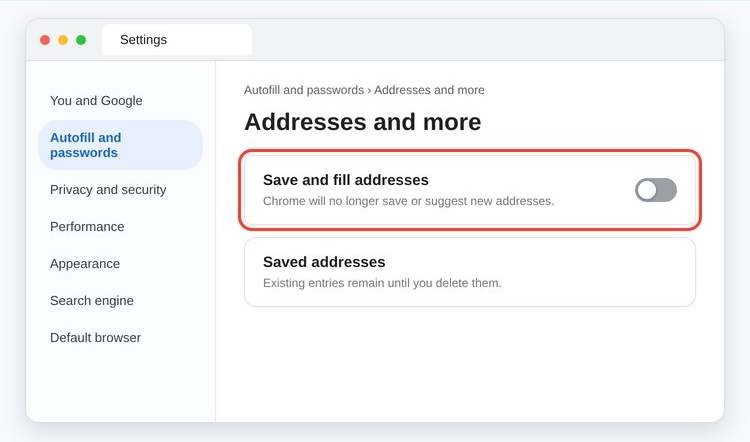
Step 2. Under Addresses and more, turn off Save and fill addresses.
Step 3. Under Payment methods, turn off Save and fill payment methods.
Step 4. Open Google Password Manager > Settings, and turn off Offer to save passwords and passkeys.
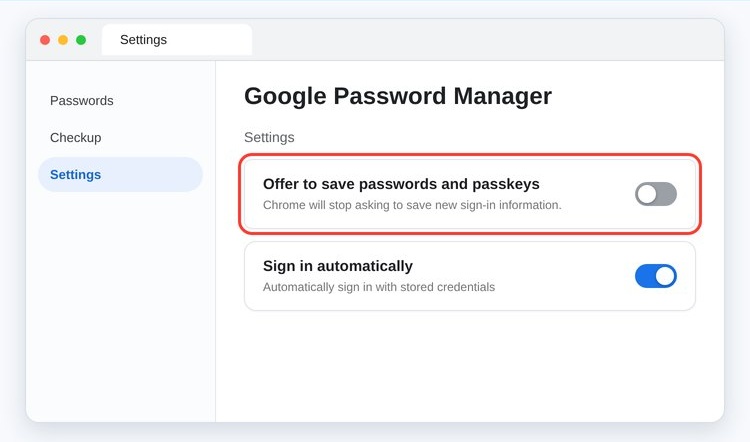
Step 5. Optionally turn off Sign in automatically if you want Chrome to request confirmation before using saved login information.
This is the clearest way to remove autofill on Chrome for future entries. It also answers how to remove autofill on Google Chrome when prevention, rather than a one-time cleanup, is the goal.
Final Words
There are several effective ways to delete autofill Chrome data. Clear form data when many suggestions are obsolete, remove one field entry for a single mistake, or manage addresses, cards, and passwords through their dedicated pages.
Advanced SystemCare offers a broader Windows privacy interface, while Chrome’s switches prevent new records from being saved. Review every selected category before deletion, especially when Chrome sync is enabled. These methods also show how to delete autofill on Google and how to delete autofill Chrome records without unnecessarily removing unrelated browser information.