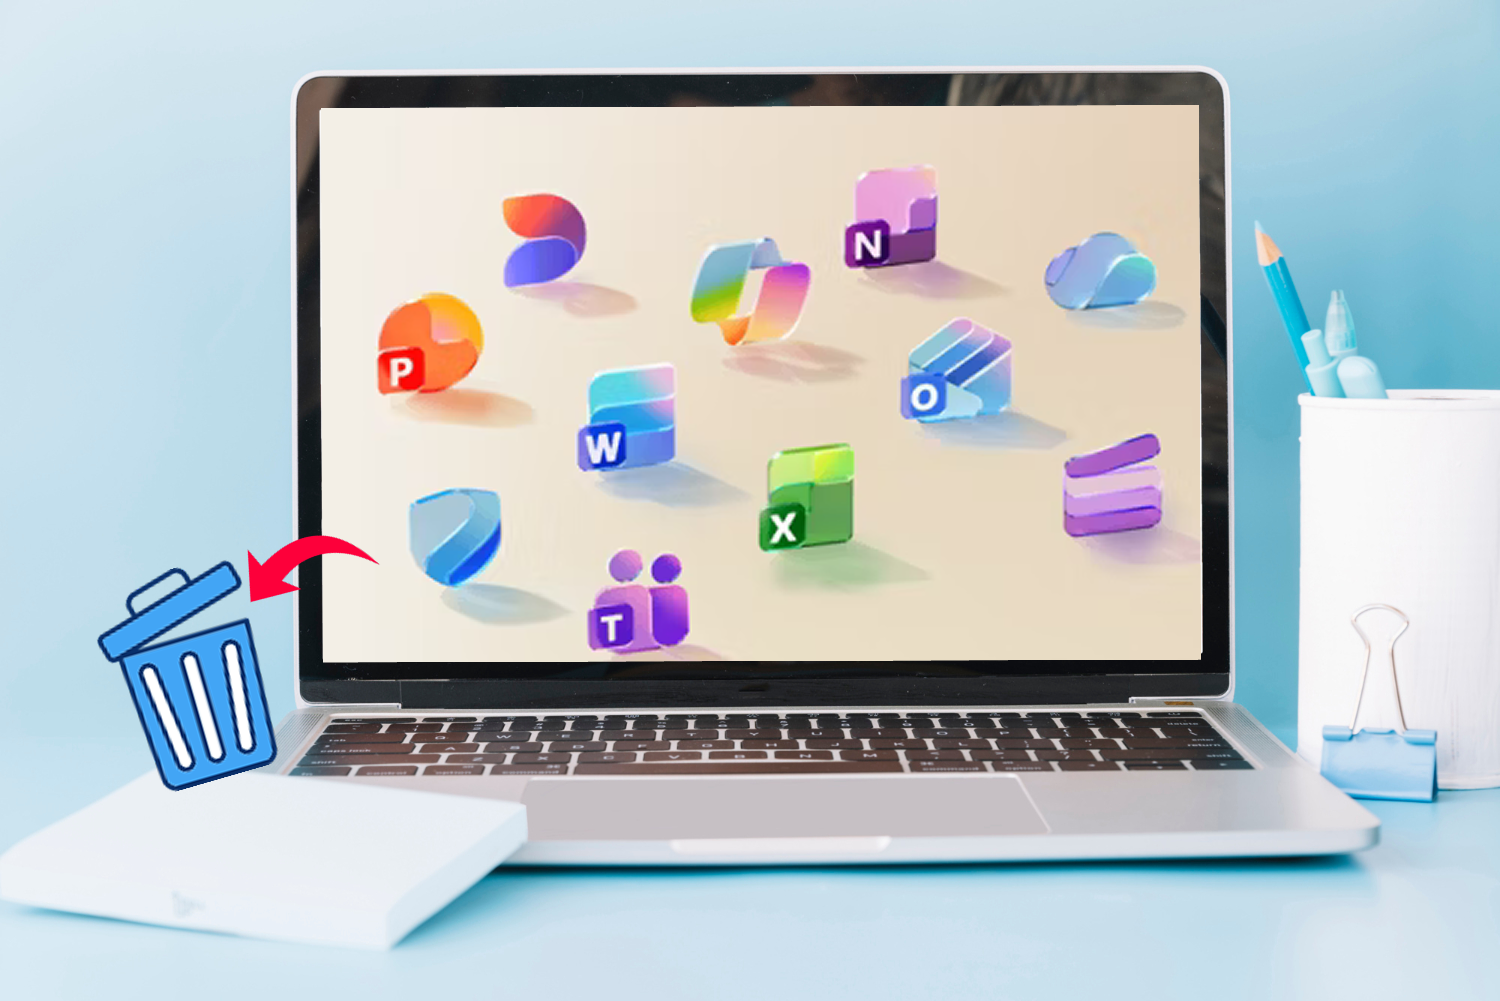
Many users who have Microsoft Teams installed on their computers have encountered the same frustration: the app automatically launches and pops up when the computer starts, slowing down the startup process while also taking up valuable disk space.
If you no longer use Teams, uninstalling it may be the simplest solution. This article provides a quick and detailed guide on how to uninstall Microsoft Teams on Windows and Mac, along with useful tips for clearing leftover files and data.

Why Can't I Uninstall Microsoft Teams?
Using the traditional way to uninstall Microsoft Teams does not always mean you can completely uninstall Microsoft Teams. It may sound a little confusing, but many users find that Teams reappears the next time they restart their computers even after completing the uninstallation.
This usually happens because Teams was not completely closed before the uninstall process, or because not all components associated with Teams were removed. These may include installation packages or other Microsoft accounts and services linked to Teams.
So, how to completely remove Microsoft Teams? Besides removing the main program, you also need to check its background processes, related components, and leftover files. The one-click best uninstaller for Windows 11 introduced in this guide may be the key to getting the job done completely.
How to Uninstall Microsoft Teams on Windows 11
This how to uninstall Microsoft Teams guide will start with the simplest method. Since the interfaces of Windows 11 and Windows 10 are slightly different, separate steps will be provided for each version.
Let's start with how to remove Microsoft Teams Windows 11.
Step 1. Find Settings and open it.
Step 2. Select Apps > Installed apps from the left-hand menu.
Step 3. Find Microsoft Teams (you can use the search box), click the three-dot button next to it, and select Uninstall.
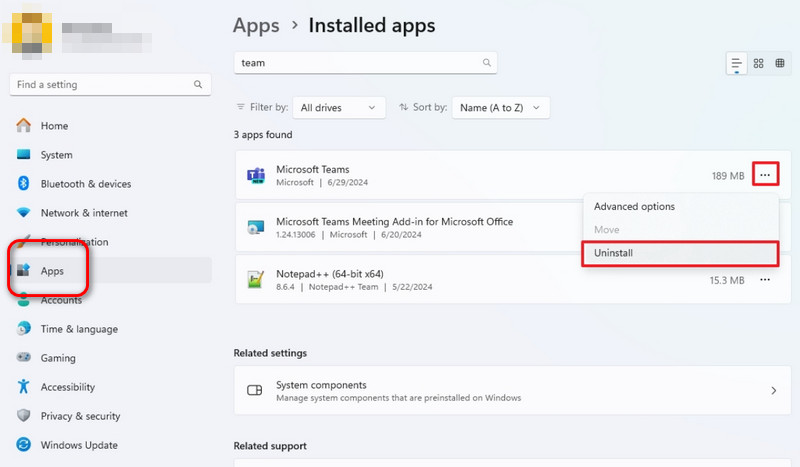
Step 4. Click Uninstall again to confirm, then follow the on-screen instructions to complete the process.
After the force uninstall program Windows 11 progress is complete, it's best to restart your computer and carefully check the app list to see whether Microsoft Teams or any related components are still present.
How to Uninstall Microsoft Teams on Windows 10
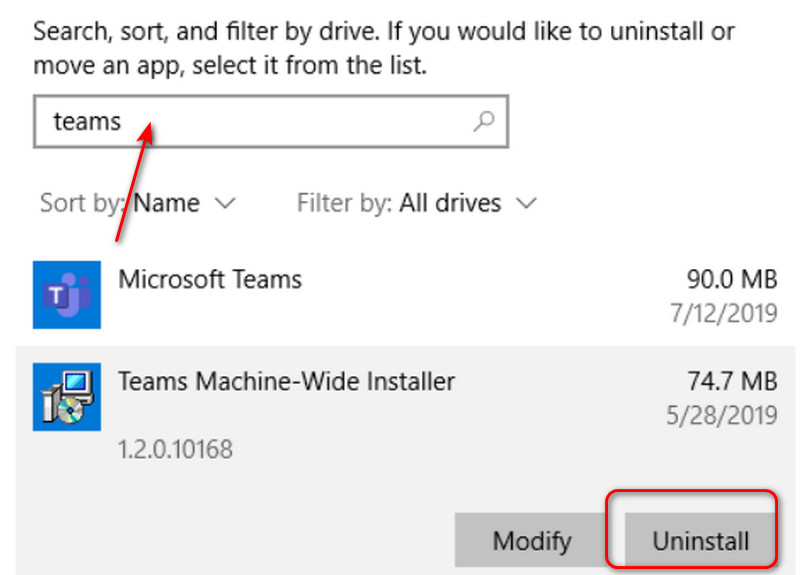
Like Windows 11, Windows 10 also allows you to manage apps through Settings, so you can uninstall Microsoft Teams using almost the same path. The only key difference to note is that the corresponding section on Windows 10 is called Apps & features.
Here are the complete steps for how to uninstall Microsoft Teams on Windows 10:
Step 1. Open Settings.
Step 2. Click Apps > Apps & features.
Step 3. Find Microsoft Teams in the app list, then select Uninstall.
You may need to click Uninstall again to confirm.
Similarly, this guide recommends restarting your computer after the uninstallation. Then, return to Apps & features and check whether any Microsoft Teams-related components are still present on your device. If you find any, proceed with further cleanup.
How to Completely Uninstall Microsoft Teams on Windows
Can I uninstall Microsoft Teams? Yes, the basic methods above should meet your needs, but you may notice one important reminder: after uninstalling, you still need to check for leftover files. If any remain, you'll have to clean them up separately.
Is there a way to remove Microsoft Teams Windows 11/10? This guide strongly recommends choosing IObit Uninstaller from the start.
As the best uninstaller for Windows 11/10 that can handle the cleanup in one place, it allows you to select Microsoft Teams and start the process with just a few clicks. The software can remove the main program, installation files, cache, and other related data, helping ensure your disk is not left cluttered with unnecessary remnants.
Here is how to uninstall Microsoft Teams on PC using IObit Uninstaller.
Step 1. Download and install IObit Uninstaller on your computer, then launch it.
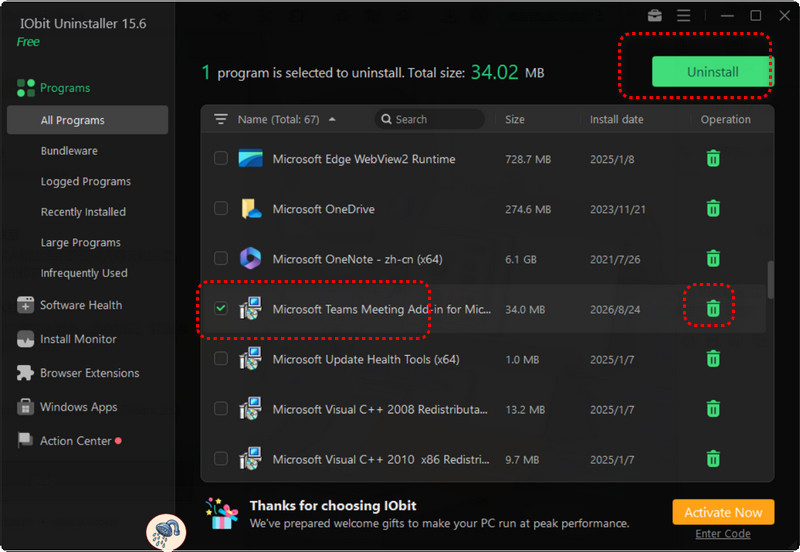
Step 2. Click Programs > All Programs on the left side of the interface, then find Microsoft Teams in the list on the right.
Step 3. Check the box next to the program, then click the green delete button beside it.
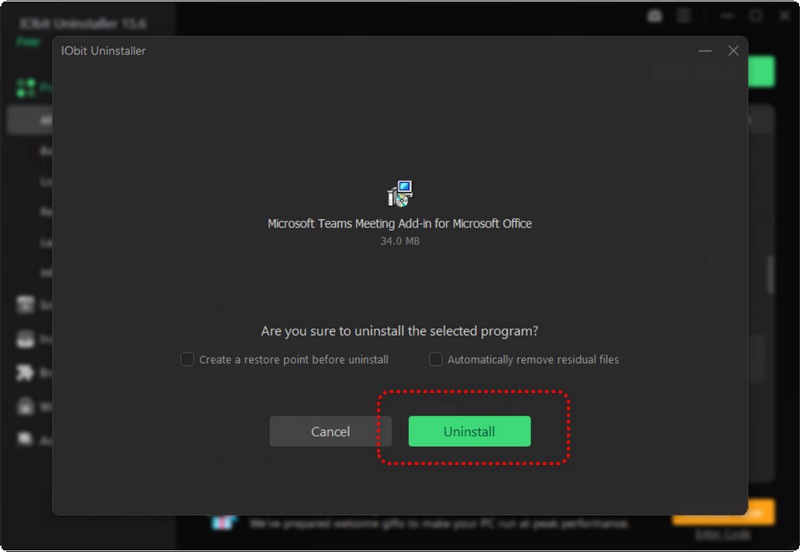
Step 4. Click Uninstall again in the pop-up window to confirm.
The same steps can also be used for how to uninstall Microsoft Edge and other software. However, there may be an exception: sometimes a program cannot be uninstalled through the normal process. In this case, this guide recommends trying IObit Uninstaller's advanced Force Uninstall feature.
Here is how to deep uninstall apps on Windows 11/10 using IObit Force Uninstall
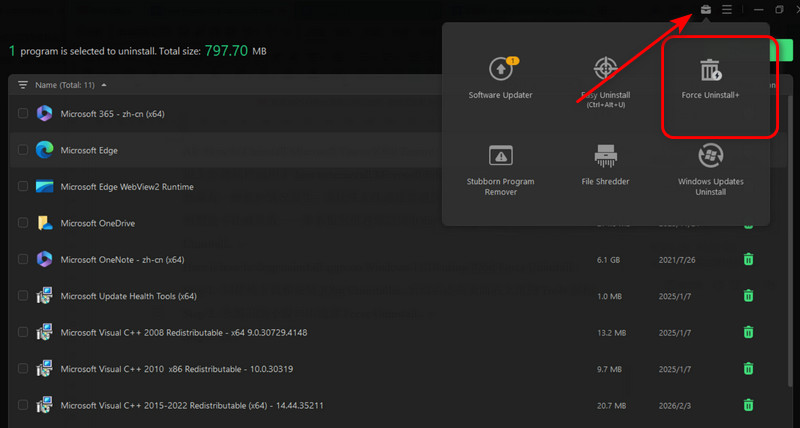
Step 1. After launching IObit Uninstaller, click the Tools icon in the upper-right corner.
Step 2. Select Force Uninstall from the expanded window.
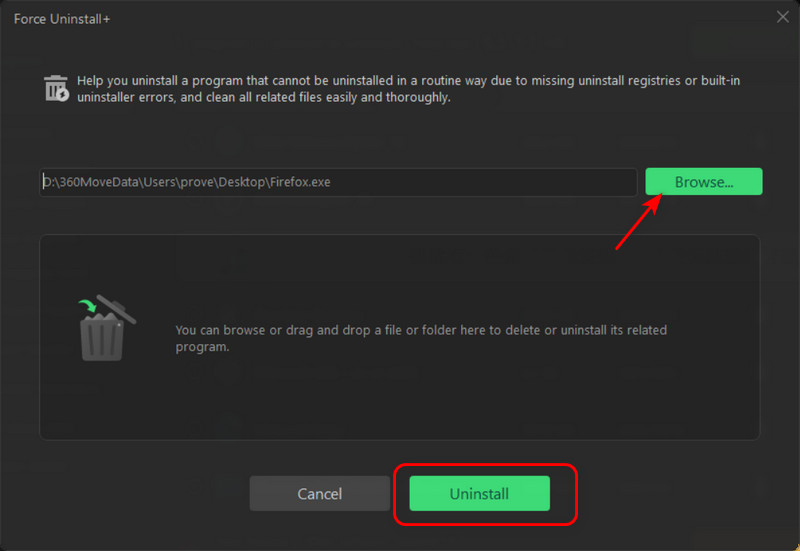
Step 3. Click Browse to locate the folder where the software you want to uninstall is installed, then click Uninstall.
Why Choose IObit Uninstaller?
Completely Uninstall Microsoft Teams Free: Tedious manual steps, endless checks, and follow-up cleanup... all of that can be skipped with just one click. Choose IObit Uninstaller and click once to completely remove the software, related data, records, and more.
Powerful Force Uninstall for Teams Leftovers: Is the uninstaller always getting stuck, or unable to uninstall properly due to system issues? IObit Uninstaller's Force Uninstall will step in to scan for and remove stubborn Teams leftovers, freeing up space on your disk.
Easy Microsoft Teams Uninstall via the Icon: IObit Uninstaller won't leave you stuck searching through a long list for the app folder. Simply drag the software icon into IObit Uninstaller to quickly start the uninstallation process.
Remove Windows Apps & Browser Extensions: It's not limited to Microsoft Teams. Any Windows apps and browser extensions, such as Media Player, Calendar, Chrome, Firefox, and more, can be handled by IObit Uninstaller.
More Free Tools for Windows Uninstall: IObit Uninstaller is more than just a useful software management tool. It also provides features such as Windows Update Uninstall and Software Updater, helping you manage your entire computer with ease.
How to Uninstall Microsoft Teams on Mac
By now, you should definitely know how to deep uninstall apps on Windows 11.
As an excellent productivity tool, Microsoft Teams is trusted and loved by many Mac users. However, there may come a day when it's time to say goodbye.
For Mac users, this guide provides the following how to uninstall Microsoft Teams steps:
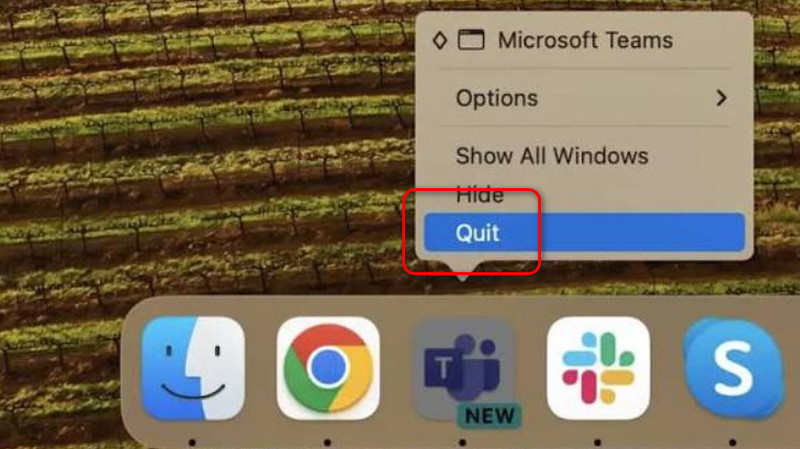
Step 1. Quit Microsoft Teams. You can right-click its icon and select Quit.
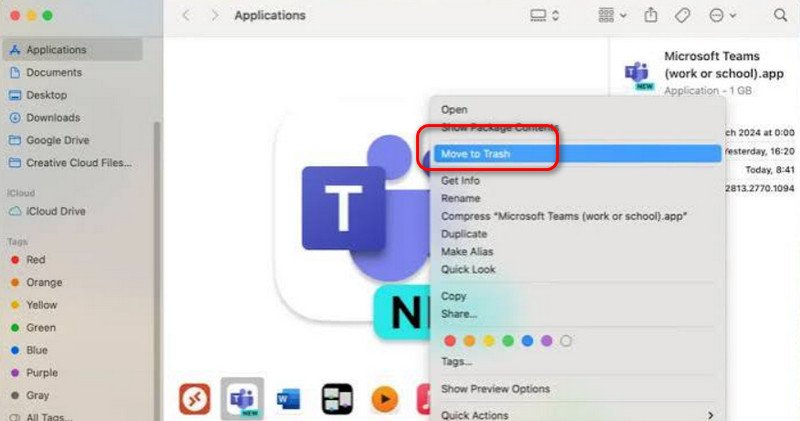
Step 2. Go to Finder > Applications > Microsoft Teams.
Step 3. Right-click Microsoft Teams, then select Move to Trash.
Step 4. Go to Trash and select Empty Trash to complete the cleanup.
How to Stop Teams from Opening at Startup (Alternative)
If you don't want to uninstall Microsoft Teams just yet and are simply annoyed by it popping up every time your computer starts, there's an easier alternative: disable Teams from launching at startup. This can also prevent it from using system resources during startup.
The steps for Windows and Mac are provided below.
On Windows
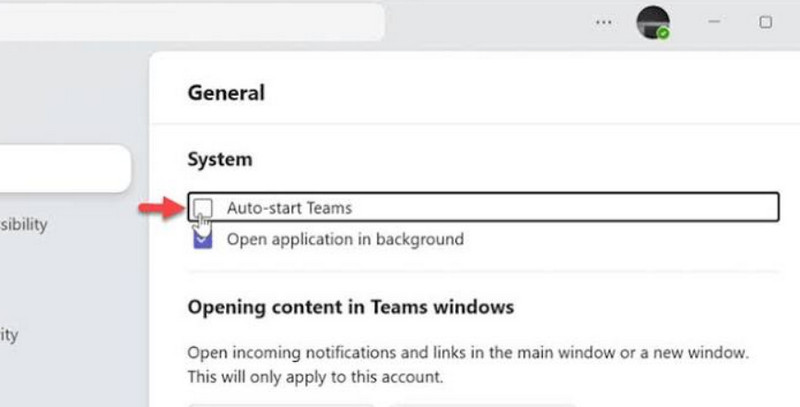
Step 1. Open Microsoft Teams and click Settings and more > Settings in the upper-right corner.
Step 2. Find General and look for Auto-start Teams or other startup-related options.
Step 3. Turn off Auto-start Teams. After restarting your computer, Teams will no longer launch automatically with the system.
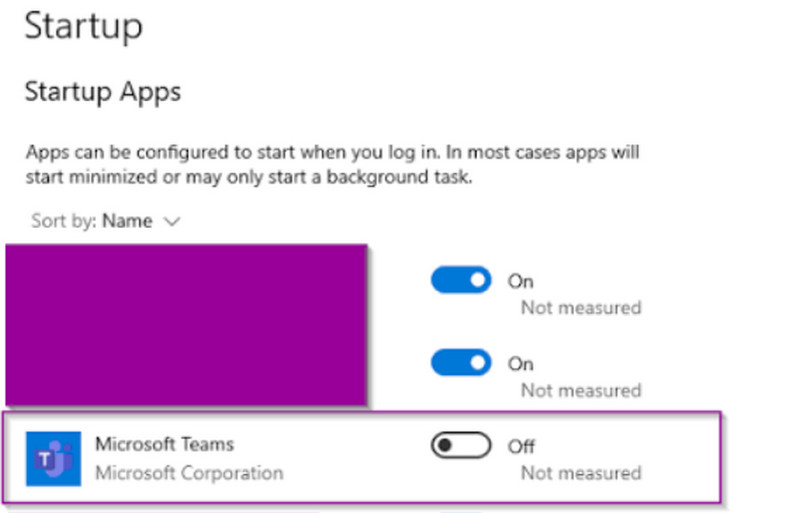
If you can't find this option in Teams' settings, you can also manage it through Windows startup apps: open Settings > Apps > Startup, find Microsoft Teams, and turn it off.
On Mac
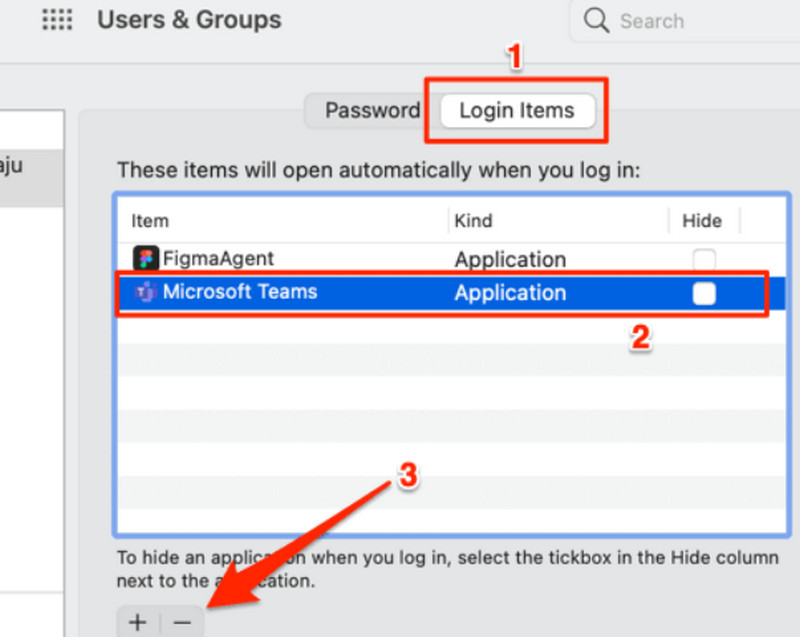
Step 1. Click Apple menu > System Settings in the upper-left corner.
Step 2. Select General > Login Items & Extensions on the left.
Step 3. Find Microsoft Teams in the Open at Login list and remove or disable it.
FAQs About Microsoft Teams Uninstall
1. Why Does Microsoft Teams Keep Reinstalling Itself?
Microsoft Teams may reappear because of Windows updates, related Microsoft components, or account settings. If Teams keeps coming back after uninstallation, check for any remaining Teams-related components or installers and remove them completely.
2. Will Uninstalling Teams Delete My Chat History or Files?
Usually, no. Teams chat history and cloud files are generally associated with your Microsoft account or Microsoft 365 services rather than being stored solely in the local app. However, it's still recommended to make sure important files are synced or backed up before uninstalling.
3. How to Force Uninstall Microsoft Teams on Windows?
If you can't uninstall Teams normally through Windows Settings or Control Panel, first end any Teams-related background processes and then try a Force Uninstall tool. This can help remove Teams when the standard uninstallation process fails and clean up its leftover files.
Final Thoughts
This how to uninstall Microsoft Teams guide is a comprehensive solution for anyone who wants to remove the software and free up disk space. However, if you choose to uninstall it manually, the process can be somewhat tedious, and you'll also need to check for leftover cache and other data. That's why using a one-click uninstaller like IObit Uninstaller can be a more convenient option.
IObit Uninstaller Free
- Complete forced uninstallation for stubborn programs.
- Uninstall a batch of programs at once.
- Scan and remove leftover files, folders, and registry entries.
- Support the management of Universal Windows Platform apps.