



Kevin Hart
Kevin is an experienced editor focused on tech blog writing. Familiar with all kinds of PC software on the market. All the topics he chooses are aimed at bringing more benefits to users.
Expert in
PC Health Solution

All-in-one PC health solution: clean, optimize and secure

Comprehensive PC cleaning, optimization and protection

Keep drivers always up-to-date

More stable performance with less system crashes

Protect millions of computers against malware

Top computer security with full-round protection

Protect against viruses & boost PC performance
Complete forced uninstallation for stubborn programs.
Uninstall a batch of programs at once.
Scan and remove leftover files, folders, and registry entries.
Support the management of Universal Windows Platform apps.

Learn how to uninstall and reinstall Chrome on Windows 11 with 2026 fixes. Step-by-step manual methods and deep cleaning leftovers for a fresh, fast browser.

Kevin Hart


Is your Google Chrome browser acting slow, crashing frequently, or refusing to load pages properly? Often, the most effective solution is to perform a clean removal followed by a fresh installation. However, simply clicking "Uninstall" isn't always enough. Leftover files and registry entries can cause the same issues to reappear. This complete guide will walk you through exactly how to uninstall and reinstall chrome on windows 11. We will cover standard manual methods, a powerful one-click solution, and deep cleaning techniques to ensure no trace is left behind. By the end, you will have a fresh, fast, and fully functional Chrome browser.
Before we dive into reinstallation, we must first completely remove the existing browser. A partial removal is a common reason for post-reinstall failures. Follow these three detailed steps to master how to uninstall chrome on windows 11 thoroughly.
You might want to keep your bookmarks, saved passwords, and history. Chrome's sync feature is the best way to do this. Understanding how to uninstall and reinstall chrome on windows 11 starts with proper data preservation.
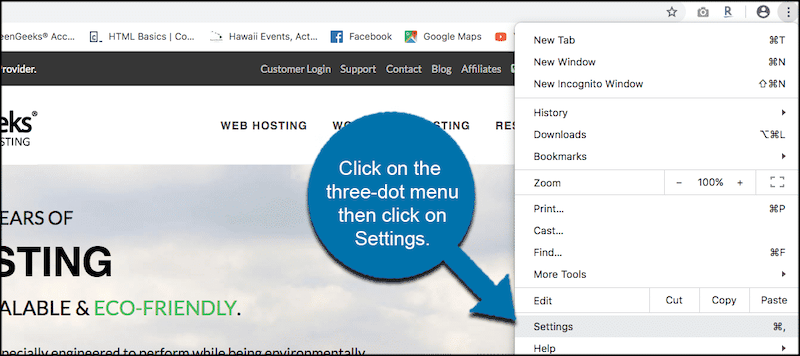
Step 1. Open Chrome and Click on Your Profile
Launch Chrome. Look at the top-right corner and click on your profile icon (or the circular icon with a person or initial).
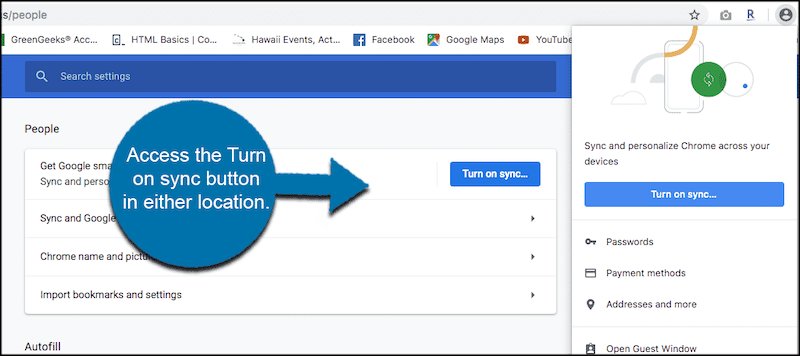
Step 2. Turn on Sync
Go ahead and click "Turn on sync…" If you haven't signed in already, do so with your Google account. Choose "Sync everything" or customize what you want to save (e.g., Bookmarks, Passwords, History, Open Tabs).
Step 3. Verify Sync is Complete
Wait a few moments. You can go to chrome://settings/people to confirm your data is synced to your Google account. Once verified, you can safely uninstall Chrome without permanently losing your data.
Now that your data is safe, let's perform the standard removal process. These steps show the basic how to uninstall chrome on windows 11 method via system settings.
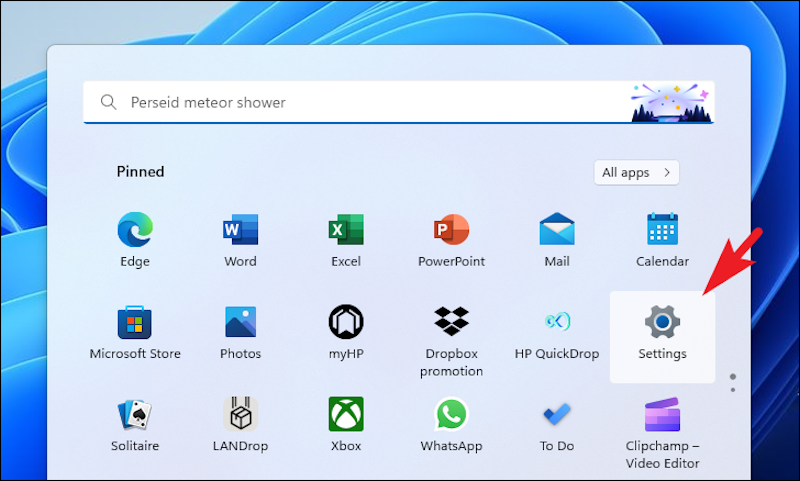
Step 1. Open Windows Settings
Press Windows + I on your keyboard to open the Settings app. Alternatively, click the Start button and select the gear icon.
Step 2. Navigate to Installed Apps
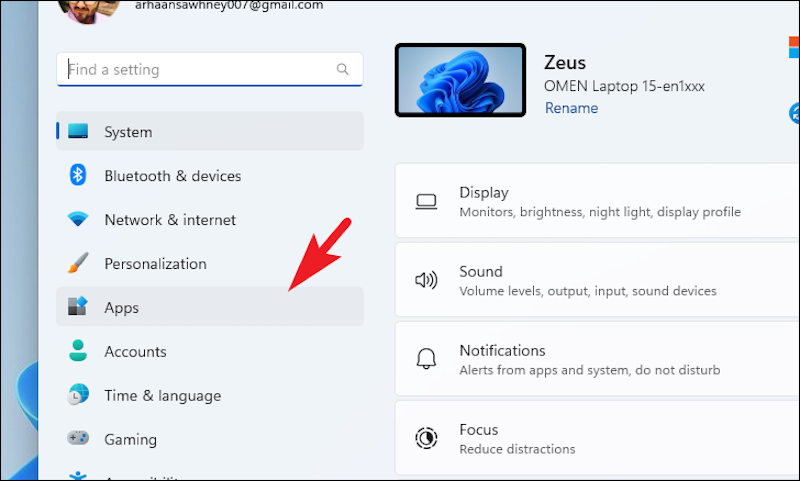
On the left sidebar, click on Apps, then select Installed apps. Wait for the list to populate.
Step 3. Uninstall Google Chrome
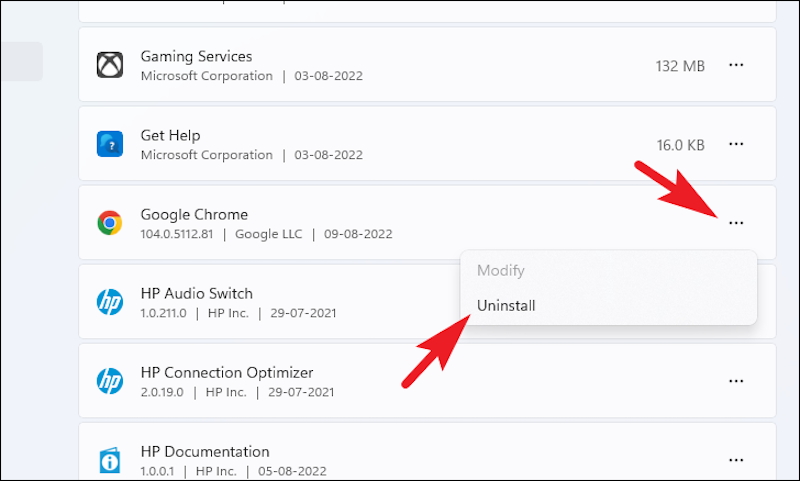
Find "Google Chrome" in the list. Click the three dots (...) on the right side of the entry. Select Uninstall. A small pop-up window will appear asking for confirmation. Click Uninstall again. The system will then run Chrome's own uninstaller. Completing this step brings you closer to finishing how to uninstall and reinstall chrome on windows 11.
This is the most critical step. The standard Windows uninstaller often leaves behind folders and registry keys. These leftovers can conflict with a new installation, bringing back old problems. This section teaches you the advanced part of how to uninstall chrome on windows completely.
● Clear Local AppData
This folder contains user-specific settings and cached files. To remove it:
1.Press Windows + R, type %localappdata%, and press Enter.
2.Find the folder named Google.
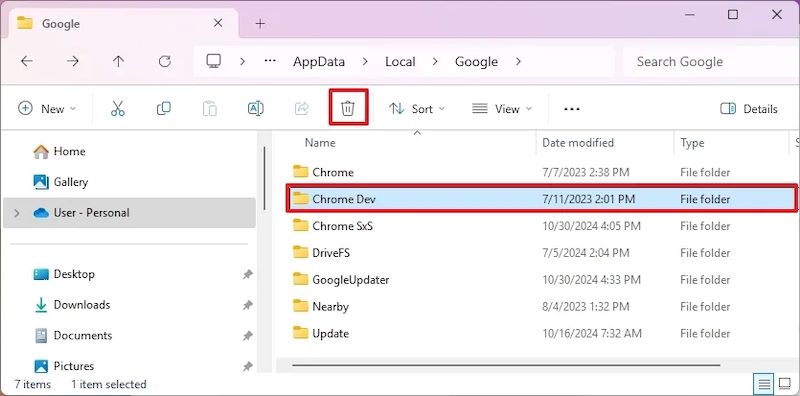
3.Right-click on it and select Delete. If prompted for permission, click Yes or Continue.
● Clear Program Files
Some core Chrome program files may reside here.
1.Press Windows + R, type C:\Program Files, and press Enter.
2.Look for the Google folder. If it exists, right-click and delete it.
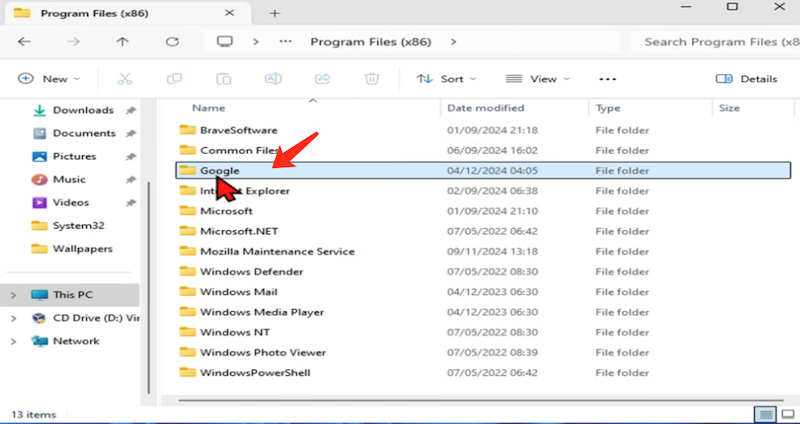
3.Repeat this step for C:\Program Files (x86).
These manual steps are complicated and time-consuming. A one-stop solution called IObit Uninstaller can help. Many users turn to this tool when they need to how to uninstall and reinstall chrome on windows 11 without technical hassle.
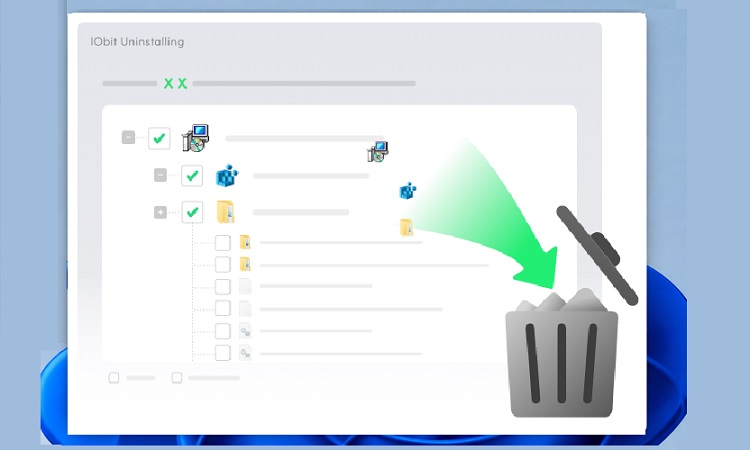
Manually hunting for leftover files is tedious. With the right tool, how to uninstall Chrome on Windows 11 becomes a single, effortless action. IObit Uninstaller is a powerful utility that goes far beyond the Windows default. It is specifically designed to remove stubborn programs and automatically scan for and delete all residual files, registry entries, and folders. Instead of spending 15 minutes on manual cleanup, you can achieve a deeper, more thorough uninstall in seconds. It also helps you how to free up disk space by eliminating gigabytes of leftover junk from various uninstalled programs.
Here is how to use IObit Uninstaller to remove Chrome completely in just three simple steps:
Step 1. Download and Launch IObit Uninstaller
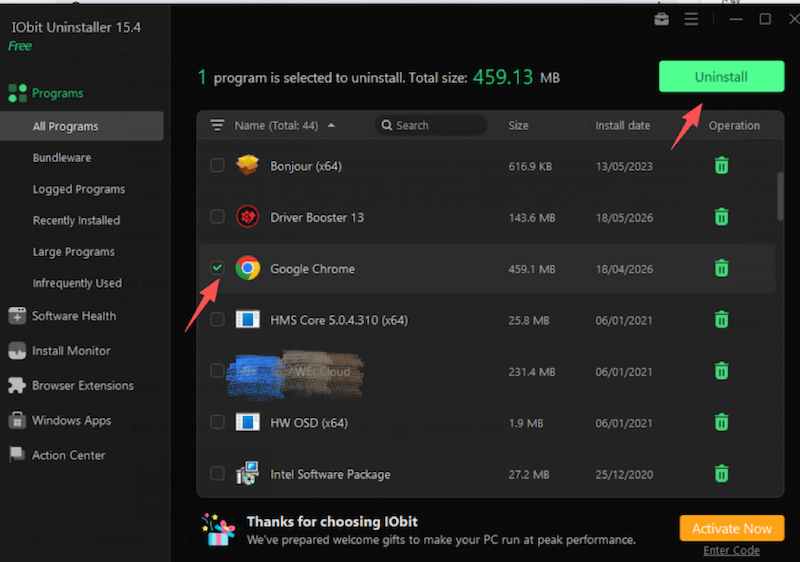
First, download the tool from the official IObit Uninstaller website. Once installed, launch the program. Its main dashboard will display all your installed applications in a clean, organized list. You can use the search bar at the top to quickly find "Google Chrome."
Step 2. Uninstall Google Chrome
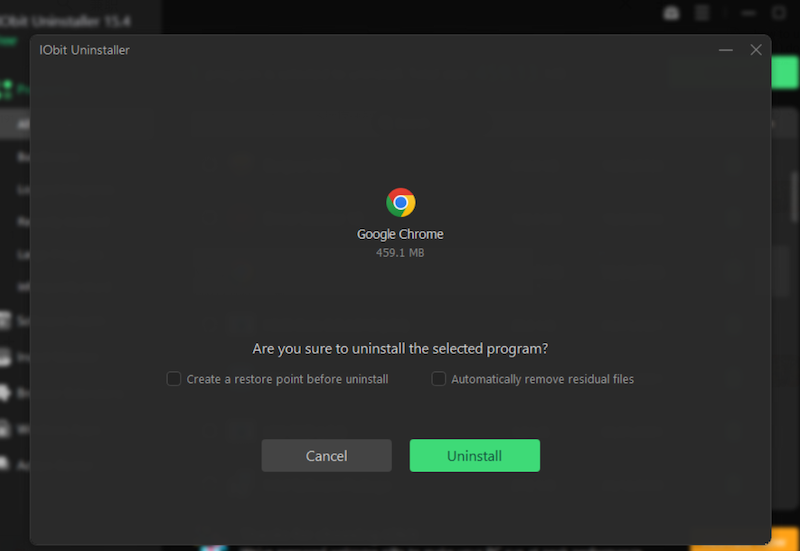
Click on the "Uninstall" button located in the upper-right corner of the interface. A confirmation pop-up will appear. For the best results, ensure the options "Create a restore point" (for safety) and "Automatically remove residual files" are checked. Then, click the "Uninstall" button again.
Step 3. Perform Powerful Scan for Leftovers
After Chrome's own uninstaller finishes, IObit Uninstaller will automatically run its Powerful Scan. This feature searches deep within your system for any leftover folders, files, and registry entries. Click the "Scan" button and then click "Remove" to delete everything found. Chrome is now 100% gone from your PC. Now you are ready for the next phase of how to uninstall and reinstall chrome on windows 11.
This best uninstaller for Windows 11 not only saves time but also guarantees a cleaner system. Moreover, it can help you manage your browser's health. You can easily remove chrome extensions that are malicious or unwanted, directly through the "Browser Safeguard" feature. It supports all major browsers, making it an essential tool for any Windows 11 user.

With Chrome completely removed, you can now perform a clean reinstall. This process is straightforward, but we will follow best practices to ensure you get the latest, most stable version. This section covers how to reinstall chrome on windows 11.
Step 1. Download the Official Installer
Open any other browser (like Microsoft Edge). Go to the official Google Chrome website: www.google.com/chrome. Make sure you are on the official site to avoid fake or malware-ridden installers. Click on the "Download Chrome" button.
Alt: Click Download Chrome
Step 2. Run the Installer
Once the ChromeSetup.exe file is downloaded, locate it in your Downloads folder and double-click it to run. If you see a User Account Control prompt asking for permission, click Yes.
Step 3. Wait for Installation
The setup process is automatic. You will see a small window showing the download and installation progress. Once finished, Chrome will launch automatically. It will also add a shortcut to your desktop and taskbar by default. You have now successfully completed how to uninstall and reinstall chrome on windows 11.
After Chrome opens, sign back into your Google account. Your synced bookmarks, passwords, and history will automatically reappear. You now have a clean, fast, and issue-free version of Chrome.
Also Read: How to Uninstall Microsoft Edge Permanently on Windows 10/11>>
Learning how to uninstall and reinstall chrome on windows 11 is a valuable skill that solves most browser-related performance problems. As we have outlined, you can do this via manual methods, but they require careful attention, especially when deleting leftover files. For a faster, more thorough, and safer process, IObit Uninstaller is the superior choice. It automates the removal of stubborn software and deep cleans every trace. By using this tool, you not only fix Chrome but also maintain the overall health of your entire Windows 11 system.

Remove unwanted software easily.
Free Download