If your games suddenly start stuttering, show graphical glitches, or take longer to load, DirectX shader cache may be one of the reasons. Over time, cached shader files can become outdated or corrupted and also take up unnecessary storage space. It helps your PC rebuild fresh shader files and improve gaming performance by removing those unnecessary caches. In this guide, you will learn three simple methods that explain how to clear DirectX shader cache on Windows PCs for a smoother gaming experience.

DirectX Shader Cache Explained
What Is DirectX Shader Cache?
DirectX shader cache is a folder that stores precompiled shader files created by DirectX. These files help games and graphics applications load visual effects more quickly. Instead of compiling shaders every time you launch a game, Windows reads the cached files, reducing loading times and improving gameplay.
The cache grows over time as you install and play more games. Most of the time, it helps improve performance. However, if the files become outdated or damaged, Windows may continue using them until you remove them. After you delete DirectX shader cache, Windows automatically creates fresh shader files when needed.
Why Does DirectX Shader Cache Matter?
Shader compilation takes time and uses system resources. By saving compiled shaders, Windows reduces loading times and helps games run more smoothly. The shader cache also reduces sudden frame drops that often happen when a game compiles shaders during gameplay. This is especially useful in modern games that use advanced lighting and visual effects. Keeping a healthy shader cache allows your graphics hardware to work more efficiently.
Why Do You Need to Clear DirectX Shader Cache?
Although shader cache improves performance, the cache does not stay useful forever. Old cache files may create problems after graphics driver updates or major Windows updates. Corrupted files can lead to screen flickering, missing textures, graphical glitches, or random game stuttering. When you clear DirectX shader cache, Windows removes the old files and builds new ones. This process often fixes graphics-related issues and also frees some storage space. That is why many gamers choose to clear DirectX shader cache from time to time.
When to Clear DirectX Shader Cache
You do not need to remove the shader cache every day. However, it is a good idea to perform a DirectX shader cache cleanup in these situations:
After updating your graphics driver.
After installing a major Windows update.
When games start stuttering or freezing.
If you notice graphical glitches or texture issues.
When your storage drive is running low.
After uninstalling several large games.
There are several easy ways to delete DirectX shader cache on a Windows PC. Let's look at the best methods.
How to Clear DirectX Shader Cache Using a PC Cleaner
If you want the easiest way to clear DirectX shader cache, a trusted PC cleaner can save you time. Instead of searching through different Windows tools, it scans your computer and removes unnecessary files with ease. Advanced SystemCare is such a perfect tool to clean up and speed up your PC seamlessly.
Advanced SystemCare Free
- Clean: 420 billion traces removed & 85 EB junk files cleaned
- Protect: 80 million unauthorized access blocked & 20 million bugs fixed
- Speed Up: 6 million hours of startup time saved & Turbo boost
- Optimize: Auto clean and auto care your PC with AI mode

It includes a set of features to remove redundant data and improve performance for gaming.
Delete Caches, Junk and Temporary Files: Advanced SystemCare automatically scans app caches, temporary files, system junks, and other unnecessary files, then removes them with a single click.
Safely Clean and Optimize Registry Files: It detects invalid and outdated registry entries, removes unnecessary items, and repairs common registry issues while creating backups for added safety.
Identify and Manage Large Files: The built-in Large Files Manager quickly finds oversized files, old downloads, installers, and other storage-heavy items so you can free up valuable disk space.
Turbo Boost for Better Gaming Performance: It also acts as a PC gaming optimizer thanks to “Turbo Boost”. It closes unnecessary background processes and temporarily stops them while you play games. This releases more CPU and memory resources for your game, helping reduce lag and improve responsiveness.
Advanced SystemCare can also disable unnecessary startup services during gaming sessions, allowing games to load faster. If you regularly play games, combining Turbo Boost with DirectX shader cache cleanup can help keep your system running smoothly.
Steps to Clear DirectX Shader Cache with Advanced SystemCare
Step 1. Download and install Advanced SystemCare on your Windows PC.
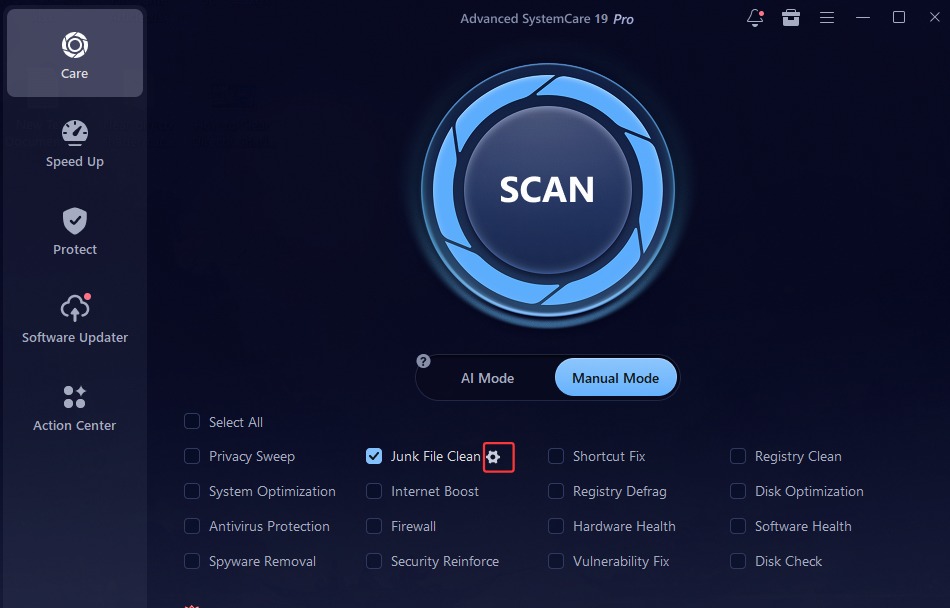
Step 2. Launch the program after installation. Click the gear icon next to Junk File Clean.
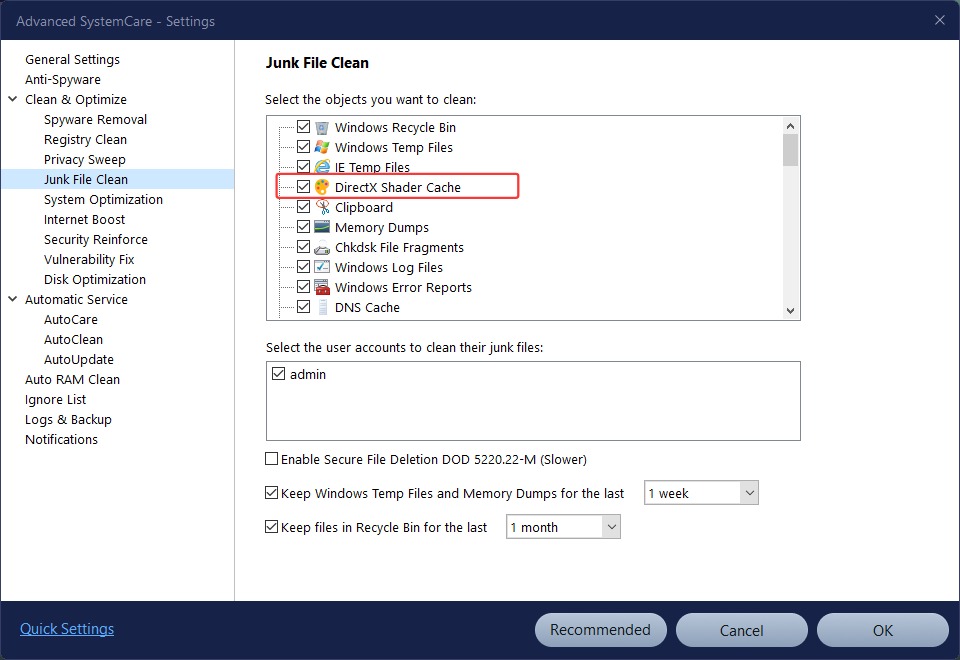
Step 3. In the Settings window, make sure that DirectX Shader Cache is checked.
Step 4. Back to the main interface and check Junk File Clean. Click Scan to make Advanced SystemCare scan your system.
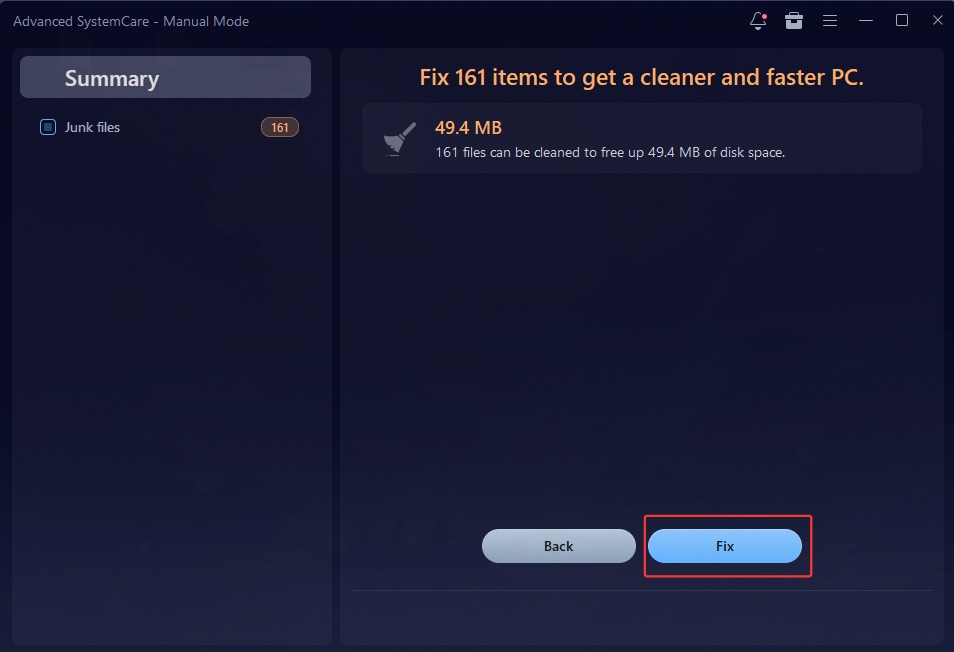
Step 5. Click Fix to delete DirectX shader cache and other junk files to free up your disk space.
Step 6. After the cleanup finishes, restart your computer so Windows can build a fresh shader cache the next time you launch your games.
How to Clear DirectX Shader Cache with Disk Cleanup
If you do not want to install extra software, Windows has a built-in tool called Disk Cleanup. This utility helps free up storage space by removing temporary files and other unnecessary data. It can clean items such as temp internet files, recycle bin files, thumbnails, delivery optimization files, temporary Windows files, and DirectX Shader Cache.
Disk Cleanup is easy to use and works well when you simply want to clear DirectX shader cache without changing other system settings. Since it is part of Windows, you do not need to download anything.
Steps to Delete DirectX Shader Cache with Disk Cleanup
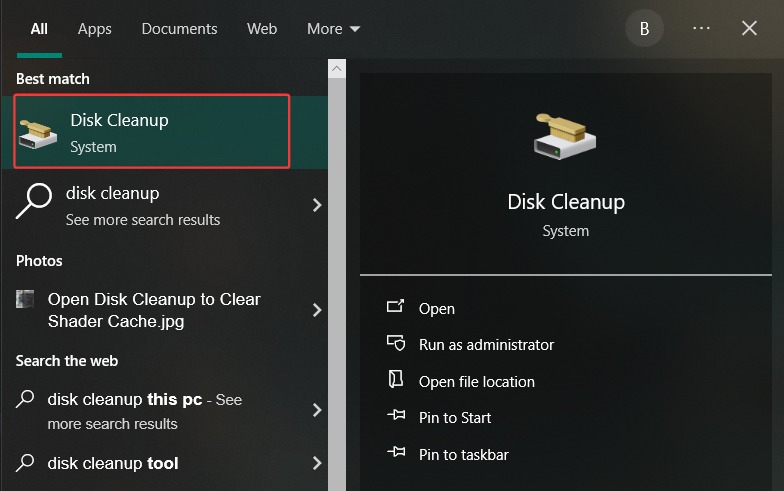
Step 1. Press Windows + S, type Disk Cleanup, and open the application. Choose the system drive, which is usually C:, then click OK.
Step 2. Wait while Disk Cleanup scans your drive. In the list of files, check the box next to DirectX Shader Cache. You can also select other temporary files if you want to free more storage space.
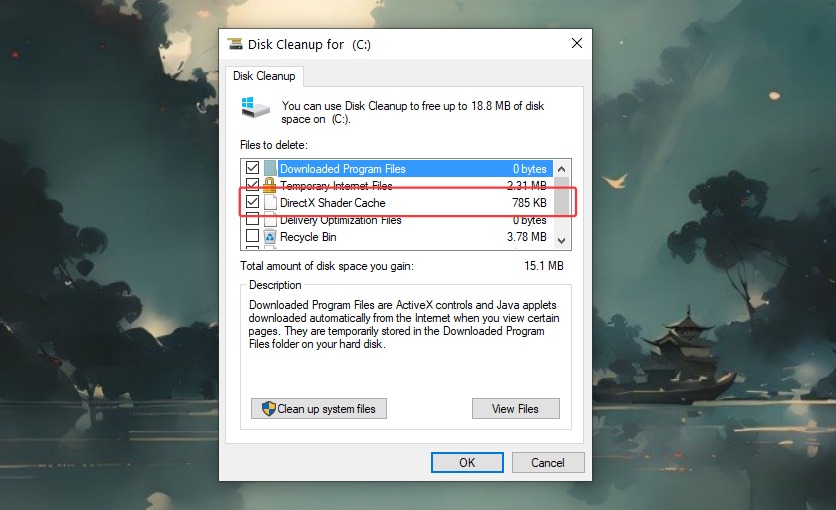
Step 3. Click OK, then select Delete Files to confirm. Windows will delete DirectX shader cache and remove the selected temporary files. Restart your computer before launching your games.
How to Delete DirectX Shader Cache by Windows Settings
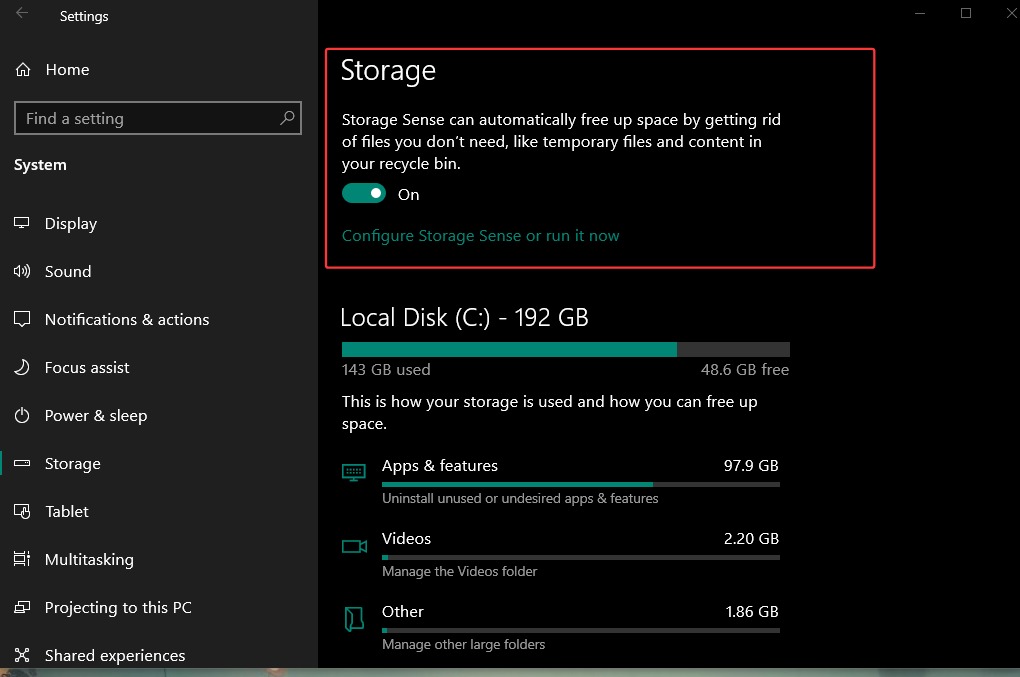
Windows 10 and Windows 11 include a modern Settings app that lets you manage storage and device preferences. Inside the Settings app, you can use Storage and Storage Sense to remove unnecessary files, including cached data. Storage Sense can automatically clean temporary files, while the manual cleanup option lets you choose exactly what you want to remove.
This method is useful if you prefer using the Windows interface instead of Disk Cleanup. It also gives you better control over storage management and helps keep your PC organized. If you are wondering how to delete DirectX shader cache, this method is one of the easiest built into Windows.
Steps to Clear DirectX Shader Cache from Windows Settings
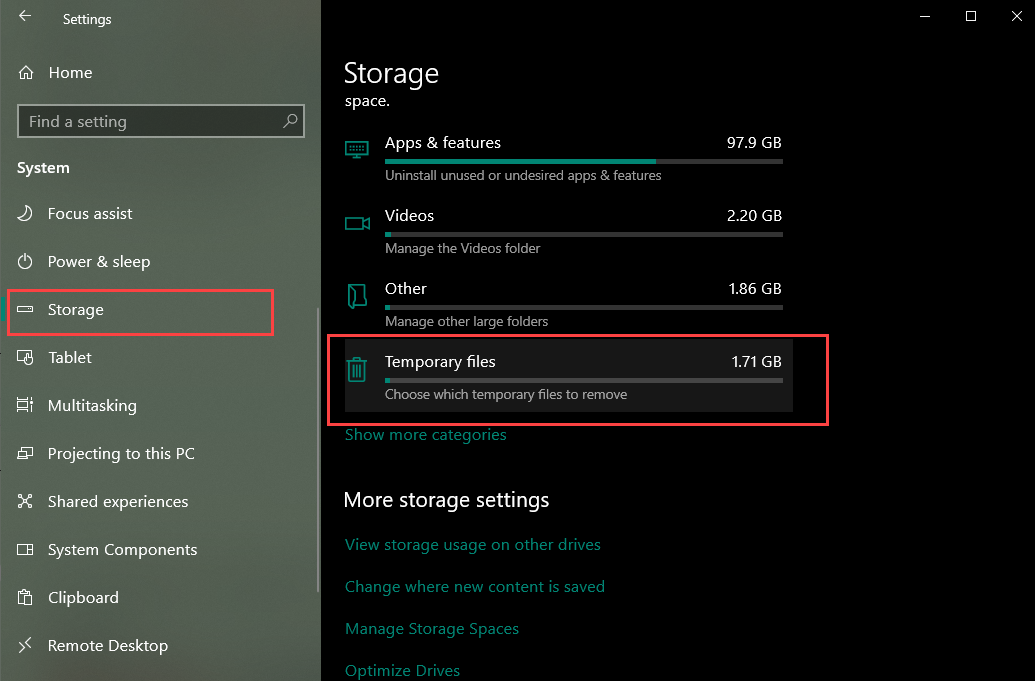
Step 1. Press Windows + I to open Settings. Go to System and select Storage.
Step 2. Click Temporary Files. Windows will scan your computer and display different file categories that can be removed.
Step 3. Find and select DirectX Shader Cache from the list.
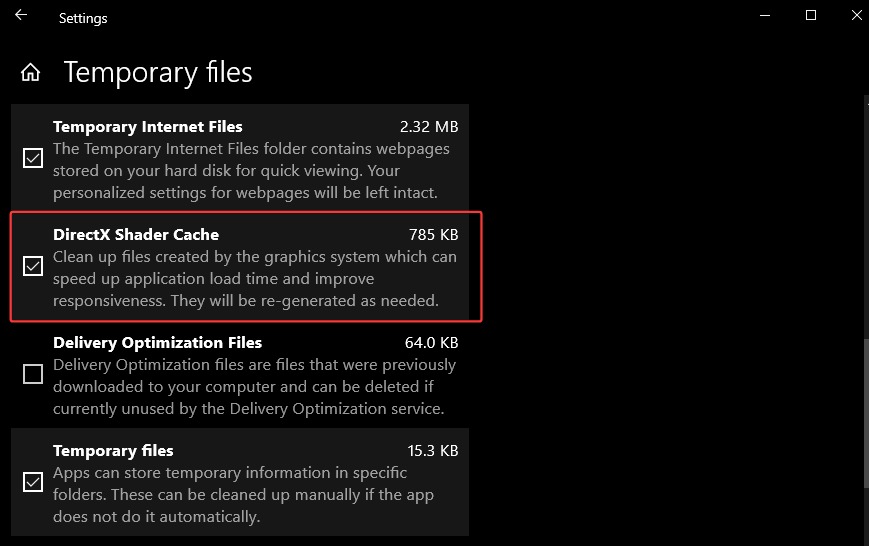
Step 4. Click Remove Files and confirm the action. Windows will clear DirectX shader cache and remove the selected files. Restart your PC so Windows can create a fresh shader cache during your next gaming session.
You can also enable Storage Sense to clean temporary files automatically in the future. Although it may not always remove shader cache immediately, it helps reduce unnecessary storage usage over time.
DirectX Shader Cleanup FAQs
Where is DirectX shader cache stored in Windows?
DirectX shader cache is usually stored on your system drive inside Windows-managed cache folders. The exact location can vary depending on your Windows version and graphics driver. Most users do not need to access the folder manually because Disk Cleanup and Windows Settings remove the cache safely.
Is it safe to clear DirectX shader cache?
Yes. It is completely safe to clear DirectX shader cache. Windows and your graphics driver automatically create new shader cache files the next time you launch supported games or graphics applications.
What happens if I clear DirectX shader cache?
When you remove the shader cache, Windows deletes the old cached shader files. Your games may take slightly longer to load the first time because Windows rebuilds the cache. After that, performance usually returns to normal, and many users notice fewer graphical problems.
How often should I delete DirectX shader cache?
You do not need to remove it regularly. It is best to clear it after a graphics driver update, a major Windows update, or when you experience game stuttering, graphical glitches, or storage issues.
The Bottom Line
An outdated shader cache can sometimes cause game stuttering, graphical issues, and unnecessary storage use. Fortunately, there are several ways to clear DirectX shader cache easily. While the built-in Windows tools work well, Advanced SystemCare - the leading PC cleaner and Windows optimizer - provides a faster and more automated way to remove cache or junk files and boost your PC for better gaming performance. Download Advanced SystemCare to delete DirectX shader cache automatically and keep your Windows PC running smoothly.
Advanced SystemCare Free
- Clean: 420 billion traces removed & 85 EB junk files cleaned
- Protect: 80 million unauthorized access blocked & 20 million bugs fixed
- Speed Up: 6 million hours of startup time saved & Turbo boost
- Optimize: Auto clean and auto care your PC with AI mode