Nothing is more frustrating than connecting an external monitor or TV and finding that your HDMI port is not working. Whether you're working, gaming, or watching videos, a broken HDMI connection can quickly stop what you're doing.
The good news is that this problem doesn’t always mean your HDMI port is damaged. In many cases, it’s caused by simple issues like outdated graphics drivers, wrong display settings, loose cables, or Windows errors. Most of these can be fixed in just a few minutes.
In this guide, you’ll learn how to fix an HDMI port not working step by step.
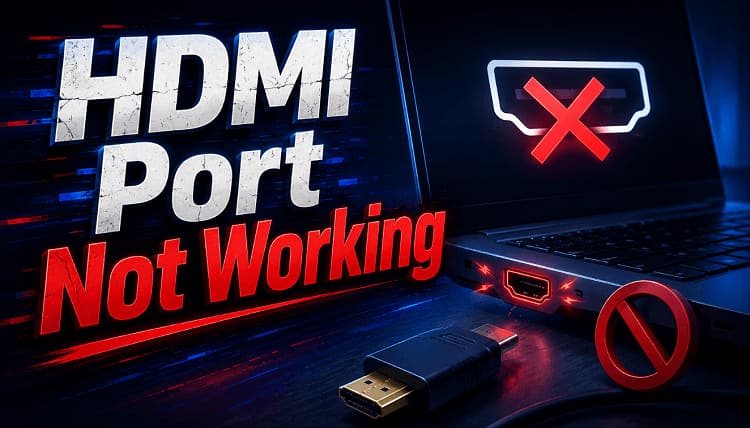
Why Is HDMI Port Not Working?
Before trying different fixes, it's worth understanding why HDMI connections fail in the first place. Identifying the root cause can save you a lot of troubleshooting time.
Common causes include:
Loose or damaged HDMI cables
Faulty HDMI ports
Incorrect monitor input source
Outdated graphics drivers
Corrupted display drivers
Windows display detection issues
Unsupported display resolution
BIOS or firmware problems
Hardware failure on the graphics card or motherboard
Fortunately, most users encounter software-related issues rather than permanent hardware damage, meaning the problem is often easy to resolve.
How to Fix HDMI Port Not Working on PC
When your HDMI port is not working on a PC, the problem may come from a faulty cable, connection issue, outdated graphics driver, incorrect display settings, or damaged hardware. The good news is that most HDMI problems can be diagnosed and fixed with a few straightforward checks. Try the following methods one by one, starting with the simplest solutions before moving on to driver and hardware troubleshooting.
Method 1. Check Your HDMI Cable and Ports
Before adjusting software settings or updating drivers, it's best to rule out basic hardware issues. Since faulty cables and damaged HDMI ports are among the most common causes of display problems, performing a quick physical inspection can save you considerable troubleshooting time later.
Follow these steps:
Step 1. Turn off both your computer and external display.
Step 2. Disconnect the HDMI cable from both devices.
Step 3. Examine the cable for bends, cuts, or damaged connectors.
Step 4. Inspect the HDMI ports for dust or bent pins.
Step 5. Reconnect the cable firmly until it is fully seated.
Step 6. Power on your monitor first, then your computer. If the issue remains, try:
Another HDMI cable
Another HDMI port
Another monitor or TV
Another computer
Method 2. Restart Your Computer and External Display
If your HDMI cable and ports appear to be in good condition but the display is still not detected, the issue may be caused by a temporary communication error. Restarting both devices refreshes the HDMI connection and often restores normal signal detection without additional changes. Here's how:
Step 1. Shut down your PC or laptop.
Step 2. Turn off your monitor or TV.
Step 3. Unplug both devices from the power for about one minute.
Step 4. Reconnect the HDMI cable securely.
Step 5. Turn on the display first.
Step 6. Start your computer and wait for Windows to detect the monitor.
Many users find that a complete power cycle restores HDMI functionality without making any system changes.
Method 3. Update Graphics Drivers with Driver Booster
An outdated graphics driver is one of the leading causes of HDMI port not working on computer. Driver corruption, failed Windows updates, or incompatible GPU drivers can all stop HDMI from functioning correctly.
While you can update drivers manually through Device Manager or your GPU manufacturer's website, the process can be time-consuming and may not always install the latest compatible version.
For a faster and more reliable solution, Driver Booster automatically scans your system, identifies outdated or faulty graphics drivers, and installs the newest official versions with just one click.
Driver Booster Free
- Automatically scan and update drivers.
- Update game ready drivers for peak gaming performance.
- Identify and fix various common of hardware issues.
- Boost 30% of system performance for fast & smooth running.
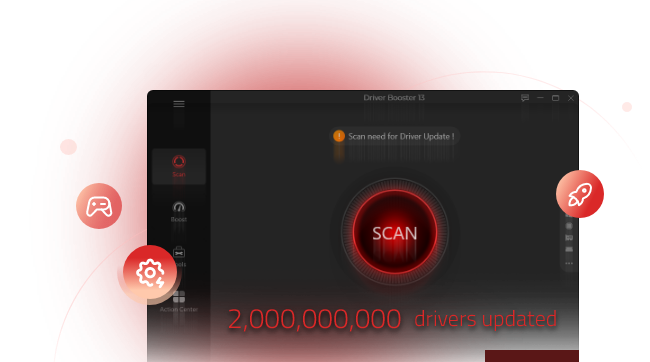
Key Features of Driver Booster
One-Click Graphics Driver Updates for Easy Fixes
Automatically installs the latest graphics drivers to replace outdated, corrupted, or problematic drivers that may be causing HDMI connection issues. Updating to a fresh driver can resolve driver-related errors and improve compatibility with monitors, TVs, projectors, and docking stations.
Massive Driver Database with Extensive Hardware Support
Supports over 15 million drivers for Intel, NVIDIA, AMD, Dell, HP, Lenovo, ASUS, Acer, MSI, and many other hardware manufacturers.
Optimized Driver Matching for Best System Performance
Installs the most suitable WHQL-certified driver for your hardware, reducing compatibility problems after Windows updates.
Replace Corrupted Display Drivers for Stable Output
Damaged or missing graphics drivers can prevent Windows from detecting HDMI-connected displays. Update or reinstall drivers with this driver updater to help replace the malfunctioning drivers easily. Also, if the audio driver is not working in Windows 11, it can also help fix it without a problem.
Safe Backup and Restore for Driver Changes
Creates a driver backup before every update, allowing you to restore a previous version if necessary. This is great for people who don’t know how to uninstall a driver.
How to Update HDMI Drivers with Driver Booster
Step 1. Download and install Driver Booster on your Windows computer.
Step 2. Launch the software and click Scan. Wait while Driver Booster scans your PC for outdated drivers.
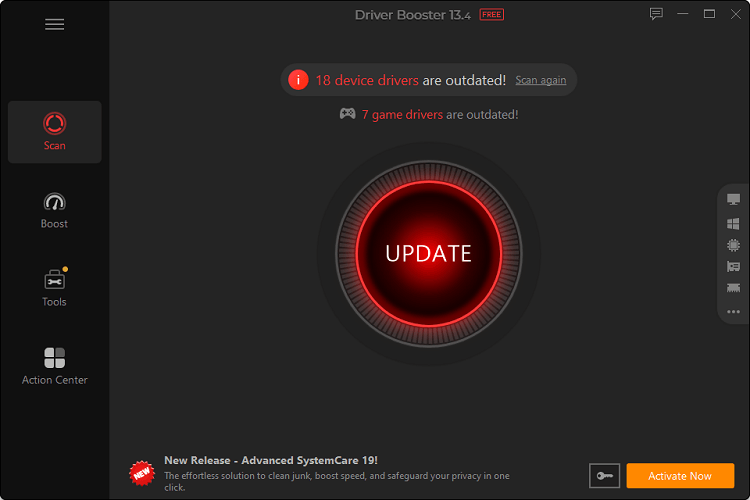
Step 3. Locate your graphics driver (Intel, NVIDIA, or AMD). Click Update or Update All.
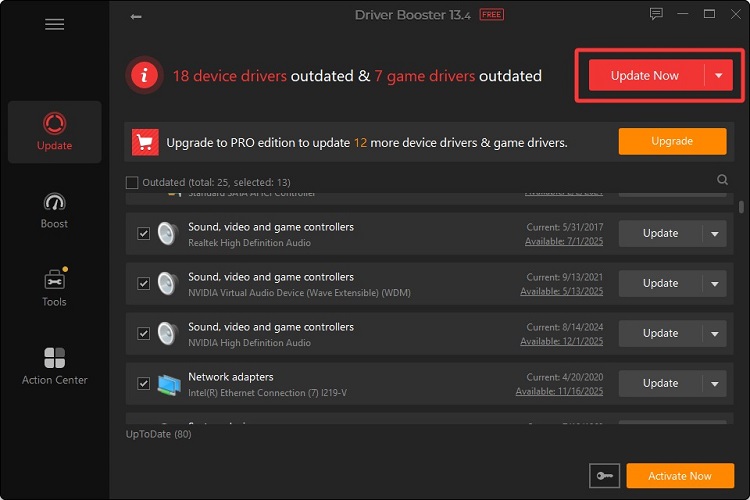
Step 4. Restart your computer. After rebooting, reconnect your HDMI cable and check whether your external display is detected properly.
Method 4. Configure Windows Display Settings
If updating your graphics driver doesn't resolve the problem, Windows may simply be using the wrong display configuration. This often happens after connecting a new monitor, changing display resolutions, or installing major Windows updates. Checking your display settings can help Windows recognize the HDMI-connected screen properly. Here are the steps.
Step 1. Right-click an empty area of your desktop and select Display settings.
Step 2. Scroll down to the Multiple displays section.
Step 3. Click Detect to let Windows search for another display.
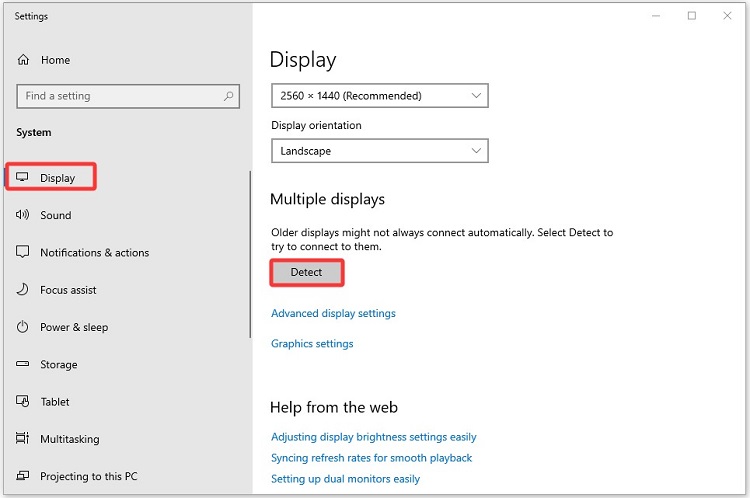
Step 4. If your monitor appears, choose one of the display modes:
Duplicate desktop
Extend
Second screen only
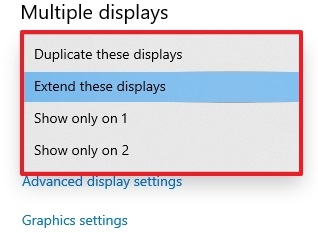
Step 5. Click Keep changes if the external display works correctly.
You can also press Windows + P and switch between different projection modes to see whether your monitor is detected.
Method 5. Check for Hardware Failure
After trying every software fix, it's time to determine whether the HDMI hardware itself has failed. Although less common, damaged HDMI ports, faulty graphics cards, or motherboard issues can prevent any external display from being detected, regardless of the settings or drivers you use. Here's how to identify hardware problems:
Test your computer with another monitor.
Try a different HDMI cable.
Connect another computer to the same monitor.
If available, test another graphics card.
Check whether other video outputs, such as DisplayPort or USB-C, still function.
Contact the device manufacturer or a professional repair center if the HDMI port appears physically damaged.
If every test points to the same HDMI port, hardware repair or replacement is likely the only permanent solution.
How to Fix HDMI to Display Port Not Working Issue
If you're using an HDMI-to-DisplayPort adapter instead of a direct HDMI cable, compatibility becomes another factor to consider. Not all adapters work the same way, and using the wrong type can easily result in HDMI to display port not working, even when both devices function normally.
Try these solutions:
Verify whether your adapter is active or passive.
Replace the adapter with an active HDMI-to-DisplayPort converter if required.
Ensure the adapter supports your monitor's resolution and refresh rate.
Update your graphics driver to the latest version.
Test another DisplayPort input on the monitor.
Restart both devices after reconnecting everything.
Tip: Passive adapters typically work only in one signal direction. If you're converting HDMI output to DisplayPort input, an active adapter is usually required.
How to Fix HDMI Port Not Working on Dell Laptop
Dell laptops may experience HDMI issues because of outdated chipset drivers, graphics drivers, BIOS settings, or docking station firmware. If your HDMI port not working on Dell laptop, checking Dell-specific software and hardware components can often restore the HDMI connection without replacing any hardware. Follow these troubleshooting steps:
Update your Intel, NVIDIA, or AMD graphics driver.
Install the latest Dell chipset drivers from Dell Support.
Run Dell SupportAssist to diagnose hardware issues.
Update your BIOS to the newest available version.
If you're using a Dell docking station, update its firmware.
Restart your laptop while the HDMI cable is already connected.
If the HDMI display is still not recognized, test your laptop with another monitor or television to determine whether the issue is related to the laptop or the external display.
How to Fix HDMI Port Not Working on PS5
If your HDMI problem occurs on a PlayStation 5 instead of a computer, the troubleshooting process is slightly different. Software glitches, incorrect video output settings, damaged HDMI cables, or even bent HDMI pins can all cause the HDMI port not working PS5 issue.
Here's how to troubleshoot it:
Step 1. Turn off your PS5 completely.
Step 2. Disconnect the HDMI cable and inspect both connectors.
Step 3. Connect the console using another certified HDMI cable.
Step 4. Try another HDMI port on your TV or monitor.
Step 5. Boot your PS5 into Safe Mode by holding the power button until you hear the second beep.
Step 6. Select Change Video Output and lower the display resolution.
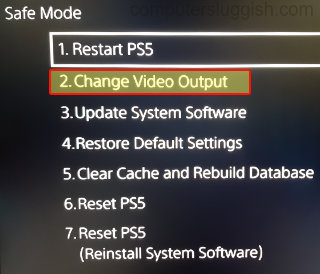
If your PS5 still shows no image after trying another display and cable, inspect the HDMI port carefully. Loose connectors or bent pins usually indicate physical damage that requires professional repair.
How to Prevent HDMI Port Problems
Even after fixing your HDMI connection, a few simple habits can help prevent the problem from coming back. Taking care of your cables, keeping your system updated, and handling your devices properly can all help maintain a stable display connection and extend the life of your HDMI hardware. Here are some easy tips to avoid future HDMI issues:
Update your graphics drivers. This helps fix bugs and improves display performance.
Use good-quality HDMI cables. Better cables are less likely to cause signal problems.
Don’t plug and unplug cables too often. This can loosen or damage the port over time.
Keep HDMI ports clean. Dust can interfere with the connection.
Turn off devices before reconnecting cables. This helps prevent connection errors.
Keep Windows and BIOS updated. Updates improve compatibility and stability.
Store cables carefully. Avoid bending or twisting them too much.
Following these simple steps can help keep your HDMI connection working smoothly and prevent future display issues.
Conclusion
An HDMI port not working issue doesn't always mean hardware damage. Often it can be fixed by checking the cable, restarting devices, adjusting display settings, or updating graphics drivers. This applies whether it's a computer, Dell laptop, or PS5. Keeping drivers updated is one of the best long-term fixes. Driver Booster, as the best driver updater, helps by detecting outdated drivers, installing compatible updates, and reducing HDMI issues with a few clicks. Download Driver Booster to maintain stable display performance and prevent future HDMI connection problems.
Driver Booster Free
- Automatically scan and update drivers.
- Update game ready drivers for peak gaming performance.
- Identify and fix various common of hardware issues.
- Boost 30% of system performance for fast & smooth running.