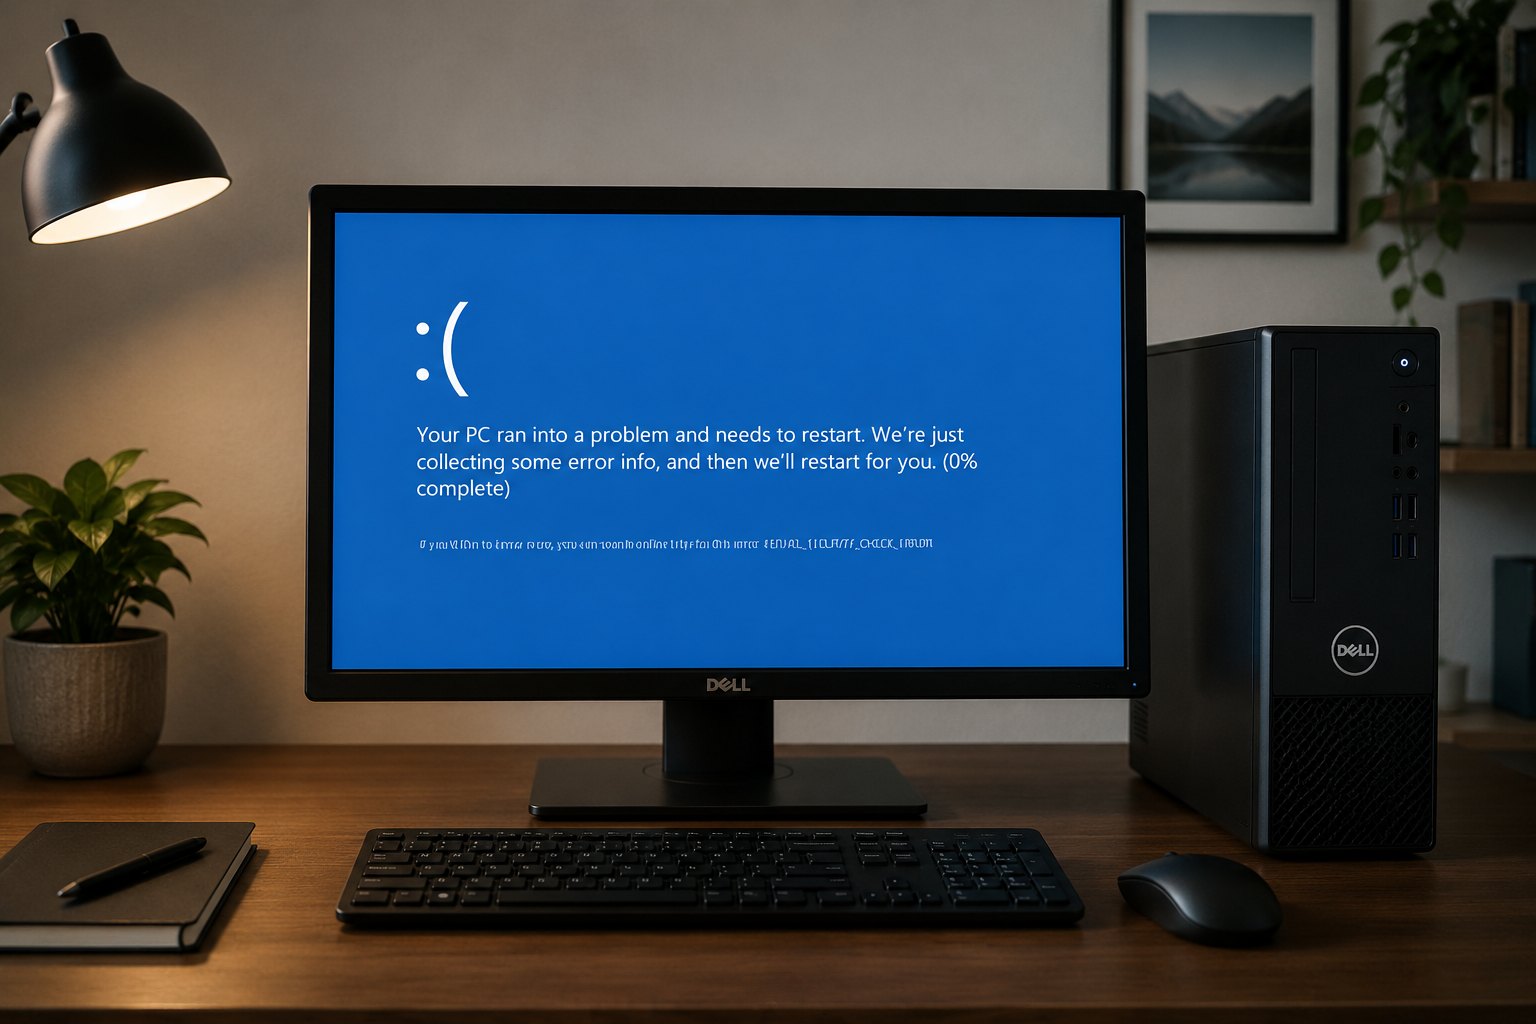
Windows relies on a healthy system image to install updates, load built-in features, and run reliably. Once that image becomes damaged, you may notice failed updates, unexpected errors, or performance issues. Microsoft provides DISM to inspect and repair these underlying Windows components.
 A DISM scan can identify corruption in the component store before more serious problems develop. Since ScanHealth, CheckHealth, and RestoreHealth have similar names, they're often mistaken for one another. This blog explains how each command works, when it should be used, how to resolve common DISM errors, and what you can do afterward to help keep Windows stable and protected.
What is a DISM Scan & When Should I Run ScanHealth?
DISM, short for Deployment Image Servicing and Management, is a built-in Windows utility that checks and repairs the operating system's component store. A DISM scan using the DISM scan command with the ScanHealth option performs a detailed inspection to determine whether that component store contains corruption.
ScanHealth is worth running when Windows begins behaving abnormally, especially in situations like these:
Frequent system crashes or unexpected restarts. Repeated instability can indicate corruption within the Windows image rather than a faulty application.
Windows Update failures. Updates that refuse to install or repeatedly return error codes are often linked to problems in the component store.
Missing Windows features or unexplained system errors. Built-in apps, optional features, or Windows services may stop working correctly when image corruption develops.
DISM Scan Command: CheckHealth vs. ScanHealth vs. RestoreHealth
CheckHealth provides a quick status check, ScanHealth performs a more thorough inspection of the component store, and RestoreHealth goes one step further by repairing detected corruption. The table below highlights the key differences to help decide which DISM scan command is appropriate for your situation.
| Command |
Checks Corruption |
Deep Scan |
Repairs Windows |
Best For |
| CheckHealth |
Yes |
No |
No |
Quick health verification |
| ScanHealth |
Yes |
Yes |
No |
Scan of the component store |
| RestoreHealth |
Yes |
Yes |
Yes |
Repairing corrupted system files |
How to Run a DISM ScanHealth Scan Step-by-Step
Running DISM ScanHealth only takes a few minutes to start. Follow the steps below carefully to learn how to run DISM scan and enter each command exactly as shown. Beyond scanning and repairing Windows system issues with DISM scans, improving everyday PC security also involves controlling online threats such as malicious ads and tracking scripts with a reliable free ad blocker Chrome/Firefox/Edge web browsers.
How to run DISM scan Windows 11:
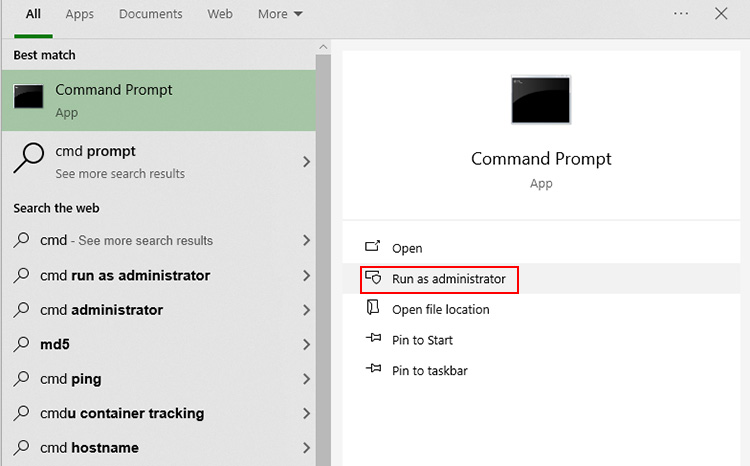
Step 1. Press Windows + S, type cmd, then right-click Command Prompt and choose Run as administrator. Select Yes if the User Account Control prompt appears.
Step 2. Run the appropriate command. Windows supports three different health-check commands. Pick the one that matches your goal.
Type the selected command exactly as displayed, then press Enter.
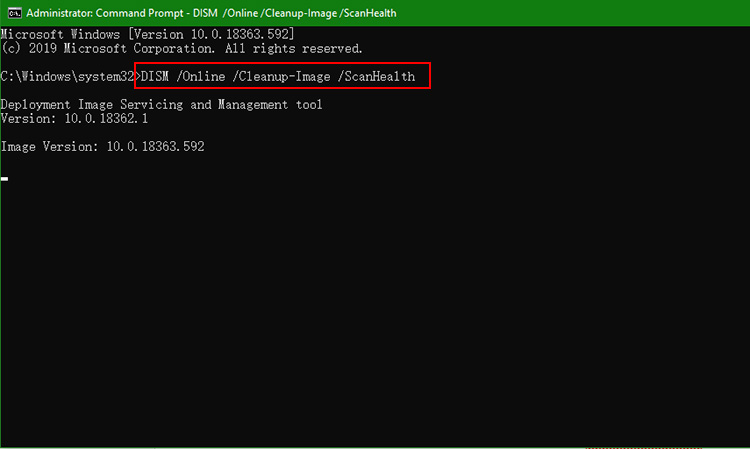
Step 3. The scan may take anywhere from several minutes to half an hour. Progress occasionally appears to stop, which is normal. Keep the Command Prompt window open until a completion message confirms that the operation has finished.
How to Repair Windows After DISM ScanHealth Finds Corruption
When DISM ScanHealth reports damage in the component store, the next step is to use RestoreHealth, which attempts to replace corrupted components with healthy copies. In most cases, Windows retrieves the required files automatically through Windows Update, allowing the repair to complete without any additional downloads. Before you begin, make sure your PC has a stable internet connection.
Step 1. Press Windows + S, search for cmd, right-click Command Prompt, and choose Run as administrator. Approve the UAC prompt if it appears.
Step 2. Enter the command below exactly as shown, then press Enter.
DISM /Online /Cleanup-Image /RestoreHealth
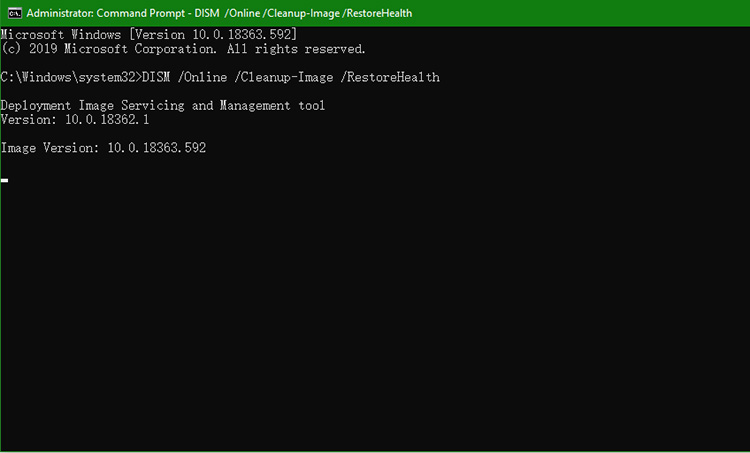 Step 3. The process may take 10 to 30 minutes, depending on your system and internet connection. It's normal for the progress indicator to pause temporarily, so avoid closing the window or restarting the computer.
Step 4. After DISM repairs the Windows component store, running SFC/scannow checks and replaces corrupted protected system files using the repaired Windows image.
Tips: Before repairing Windows, it's also important to make sure the system is free of infections by using the best malware removal tool.
Common DISM Scan Errors and How to Fix Them
Although DISM is a reliable Windows repair utility, the process does not always complete smoothly. Some users may encounter frozen progress, error codes, or repair failures during the operation.
DISM Stuck at 20%, 40%, or 62%
Windows may spend extra time analyzing large component packages, so the progress indicator can remain unchanged for several minutes. Avoid closing Command Prompt or restarting the PC too early.
DISM Error 87: The Parameter Is Incorrect
Error 87 often appears when the command contains a typing mistake or unsupported options. Check the command carefully, including spaces and forward slashes. Running the latest Windows updates can also help.
DISM Fails to Repair Corrupted Files
Running System File Checker after DISM can restore the remaining damaged files. The common workflow is to use DISM to fix Windows component corruption first, then run SFC to check protected system files.
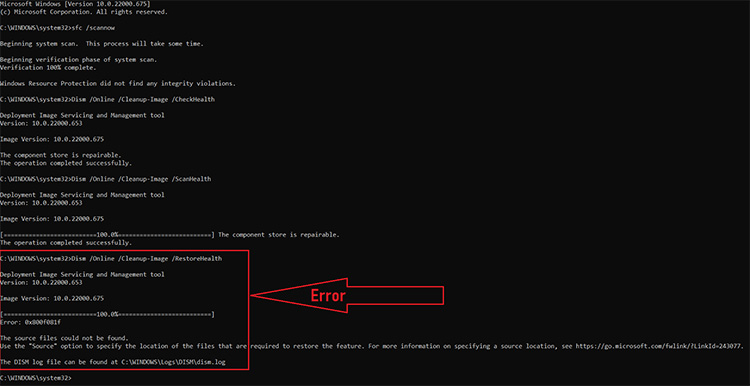
DISM Error 0x800f081f: The Source Files Could Not Be Found
This error means Windows cannot locate the files required for repair. A stable internet connection is necessary. Try using a matching Windows installation source to provide the missing files.
Protect Your Repaired Windows PC with IObit Malware Fighter
While DISM repairs Windows image corruption, it cannot detect malware or ransomware that may have caused or worsened system instability. Running a malware scan afterward helps ensure your repaired system remains secure.
For an extra layer of security, IObit Malware Fighter complements Windows repair tools by actively detecting and blocking malware. It provides real-time protection against viruses, ransomware, spyware, Trojans, and phishing attacks, while also safeguarding browser activity, sensitive files, USB devices, and suspicious applications through multiple security layers. The tool helps protect your PC automatically, even if you're unfamiliar with advanced Windows repair commands like DISM.
IObit Malware Fighter Free
- Quick and deep system scanning throughout PC system.
- Smart defense against all malicious infestations.
- High-level security and privacy protection in real time.
- Leading anti-malware and anti-virus engines.

Key Features of IObit Malware Fighter
Deep Windows virus detection & removal:
Powered by the Bitdefender engine, IObit Malware Fighter thoroughly scans your Windows system to detect deeply concealed malware, including viruses, spyware, ransomware, and other advanced threats, then removes or isolates them safely.
Smart levels of scanning modes:
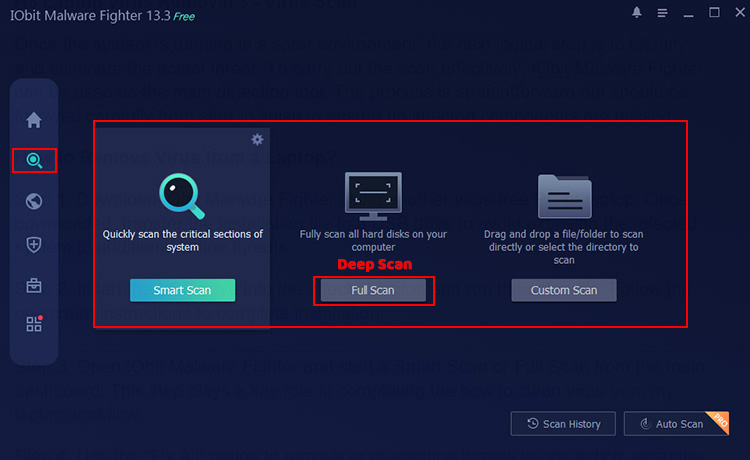
The software provides multiple scan options for different situations. Smart Scan examines critical system components for potential threats, Full Scan examines all local drives, and Custom Scan lets you choose specific files or folders.
Comprehensive security protection:
Beyond malware scanning, the anti virus software for free adds layered security for privacy, web browsing, and system protection. It detects suspicious processes, guards against malicious websites, and reduces risks from external storage devices.
Real-time system safeguard:
Real-time protection actively scans files, downloads, and system processes for potential security risks. Suspicious behavior can be detected before threats cause damage, providing ongoing protection during daily PC use.
How to Run a Deep Scan with IObit Malware Fighter
Step 1. Visit the official IObit Malware Fighter website, download the latest version, and complete the installation process. Launch the program after setup finishes.
Step 2. Open the main interface and choose Full Scan. This mode thoroughly examines all hard drives for hidden threats, then cleans or quarantines infected files to keep your system protected.
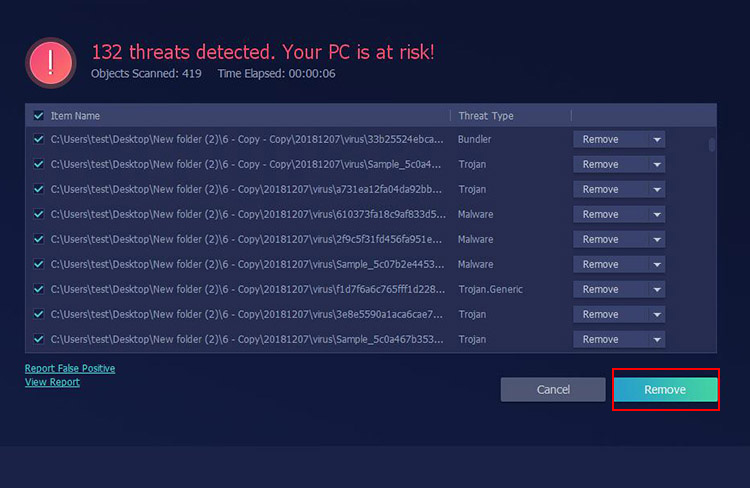
Step 3. When the scan is finished, a detection report appears with any identified malware, suspicious entries, or potential ransomware threats. Review the scan results and choose Remove to eliminate the threats, and clean compromised files.
DISM vs. SFC: What's the Difference?
Although both DISM and SFC are built-in Windows repair tools, they fix different types of problems. DISM repairs the Windows component store (system image), while SFC (System File Checker) scans and replaces corrupted protected system files. In most cases, Microsoft recommends running DISM first, then SFC, because SFC relies on a healthy Windows image to restore damaged files.
| Feature |
DISM |
SFC |
| Full Name |
Deployment Image Servicing and Management |
System File Checker |
| Repairs |
Windows component store (system image) |
Protected Windows system files |
| Typical Command |
DISM /Online /Cleanup-Image /RestoreHealth |
sfc/scannow |
| Internet Required |
Sometimes (when downloading repair files) |
No |
| When to Use |
Windows Update failures, image corruption, system instability |
Missing or corrupted system files |
Tip: If Windows is experiencing serious corruption, running DISM first ensures the system image is healthy before SFC attempts to repair individual system files.
FAQs about DISM Scan
What is the correct order to run DISM commands?
If you're troubleshooting Windows corruption, it's best to run the DISM commands in the following order: CheckHealth > ScanHealth > RestoreHealth > SFC /scannow.
Is DISM ScanHealth safe?
Yes. ScanHealth only checks the Windows component store for corruption and does not make changes to system files. It is a diagnostic step that helps identify whether further repairs are needed.
How long does a DISM scan take?
Typically, 10-30 minutes. The time depends on system speed, Windows version, and the level of corruption. A quick check may finish quickly and a deeper scan can take several minutes or longer.
Can I use IObit Malware Fighter alongside DISM?
Yes. IObit Malware Fighter prioritizes malware detection and real-time protection, while DISM repairs Windows image issues. They handle different types of system problems and can work together.
Final Words
Figuring out how DISM scan commands work makes it easier to detect component corruption, choose the right repair method, and avoid unnecessary troubleshooting steps. After repairing Windows issues, adding reliable security protection can further maintain Windows reliability. Try IObit Malware Fighter to help defend your PC against malware, privacy threats, and other security risks, and keep your everyday computing experience safer.