- Support Center
- Multiple Languages
- Language
- Help Us Translate
Expert in
PC Health Solution

All-in-one PC health solution: clean, optimize and secure

Comprehensive PC cleaning, optimization and protection

Keep drivers always up-to-date

More stable performance with less system crashes

Protect millions of computers against malware

Top computer security with full-round protection

Protect against viruses & boost PC performance
Clean: 420 billion traces removed & 85 EB junk files cleaned
Protect: 80 million unauthorized access blocked & 20 million bugs fixed
Speed Up: 6 million hours of startup time saved & Turbo boost
Optimize: Auto clean and auto care your PC with AI mode

Learn how to test your PC power supply step-by-step using a paperclip, digital tester, multimeter, or software to safely diagnose power issues and crashing.



Find Power Supply Details
Why Need to Test Power Supply Unit
Test PSU with Paperclip
Use Multimeter for Precision Measurement
Use Digital PSU Tester
How to Check PC Power Supply Wattage
Power Supply, or Power Supply Unit (PSU), is the core internal hardware of a PC for electricity. A PC cannot run without power supply.
The fact is that you cannot get any information about the PSU (its model, total wattage, or others) in system information. The fastest way is to check the label attached on your PSU after turning off your PC and open the case. Or go to the manufacturer's official support to get detailed information.
Test your Power Supply Unit (PSU) to verify if it delivers stable, clean, and sufficient power to your hardware or not. If there is any issue for PSU, it may trigger unexpected shutdowns or cause permanent damage to connected components. So test your PSU is necessary especially for the following situations:
No power at all: Your PC cannot turn on.
Sudden shutdowns under load: Your PC turns off instantly without a Windows "shutting down" screen when launching games or heavy rendering tasks.
Random restarts & BSODs: You experience frequent Blue Screens of Death or system freezes.
Strange physical signs: Encounter persistent burning smell, high-pitched electrical noise.
Before upgrading CPU or GPU: Ensure your current PSU can handle transient power spikes for new higher-wattage graphics card or processor.
Before installing a second-hand PSU: Test with a paperclip or digital PSU tester.
Use a paperclip to test if your PSU can power on or not.
Step 1. Prepare a metal paperclip and bend it into a U-shape.
Step 2. Locate pin 16 and pin 17 on the 24-pin cable and insert the ends of the paperclip into pin 16 and pin 17. (To find pin 16 and pin 17, let the clip face up and the pins face toward you, count from left to right and the 4th and 5th pins are what you need. )
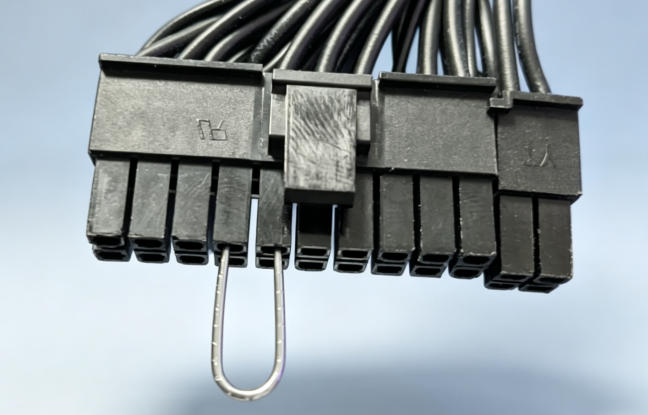
Step 3. Turn on the PSU.
Step 4. If the PSU fan spins up, the PSU functions normally.
Use a multimeter to manually verify rail voltages while the PSU is jumped via the paperclip method.
1. Set up a multimeter dial to DC voltage.
2. Insert the black multimeter probe into any Ground terminal on the 24-pin connector or a Molex connector.
3. Test voltage rails by touching a red probe to terminals inside the 24-pin connector.
Use a dedicated tester to get immediate, accurate LCD voltage readings across all rails.
1. Disconnect AC power.
2. Plug the 24-pin ATX cable into the tester to build connection. Attach additional CPU (4/8-pin) , PCIe (6/8-pin), and SATA connectors to test each output rail.
3. Plug in the AC cord and switch the PSU on. You can get the active voltages and PG delay on the LCD panel.
4. Compare the values with safe ATX specifications:
+12V Rail: 11.4V - 12.6V
+5V Rail: 4.75V - 5.25V
+3.3V Rail: 3.135V-3.465V
PG Value: 100ms-500ms
Using a Power Supply Unit (PSU) calculator provides an accurate estimate of your system's peak power demands. After getting the recommended wattage, you should buy one that is higher so your PC's normal peak power consumption sits between 50% and 80% of the PSU's total capability.
Here we take IObit Power Supply Calculator as an example to show how to test PSU wattage.
Step 1. Go to the IObit Power Supply Calculator page.
Step 2. Input detailed information about your PC, including the following:
CPU (brand, socket, model)
GPU (brand, graphics card, quantity)
Motherboard (option)
Memory module, SSD type, and HDD RMP & size (optional)
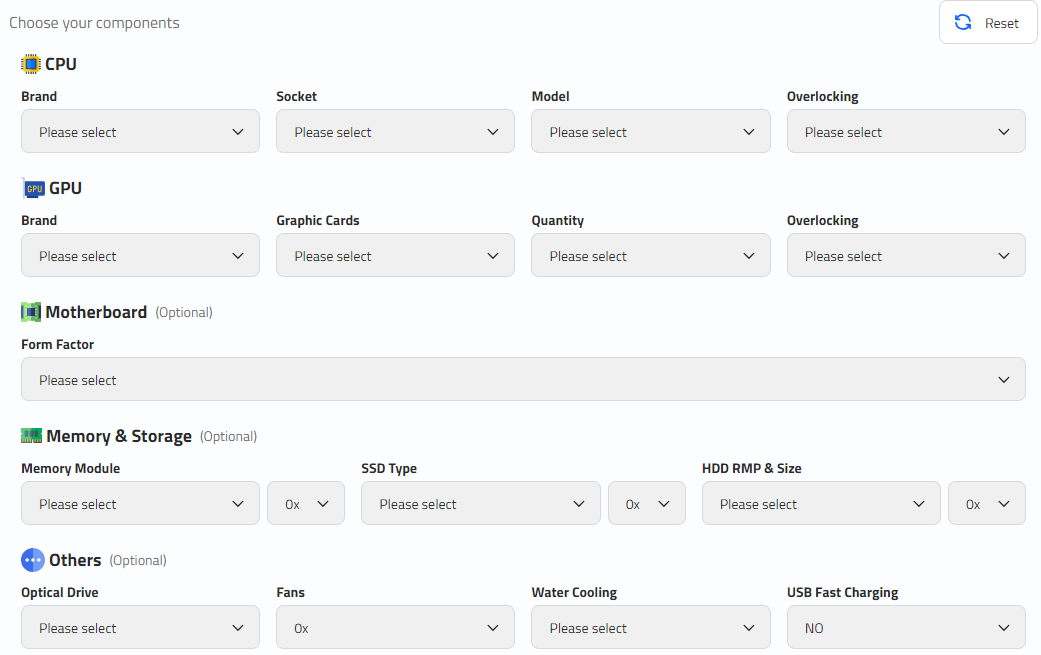
Step 3. Click the Calculate Now button to get the recommended PSU wattage.
Bonus Tips: Clean and Optimize PC with Advanced SystemCare
Advanced SystemCare is an all-in-one PC maintenance utility for cleaning and optimizing. It cleans junk files, fixes shortcuts, and removes private data from system and third-party apps. It offers additional tools like startup manager, Turbo boost, RAM cleaner, and more to keep your Windows in good condition.

 People Also Ask
Free up disk space by safe Windows Installer folder cleanup. This guide shows how to use Settings, Disk Cleanup, etc., to remove unwanted installer files.
PC stuck on boot screen? Learn how to fix pc stuck on boot screen with proven methods like Safe Mode, SFC scan, and driver updates.
How to improve Steam download speed? Check how to make Steam download faster in 12 ways: Check Internet Connection, Switch Steam Download Server Region…