The fastest way to clear the Windows Update cache is:
1. Open "Command Prompt as Administrator"
2. Run net stop wuauserv and net stop bits
3. Delete all files in C:\Windows\SoftwareDistribution\Download
4. Run net start wuauserv and net start bits
This works on both Windows 11 and Windows 10. If you'd rather not use commands, Disk Cleanup's "Windows Update Cleanup" option or Advanced SystemCare can do it in one click — see the full methods below.
Windows Update is crucial for keeping your PC secure, stable, and up to date. However, cached update files can pile up over time, taking up gigabytes of storage and sometimes causing installation errors or failed updates.
If you want to clear Windows update cache, this guide covers multiple effective methods—manual, built-in, and automated—so you can free up disk space, resolve errors, and keep your system running smoothly.
What Is Windows Update Cache?
Windows Update cache is a collection of temporary files stored by Windows when downloading and installing updates. These files are typically located in the SoftwareDistribution folder and are used to speed up the update process.
The cache may include:
Downloaded update packages
Temporary installation files
Update logs
Delivery Optimization files
While these files are useful during installation, they often remain on your system long after the update process is complete.
Is It Safe to Clear the Windows Update Cache?
Yes. In most situations, it's perfectly safe to delete Windows Update files. Windows automatically recreates the necessary folders and downloads fresh copies of updates when needed.
Why Should You Clear Windows Update Cache?
Over time, Windows update files can accumulate and sometimes cause errors or slow down your system. Clearing the cache helps free space and resolve these issues. There are several reasons why users choose to clear the Windows update cache:
Free Up Disk Space
Windows updates can occupy several gigabytes of storage over time, especially on systems that have been upgraded through multiple feature updates. If you're running low on storage, you can choose to free up disk space.
Fix Update Errors
Corrupted cache files can prevent updates from downloading or installing correctly. Clearing the cache often resolves these issues.
Resolve Stuck Updates
If Windows Update is stuck at a specific percentage or repeatedly fails, removing cached files can force Windows to start fresh.
Improve System Maintenance
Regularly cleaning unnecessary files helps keep your system organized and prevents storage-related issues. Excessive junk files and update leftovers may also contribute to performance problems such as Windows 11 100 disk usage.
Quick Comparison of Windows Update Cache Removal Methods
| Method |
Requires Admin/Stop Services |
Removes |
Best For |
| File Explorer |
Yes |
All cached files |
Full manual cleanup |
| Command Prompt |
Yes |
All cached files |
Fast, scriptable cleanup |
| Disk Cleanup |
No (built-in prompt) |
Only obsolete files |
Safe one-time cleanup |
| Settings App |
No |
Only obsolete files |
Windows 11 users, no CMD needed |
| Advanced SystemCare |
No |
All cached + other junk |
Ongoing automated maintenance |
Method 1: Clear Windows Update Cache Manually via File Explorer
If you prefer a straightforward approach to deleting Windows Update files without using additional tools, File Explorer allows you to manually locate and delete Windows Update cache files in just a few steps.
How to Delete Windows Update Files via File Explorer
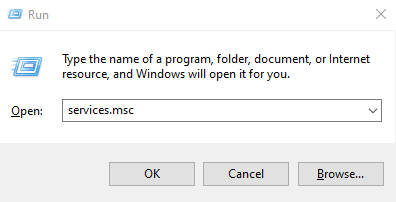
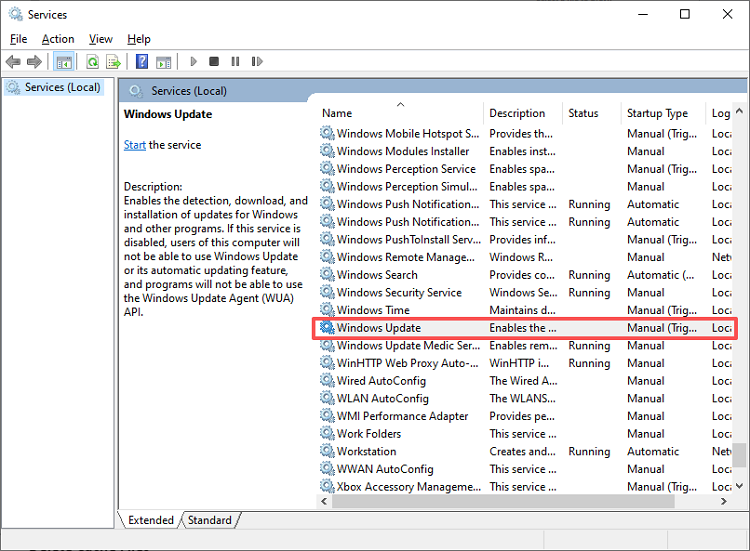
Step 1: Stop Windows Update Services
Step 2: Open the SoftwareDistribution Folder
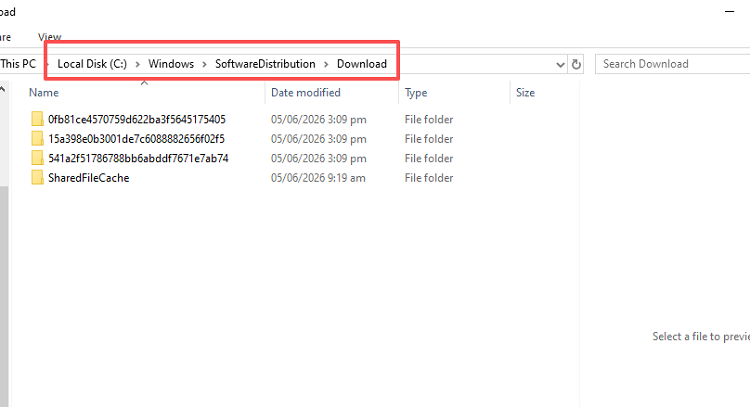
Navigate to C:\Windows\SoftwareDistribution\Download to locate cached update files.
Step 3: Delete Cached Files
Select all files (Ctrl + A) and press Delete. Confirm prompts to remove the files safely.
Step 4: Restart Windows Update Services
Return to Services, right-click Windows Update and BITS, and select Start.
Method 2: Clear Windows Update Cache Using Command Prompt
For users comfortable with command-line tools, Command Prompt provides a faster way to delete windows update files manually and restart essential Windows Update services.
How to Remove Windows Update Files via CMD
Step 1: Open Command Prompt as Administrator
Press Windows + S, type cmd, right-click Command Prompt, and select Run as administrator.
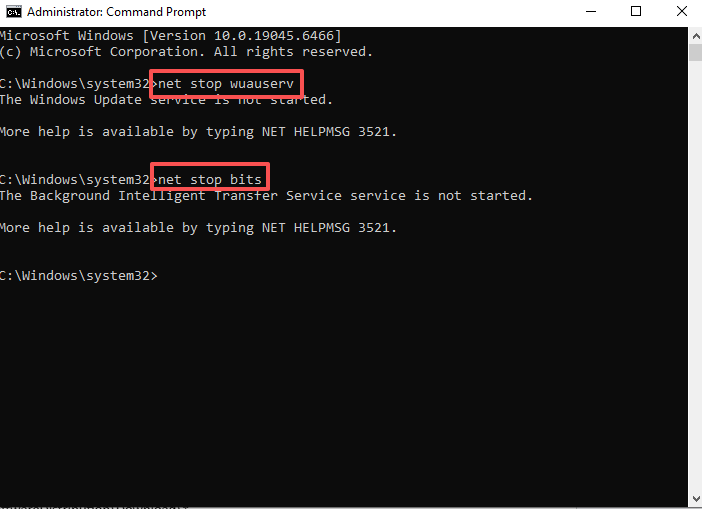
Step 2: Stop Update Services
Run the following commands:
net stop wuauserv
net stop bits
Step 3: Delete Cached Files
This deletes all downloaded update files safely.
Step 4: Restart Update Services
net start wuauserv
net start bits
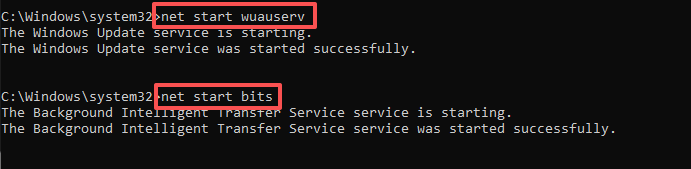
This is one of the quickest ways to delete Windows Update files manually.
Method 3: Delete Windows Update Cache with Disk Cleanup
Windows includes a built-in Disk Cleanup utility that can safely remove update-related files, making it a convenient option for routine maintenance.
How to Delete Windows Update Files with Disk Cleanup
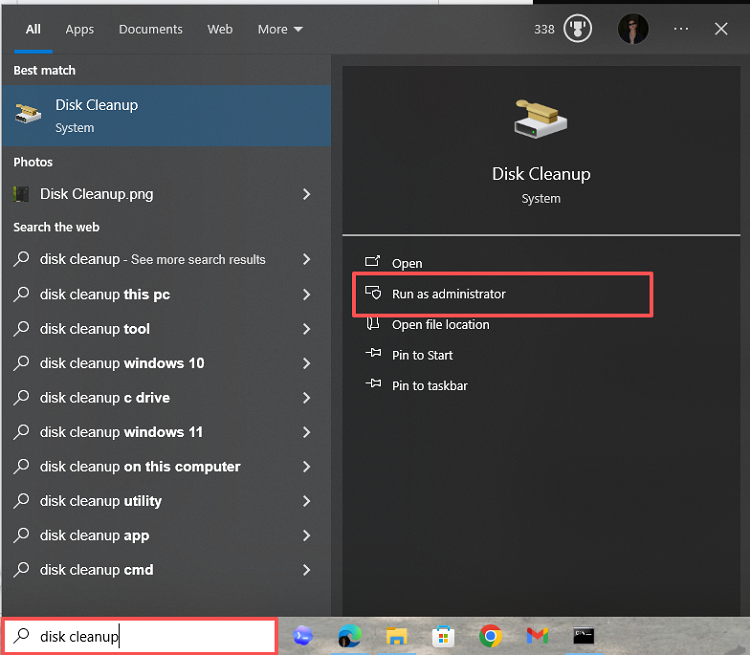
Step 1: Open Disk Cleanup
Press Windows + S, search Disk Cleanup, and run as Administrator.
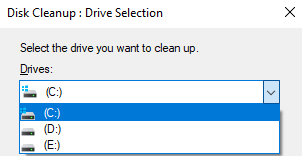
Step 2: Select System Drive
Choose C: or the drive where Windows is installed.
Step 3: Clean Up System Files
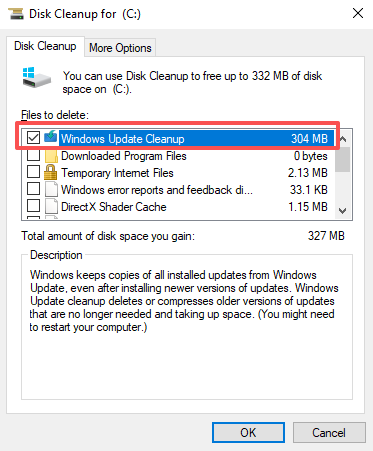
Click Clean up system files. Check Windows Update Cleanup and any other files you want to remove.
Step 4: Remove Files
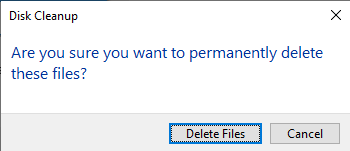
Click OK, then Delete Files. Disk Cleanup will remove the cached update files automatically.
Disk Cleanup is easy to use but may not remove every cached update file.
What is "Windows Update Cleanup"?
It's the option inside Disk Cleanup that removes old, superseded Windows Update files Windows has already confirmed are safe to delete — unlike manually deleting the whole SoftwareDistribution folder, it won't touch files still in use.
Method 4: Clear Windows Update Cache Automatically with Advanced SystemCare
If you'd rather avoid navigating system folders or running commands, Advanced SystemCare offers a simple one-click solution to clear Windows Update cache and other junk files. Many users aren't comfortable deleting system files manually. Advanced SystemCare automates the process while providing additional system optimization features.
Advanced SystemCare Free
- Clean: 420 billion traces removed & 85 EB junk files cleaned
- Protect: 80 million unauthorized access blocked & 20 million bugs fixed
- Speed Up: 6 million hours of startup time saved & Turbo boost
- Optimize: Auto clean and auto care your PC with AI mode

Benefits of Using Advanced SystemCare
One-Click Junk File Cleanup: Quickly removes temporary files, leftover Windows Update cache, and system clutter, freeing up disk space and preventing potential update errors without manual effort.
Automatic Removal of Update Cache Files: Detects and clears outdated or corrupted Windows update files safely, helping fix update failures and ensuring smooth installation of future updates.
Registry Cleaning: Repairs invalid or obsolete registry entries that can slow down your system or cause software conflicts, improving overall Windows stability and responsiveness.
Privacy Protection: Deletes browsing history, temporary files, and other private data, keeping sensitive information secure while reducing unnecessary storage usage on your PC.
Startup Optimization: Disables unnecessary startup programs and services, reducing boot times and memory usage, which helps Windows launch faster and run more efficiently.
Overall PC Performance Improvement: Combines system cleaning, optimization, and monitoring tools to enhance speed, responsiveness, and reliability, keeping your PC running smoothly while maintaining Windows updates.
How to Clear Windows Update Cache with Advanced SystemCare
Step 1: Install and Launch Advanced SystemCare
Download and install IObit Advanced SystemCare. Once installed, open the program to access its main dashboard.
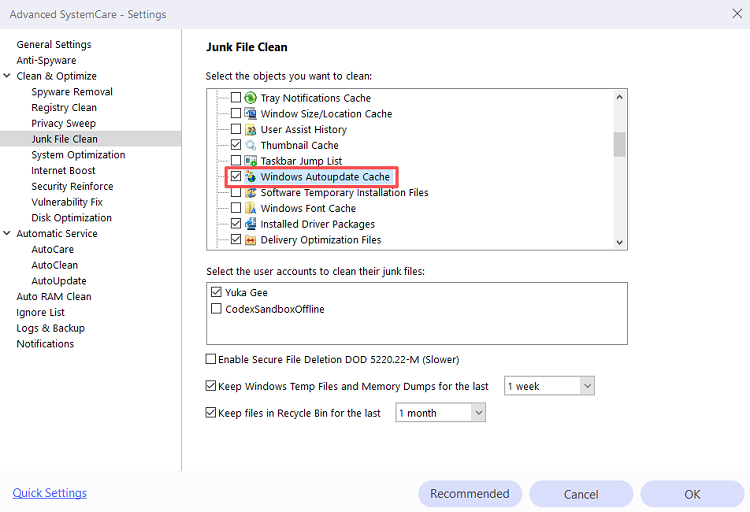
Step 2: Enable Windows Autoupdate Cache Cleaning
Click the gear icon next to Junk File Clean. In the settings window.
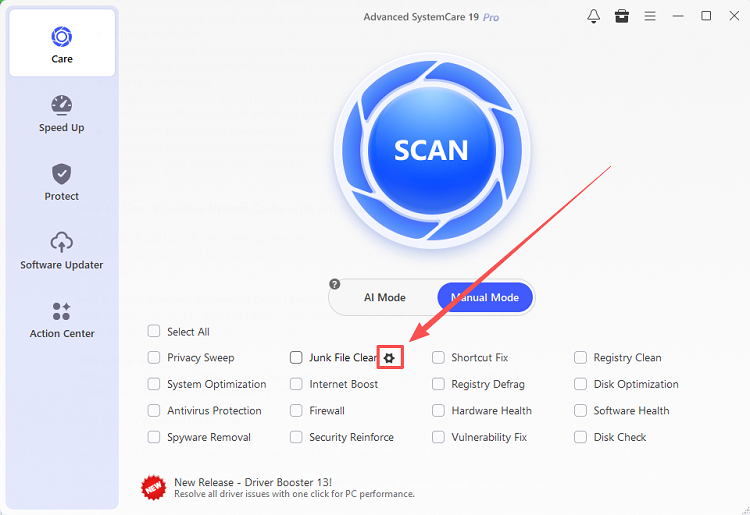
Find Windows Autoupdate Cache, check the box, and click OK to save your changes.
Step 3: Scan Your PC
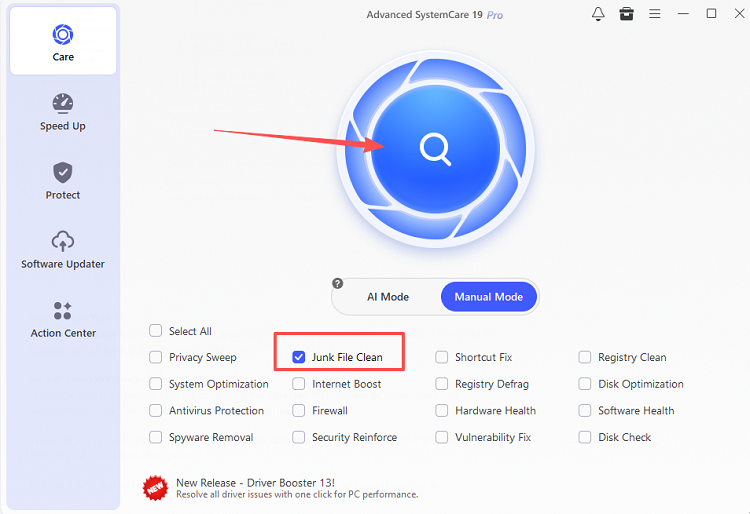
Return to the Care tab, select Junk File Clean, and click Scan. The program will search for Windows Update cache files and other unnecessary junk.
Step 4: Clean Windows Update Cache
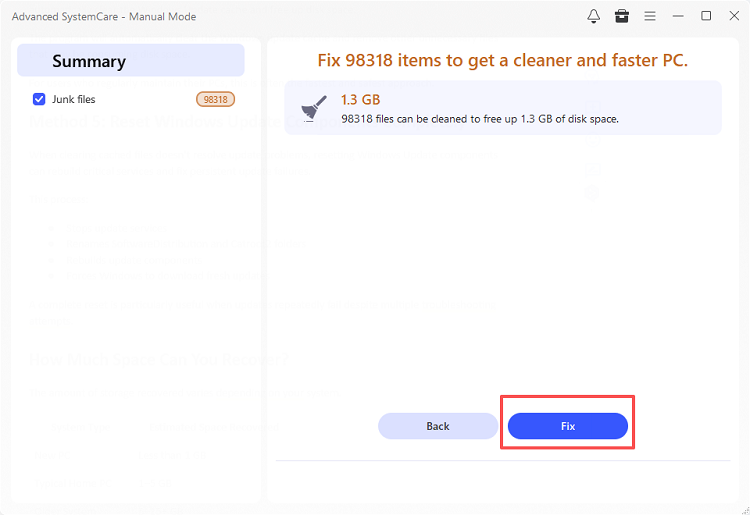
After the scan is complete, click Fix to remove the detected files. Advanced SystemCare will automatically clear the Windows Update cache and free up disk space.
The program will automatically clear the Windows update cache and remove other unnecessary files that may be consuming disk space.
For users who regularly maintain their PCs, this is often the fastest and safest approach.
Method 5: Clear Windows Update Cache via Settings (Windows 11)
Windows 11 has a built-in Storage tool that finds and removes Windows Update cache files without using Disk Cleanup or Command Prompt.
Step 1: Press Windows + I to open Settings.
Step 2: Go to System > Storage.
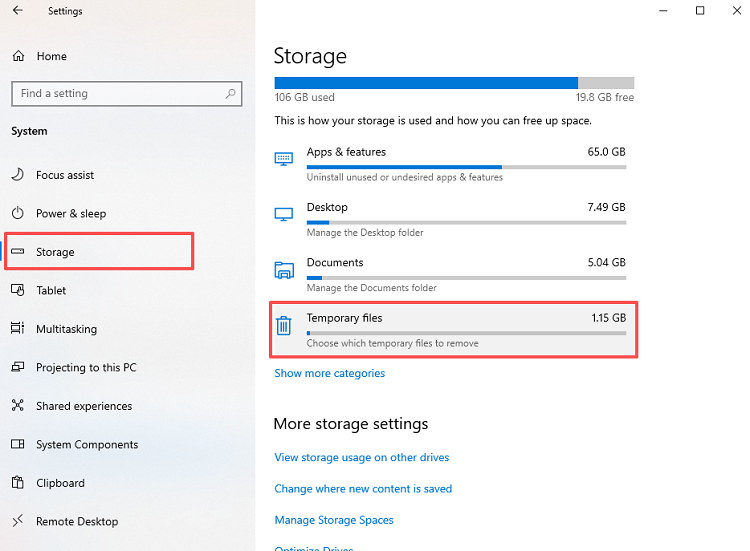
Step 3: Click Temporary files (or Cleanup recommendations, depending on your Windows 11 version).
Step 4: Wait for Windows to scan, then check the box next to Windows Update Cleanup.
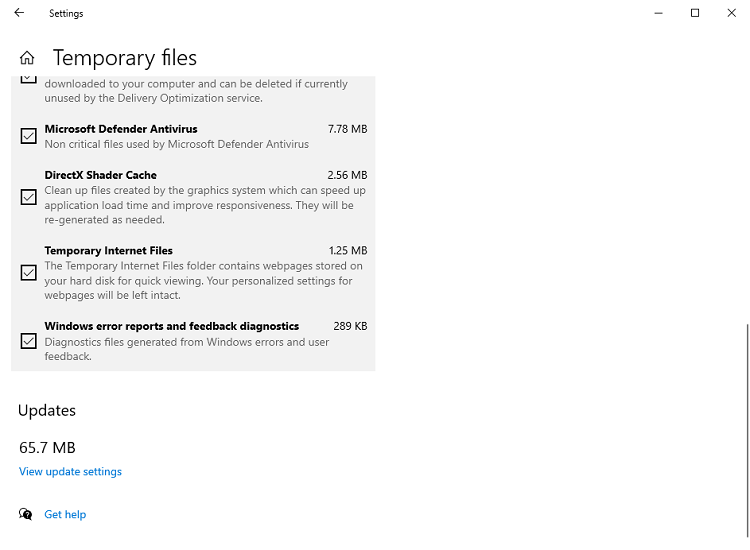
Step 5: Click Remove files to delete the selected items
This is the easiest built-in method on Windows 11 and doesn't require stopping any services manually — Windows handles that internally.
You can also enable Storage Sense on the same Storage page to have Windows automatically clear the update cache on a schedule.
Troubleshooting: What If Clearing the Windows Update Cache Doesn’t Work?
If updates still fail after cache cleaning, you may need to reset Windows Update components completely. This process rebuilds the necessary folders and services so Windows can download fresh updates.
Step 1: Open Command Prompt as Administrator
Press Windows + S, type cmd, right-click Command Prompt, and select Run as administrator.
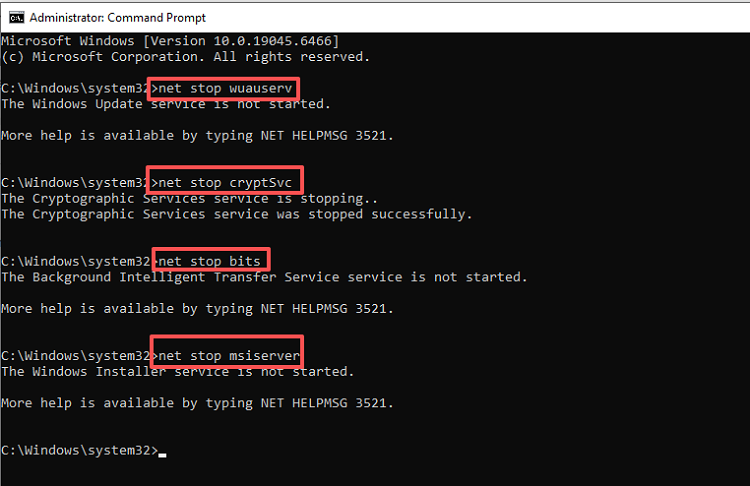
Step 2: Stop Windows Update Services
net stop wuauserv
net stop cryptSvc
net stop bits
net stop msiserver
Step 3: Rename Update Folders
Step 4: Restart Update Services
net start wuauserv
net start cryptSvc
net start bits
net start msiserver
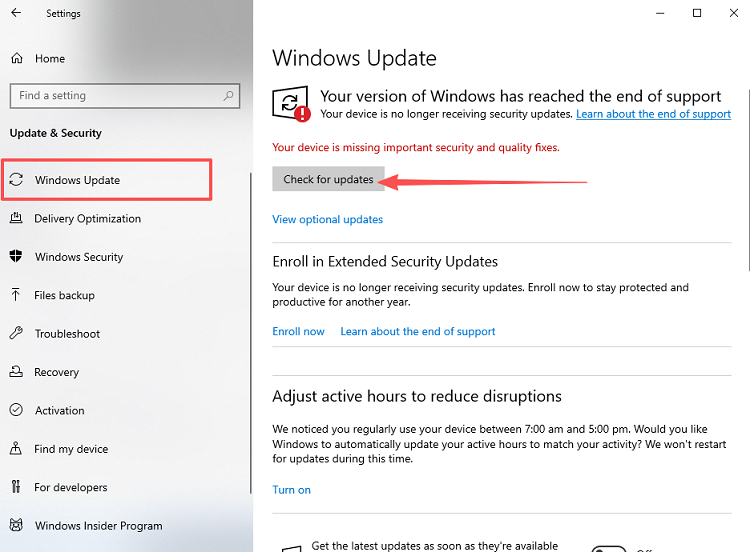
Step 5: Check for Updates
Go to Settings > Update & Security > Windows Update and click Check for updates. Windows will download fresh update files.
Resetting Windows Update components is more advanced than clearing the cache, but it’s very effective for stubborn update errors.
FAQ about Clearing Windows Update Cache
How do I remove all Windows 10 update cache files?
Stop Windows Update services, open the SoftwareDistribution\Download folder, delete its contents, and restart the services. This will effectively remove Windows update cache files.
How to delete Windows Update files safely?
The safest methods are using Disk Cleanup, Advanced SystemCare, or deleting the SoftwareDistribution cache after stopping Windows Update services.
How do I delete Windows Update cleanup files manually?
Stop the Windows Update and BITS services, then manually delete the contents of C:\Windows\SoftwareDistribution\Download. Restart both services afterward so Windows can rebuild the folder as needed.
Can I delete Windows Update cache without causing problems?
Yes. Windows automatically recreates the required folders and downloads updates again when necessary. Keep in mind that clearing the cache is different from uninstalling updates. If you need to roll back a problematic update, see our guide on how to remove Windows updates.
Why is my Windows Update cache so large, and does clearing it help performance?
Large feature updates, failed downloads, and years of accumulated files can cause the cache to grow substantially. Clearing it won't dramatically boost speed, but it frees up storage space and can resolve update-related errors.
What is the fastest way to clear Windows update cache?
For most users, Advanced SystemCare offers the quickest way to clear Windows update cache with just a few clicks.
Where are Windows Update files stored?
Windows Update cache files are stored in `C:\Windows\SoftwareDistribution\Download`. Update logs and metadata are kept in `C:\Windows\SoftwareDistribution\DataStore`, and Delivery Optimization files are stored separately in `C:\Windows\SoftwareDistribution\DeliveryOptimization`.
Final Verdict
Learning how to clear Windows update cache can help you recover valuable storage space and fix many common Windows Update problems. Whether you choose to manually delete Windows update cache files, use Disk Cleanup, or reset update components, each method can effectively remove unnecessary update data.
For users looking for the simplest solution, Advanced SystemCare provides an easy way to clear the Windows update cache, remove junk files, and optimize overall system performance—all without dealing with system folders or command-line tools.