Bloated thumbnail caches cause visual glitches, corrupted file previews, and File Explorer slowness for many Windows users. When cached photo files are damaged or overly large, system performance suffers.
Before setting up an automated cleanup schedule in Windows, it is essential to understand how to clear thumbnail cache manually. This article will show you 3 step-by-step manual techniques to clear thumbnail cache on Windows, plus the best free cleaner to automatically delete thumbnail cache and keep your PC running smoothly.
Part 1. Why Clear Thumbnail Cache? What Is It Exactly?
The Windows thumbnail cache is a special system database that saves small preview images of your files, photographs, and videos so that File Explorer may load them quickly without having to redraw each file every time. This database can get huge or corrupted over time though.
Understanding why Windows clear thumbnail cache routines are necessary is key to maintaining system performance and freeing up disk space:
Corrupted thumbnail caches often lead to incorrect, blank, or broken preview images in File Explorer. Performing a manual clear thumbnail cache operation forces Windows to rebuild fresh previews.
Accumulated thumbnail databases can consume gigabytes of unnecessary storage over months of use. Using a reliable hard disk cleaner helps reclaim this wasted space.
A bloated cache slows down directory loading times. A quick Windows clear thumbnail cache process restores rapid folder navigation and prevents File Explorer freezing.
Excess cache files contribute to high drive usage, making regular maintenance necessary to prevent issues like 100 disk usage Windows 11.
Part 2. How to Clear Thumbnail Cache Manually on Windows 11/10
If you prefer using built-in system tools, Windows provides several ways to wipe these temporary preview files. Here is a step-by-step guide on how to clear thumbnail cache Windows 11 and Windows 10 using 3 common manual methods.
Method 1. Clear Thumbnail Cache Using Disk Cleanup
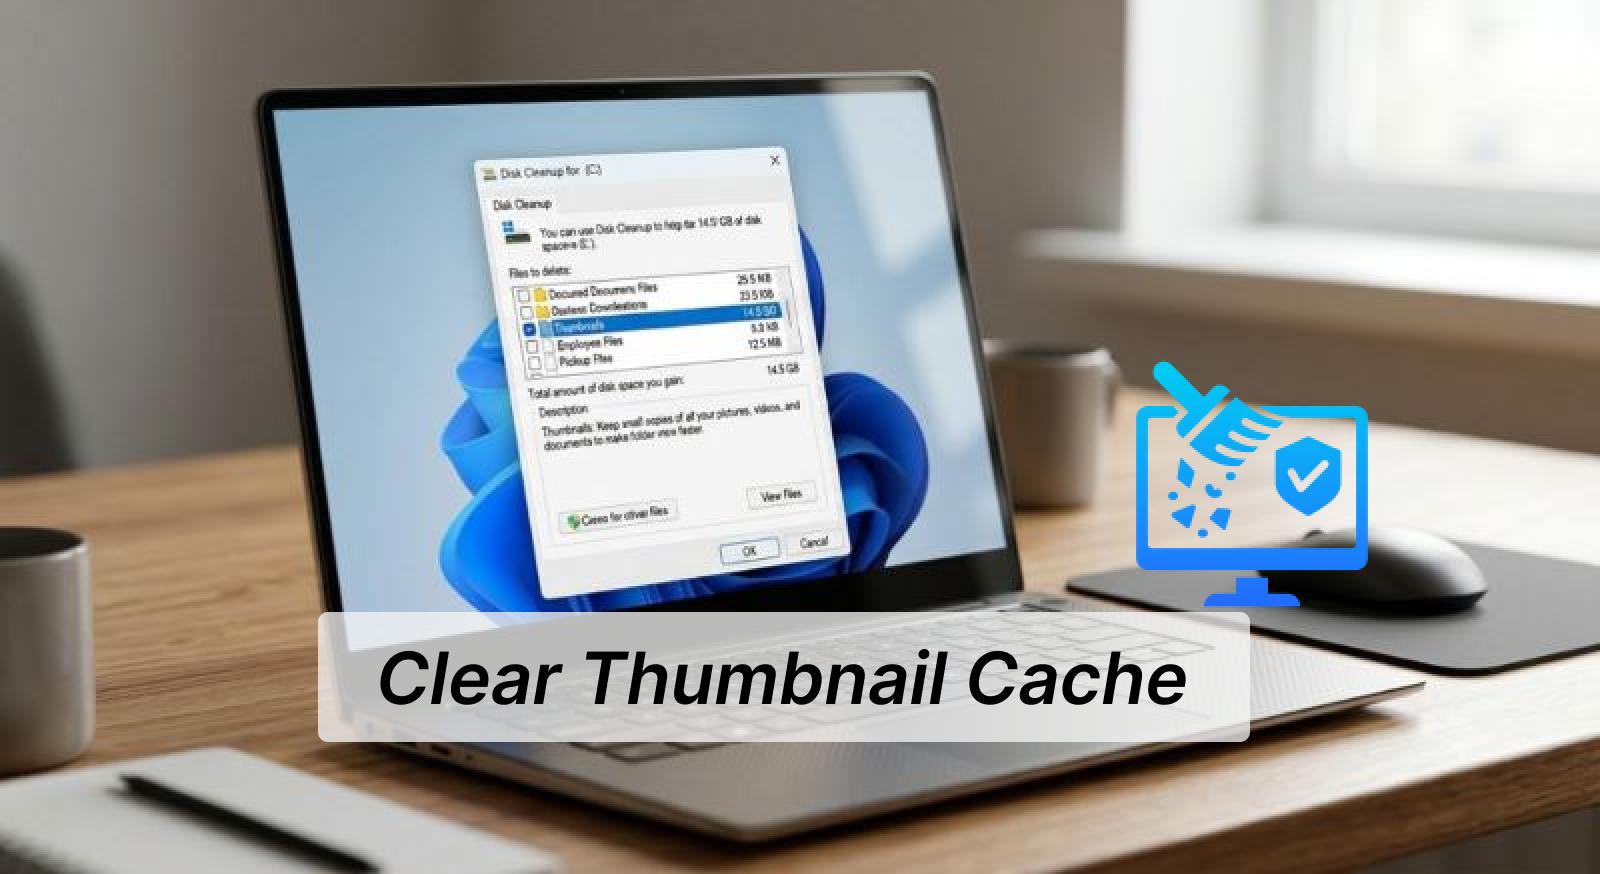
Disk Cleanup is a classic utility built into Windows that safely lets you perform a clear thumbnail cache task alongside other systems maintenance.
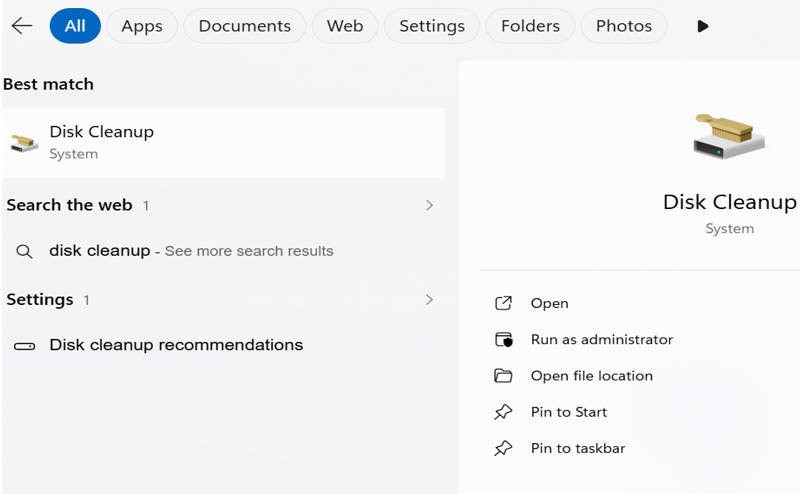
Step 1. Press the Windows key, type "Disk Cleanup" into the search bar, and select the application.
Step 2. Choose your main system drive (usually C:) and click OK.
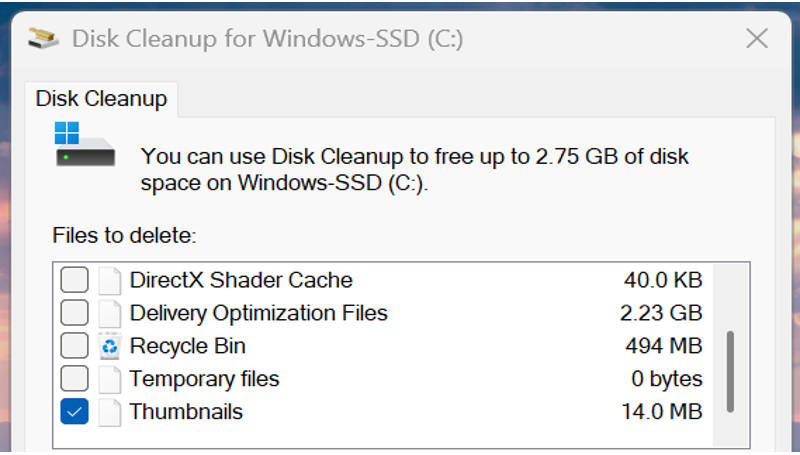
Step 3. In the list of files to delete, scroll down to check Thumbnails, and click OK to clear thumbnail cache files instantly.
Method 2. Delete Thumbnail Cache via File Explorer
You can also learn how to clear Windows thumbnail cache directly through File Explorer by navigating to the hidden system directory.
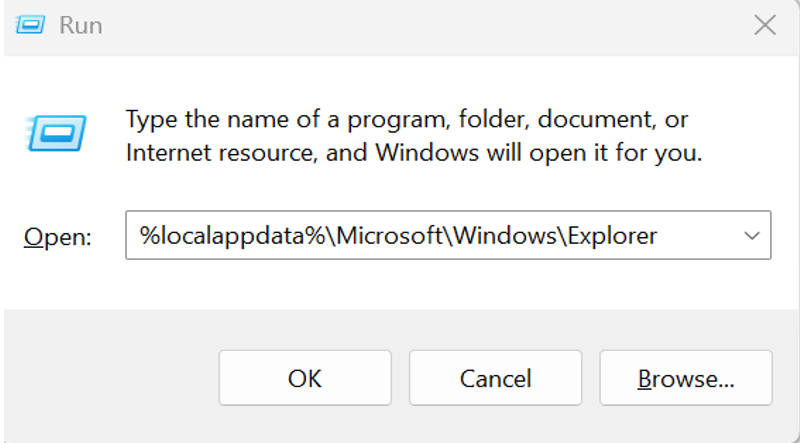
Step 1. Press Win + R to open the Run dialog box, type %localappdata%\Microsoft\Windows\Explorer, and hit Enter.
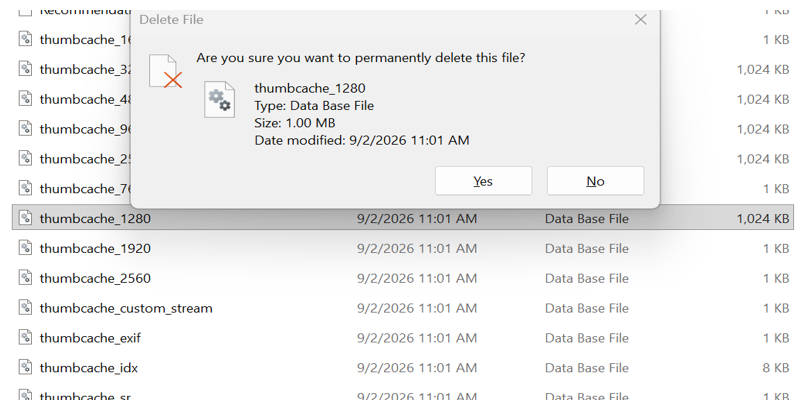
Step 2. Select all database files that start with thumbcache (such as thumbcache_32.db, thumbcache_256.db, etc.).
Step 3. Press Shift + Delete so Windows remove thumbnail cache files permanently from your system.
Method 3. Clean Thumbnail Cache with Command Prompt
Using Command Prompt is a powerful way to execute a clear thumbnail cache command when File Explorer locks files from deletion.
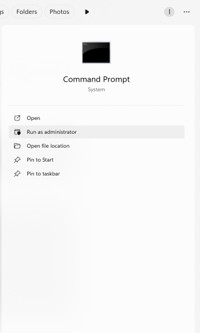
Step 1. Press the Windows key, search for "cmd", right-click Command Prompt, and choose Run as administrator.
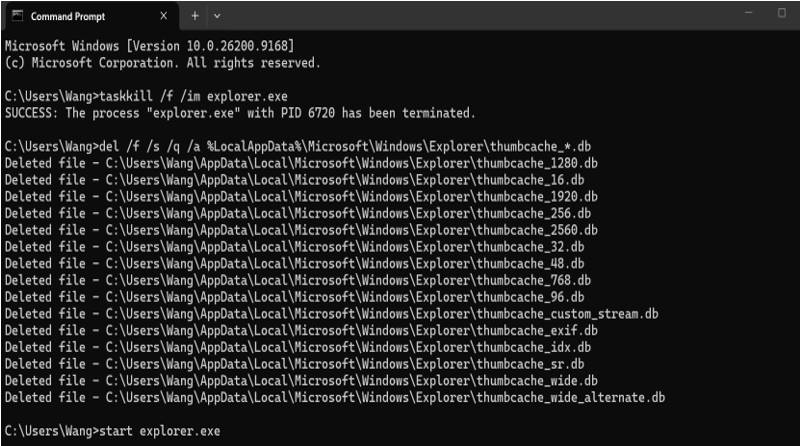
Step 2. Type taskkill /f /im explorer.exe and press Enter to stop File Explorer temporarily.
Step 3. Type del /f /s /q /a %LocalAppData%\Microsoft\Windows\Explorer\thumbcache_*.db and press Enter to complete remove thumbnail cache via terminal, then type start explorer.exe to restart your desktop.
Part 3. Automatically Clear Windows Thumbnail Cache with Advanced SystemCare
While manual methods work, thumbnail caches rebuild constantly and require frequent attention. For a completely automated, safe, and deep clean, IObit Advanced SystemCare is recommended as the best free software to quickly clear thumbnail cache in Windows. Beyond preview files, it functions as a comprehensive Windows optimizer that eliminates temporary system junk.
Advanced SystemCare Free
- Clean: 420 billion traces removed & 85 EB junk files cleaned
- Protect: 80 million unauthorized access blocked & 20 million bugs fixed
- Speed Up: 6 million hours of startup time saved & Turbo boost
- Optimize: Auto clean and auto care your PC with AI mode

How to Automatically Clear Windows Thumbnail Cache?
Follow these simple steps to automate your thumbnail cache maintenance:
Step 1. Download IObit Advanced SystemCare and install it on your computer.
Step 2. Launch the application, switch to Manual Mode, and select Junk File Clean.
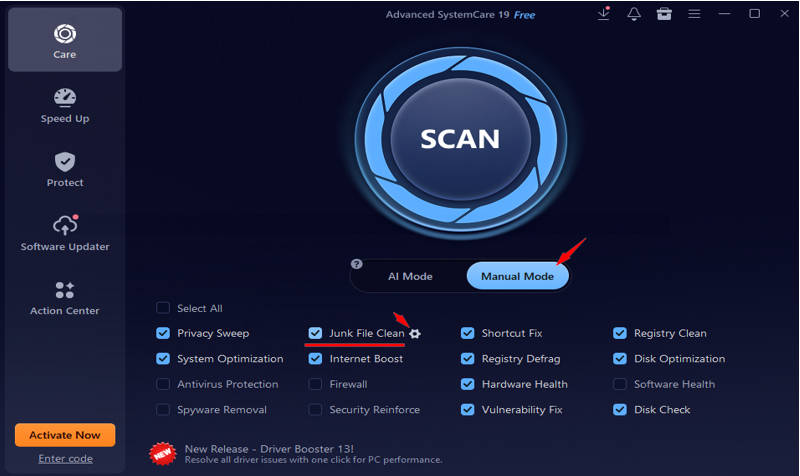
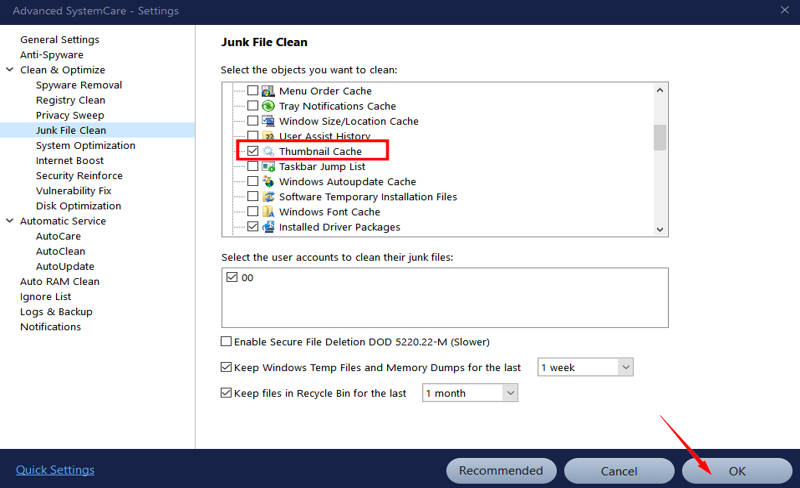
Step 3. Click the settings icon next to Junk File Clean, ensure Thumbnail Cache is selected, and click OK.
Step 4. Click Scan, then click Fix to automatically clear thumbnail cache entries along with other junk files.
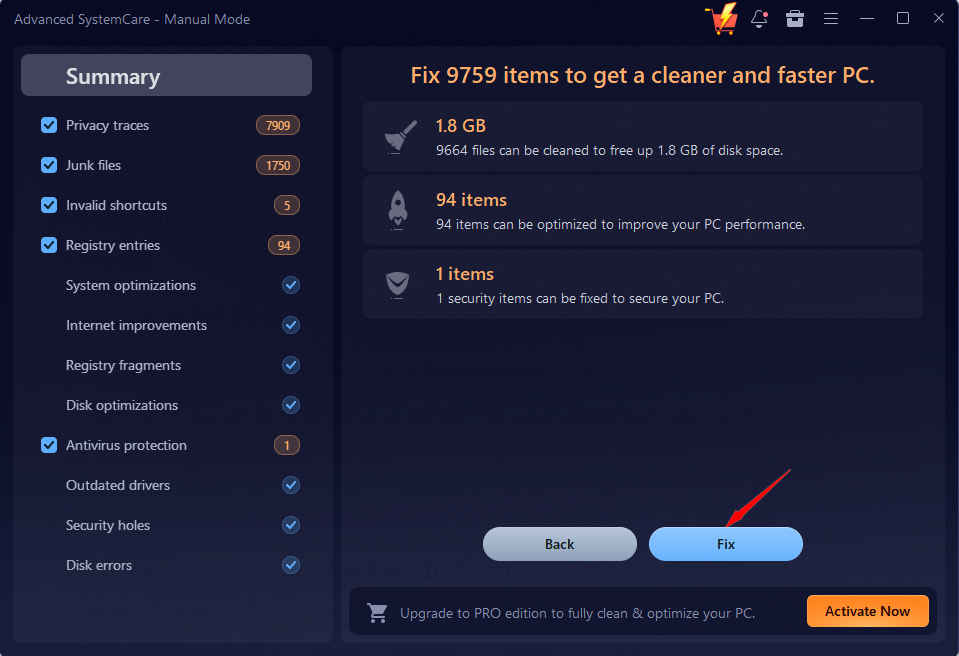
Key Features of IObit Advanced SystemCare:
Instant Thumbnail Cache Clean for Free: Effortlessly locate and remove stubborn thumbnail database files across all drives with a single click.
Complete Junk File Clean for Windows: Erase temporary files, system caches, browser histories, and perform a clear Windows update cache operation to reclaim storage.
Disk Optimization & Privacy Sweep: Features SSD tuning and thorough privacy wiping to safeguard your private browsing history.
Registry Clean & Defragment: Boosts software stability and accelerates system boot times by detecting and fixing broken registry keys.
2X Faster PC & Quicker Startup: To stop background apps from hogging resources, it integrates Turbo Boost alongside a dedicated RAM optimizer Windows 11 utility.
More Useful Optimization Tools: Packed with utility features such as File Shredder, Shortcut Fixer, and auto-care mechanisms.
Part 4. How to Reset Your Thumbnail Caches
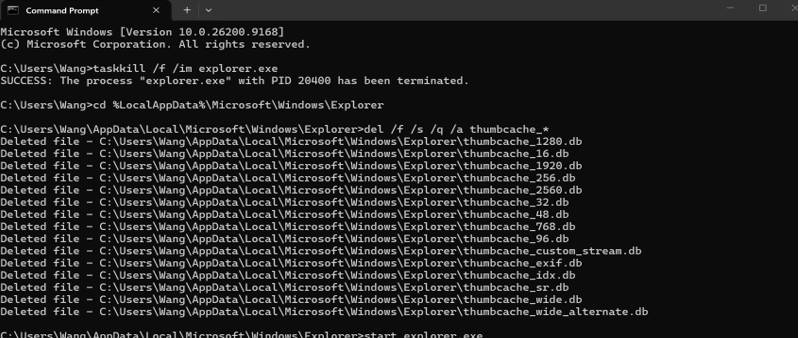
If your image previews continue to display incorrectly even after you clear thumbnail cache files, resetting the entire thumbnail database forces Windows to generate fresh index files from scratch.
Step 1. Open Command Prompt as an administrator.
Step 2. Stop the Explorer shell by entering taskkill /f /im explorer.exe.
Step 3. Run cd %LocalAppData%\Microsoft\Windows\Explorer followed by del /f /s /q /a thumbcache_* to reset the database, then launch start explorer.exe.
FAQs About How to Clear Thumbnail Cache
Is It Safe to Clear Thumbnail Caches?
Yes, it is completely safe. Thumbnail caches don't hold any important user data, just brief image previews. They just get recreated by Windows when removed as needed.
How to Tell If I Should Clear the Thumbnail Cache?
If you see broken picture icons, blank file previews, inaccurate thumbnails connected to documents or general stuttering when viewing huge media files, you should clean it.
Where Is the Windows Thumbnail Cache Location?
In Windows 10 and 11, the Windows 10 thumbnail cache location is found inside the hidden folder path: C:\Users<Username>\AppData\Local\Microsoft\Windows\Explorer.
Can I Delete Thumbnail Cache from My Phone?
Yes, Android devices also create image preview caches in hidden gallery folders. You can delete them in your device’s storage settings or in the settings of the photo app.
Will Thumbnail Caches Come Back After Cleaning?
Yes. Every time you access a folder containing photos, movies, or documents, Windows creates fresh thumbnail preview files.
Final Thought
Learning how to clear thumbnail cache manually or automatically is a simple but efficient technique to eliminate folder jitter, repair preview issues, and free up system storage. While built-in manual tools accomplish the job, using an automatic solution like IObit Advanced SystemCare guarantees that your system remains optimised without user intervention. Download Advanced SystemCare today to quickly clear thumbnail cache and keep your Windows PC working smoothly.
Advanced SystemCare Free
- Clean: 420 billion traces removed & 85 EB junk files cleaned
- Protect: 80 million unauthorized access blocked & 20 million bugs fixed
- Speed Up: 6 million hours of startup time saved & Turbo boost
- Optimize: Auto clean and auto care your PC with AI mode