

- Support Center
- Multiple Languages
- Language
- Help Us Translate
Expert in
PC Health Solution

All-in-one PC health solution: clean, optimize and secure

Comprehensive PC cleaning, optimization and protection

Keep drivers always up-to-date

More stable performance with less system crashes

Protect millions of computers against malware

Top computer security with full-round protection

Protect against viruses & boost PC performance
Complete forced uninstallation for stubborn programs.
Uninstall a batch of programs at once.
Scan and remove leftover files, folders, and registry entries.
Support the management of Universal Windows Platform apps.

Learn how to uninstall Java on Windows, Mac, and Linux with simple step-by-step instructions. Remove Java and clean up leftover files safely.



Many people report that Java is hard to uninstall on macOS, Windows, and Linux systems. And even dedicated uninstallers have problems dealing with Java uninstallation due to 5 main reasons:
Too many Java versions
Java files are stored in different folders
Java configures Windows and creates entries
Some software still demands Java
Stubborn leftovers remain in your system
How to uninstall Java? If you either don’t know your computer well or are equipped with a pro PC knowledge, the manual uninstallation can drive you crazy. But if you use a decent uninstaller, you can do a clean removement in one click.
Here in this part, you can see detailed analysis of the 5 major reasons behind Java’s hard-to-uninstall problem.
1. Multiple Java versions may be installed
You may catch up with Java updates and forget to remove the old versions. So here is the problem: you may have Java 8, Java 17, and Java 21 simultaneously on your PC. Some uninstallers don’t recognize all the Java series, including the full version and the leftovers.
2. Java files can be scattered across different locations
Your Java might be stored in paths like these:
C:\Program Files\Java\
C:\Program Files (x86)\Java\
C:\Program Files\Eclipse Adoptium\
To uninstall Java, you need to know all the paths, or it won’t be cleanly uninstalled.
3. Environment variables may still point to Java
When you install Java, Java does some configurations silently on your system. Like:
JAVA_HOME and Path.
Java modifies file directories
These entries may need manual cleanup.
4. Other applications may depend on Java
When you play games or run development tools in a Java environment, the applications remember this scenario and require this very environment to run. When you uninstall Java, you need to make sure that no applications need Java anymore.
5. Leftover files and registry entries may remain
If you manually remove Java, files including configuration files, caches, logs, manually created folders, or registry entries may still remain. The harm of leftovers is that they can cause outdated references.
To wrap up, it is not recommended to manually uninstall Java. And you might think that uninstallers solve all the problems, you might fall into another dilemma.
Here is what you may encounter when a less functional uninstaller is on duty.
| Challenge | What an uninstaller needs to handle |
| Multiple Java versions | Identify and distinguish separate installations |
| Files in different locations | Detect residual files without deleting unrelated data |
| Environment variables | Find outdated Java paths |
| Application dependencies | Avoid breaking software that still requires Java |
| Registry leftovers | Identify relevant entries and distinguish them from harmless data |
IObit Uninstaller is a universally praised uninstaller when
On a Mac, uninstalling Java depends on which version you installed and how you installed it. Oracle Java JRE and Java JDK use different files, and you may have multiple Java versions installed.
It is recommended to use a Mac uninstaller to remove Java. A lightweight, free tool for removing ordinary Mac applications and their associated files. Its drag-and-drop workflow is straightforward.
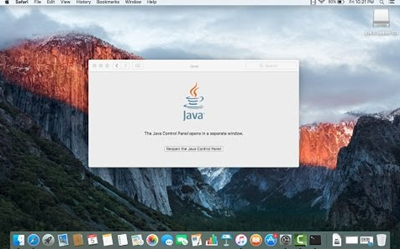
Step 1. Download AppCleaner from https://freemacsoft.net/appcleaner/
Step 2. Select Java, drag and drop to uninstall it.
Step 3. Review other Java-related files scanned by AppCleaner.
AppCleaner searches for files associated with the selected application. Depending on the app, these may include:
Application support files
Preference files
Cache files
Other related components
Step 4. Check leftovers.
Best for: Users who want simple app removal without paying for a maintenance suite.
The steps to uninstall Java on Linux depend on your Linux distribution and how Java was installed. For example, Ubuntu and Debian commonly use APT, Fedora uses DNF, and Arch Linux uses Pacman. If you installed Java manually or through SDKMAN, you will need a different method.
Before uninstalling Java, check which version is installed and whether other applications depend on it. Removing Java may prevent Java-based applications from running.
If you installed Java on Ubuntu by downloading and extracting an archive, you can uninstall it by deleting its installation folder and removing any outdated Java settings. Follow these simple steps.
Step 1. Check Your Java Installation.
#1. Open Terminal and run:
java -version
#2. Then check the Java executable path:
which java
readlink -f "$(which java)"
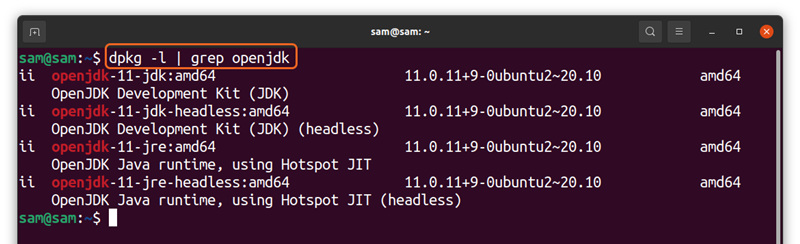
#3. Check whether Java was installed through the package manager:
dpkg -l | grep -Ei 'openjdk|oracle-java|default-jre|default-jdk'
#4. If Java does not appear in the package list, it may have been installed manually.
Step 2. Find the Java Installation Folder.
Java is often installed in /opt, /usr/local, /usr/lib/jvm, or your home directory.
#1. Run this command to search common locations:
find /opt /usr/local "$HOME" -type f -path '*/bin/java' 2>/dev/null
#2. Identify the Java version you want to remove and note its installation folder.
Step 3. Delete the Java Folder.
For example, if Java is installed in /opt/java/jdk-21, run:
#1. sudo rm -r /opt/java/jdk-21
#2. Replace the example path with your actual Java installation folder.
Note: Double-check the path before running the command, as it permanently deletes the specified files.
Step 4. Remove Outdated Java Settings.
Check whether Ubuntu still has a reference to the removed Java installation:
#1. update-alternatives --display java
If an entry points to the deleted installation, remove that specific entry:
#2. sudo update-alternatives --remove java /exact/path/to/java
Replace the example path with the exact path shown by the previous command. Skip this step if no matching entry exists.
You should also check whether JAVA_HOME or PATH points to the deleted folder:
echo "JAVAHOME"echo"PATH" | tr ':' '\n' | grep -i java
If you find an outdated entry, remove it from the relevant shell configuration file, such as ~/.bashrc or ~/.profile.
If you use a Windows PC, IObit Uninstaller can help you uninstall Java and clean up leftover files. It detects installed programs, runs their uninstallers, and scans for residual files that may remain after removal.
Step 1. Download IObit Uninstaller.
Step 2. Find Java: Open IObit Uninstaller and locate Java in the installed programs list.
Step 3. Uninstall Java: Select Java and click Uninstall to start the removal process.
Step 4. Clean up leftovers: If the option is available, run a leftover scan and review the detected files before deleting them.
Note: IObit Uninstaller is a Windows application, not a native Ubuntu uninstaller. For Java installed manually on Linux, follow the steps above to remove the installation folder and update any outdated Java references.
Uninstalling Java depends on your operating system and how it was installed. How to uninstall Java? Depend on different platforms, the methods vary. Windows users can remove Java through Settings or an uninstaller, while Mac and Linux users may need to remove Java files and update related settings manually. Before uninstalling, check for multiple Java versions and make sure no applications depend on them. If you're using Windows, IObit Uninstaller can also help remove Java and scan for leftover files.

 People Also Ask
Compare 4 disk speed test tools to measure your drive’s read and write speeds. Explore online tools and software reviews to find the best option for your needs.
Want to scan your PC for viruses online? Learn how online virus scanners work, their limitations, and how to protect your PC with IObit Malware Fighter.
Learn what system software is, how it works, its main types, functions, and real-world examples, including operating systems, drivers, BIOS, and system utilities.